Lamb...on the Loom
  • Home
  • SHOP
    • Scarves
    • Shawls & Wraps
    • Throws & Baby Blankets
    • Bags & Purses
    • For the Home
    • Odds & Ends
    • Shop All Handwovens
    • Schacht Equipment
  • Blog
  • Events
  • Gallery
    • Scarves
    • More Scarves
    • Shawls
    • Baby
    • For the Home
    • Just for Fun
    • The Wedding
    • Komen
    • Baby Wraps
  • About
    • Storyboard

Knots, Knots, Knots: The Weaver's Knot & Beyond

2/7/2020

1 Comment

 
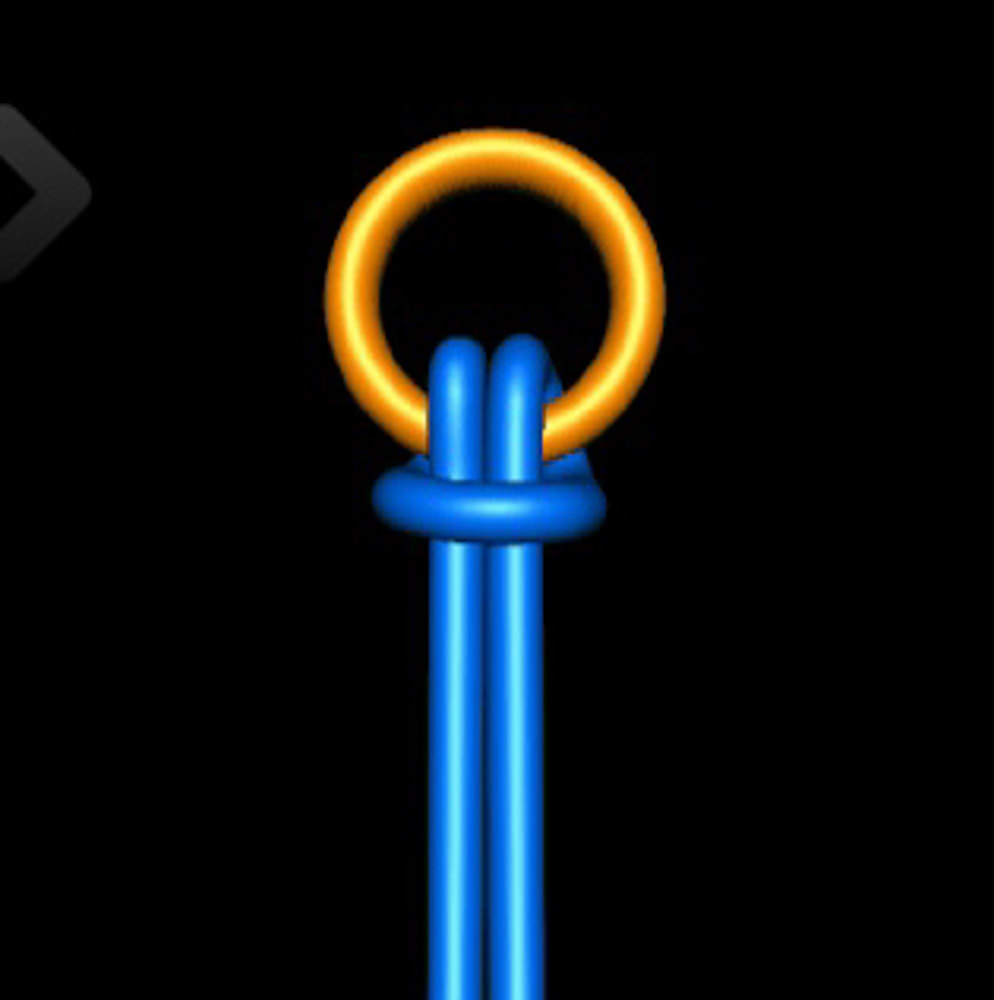
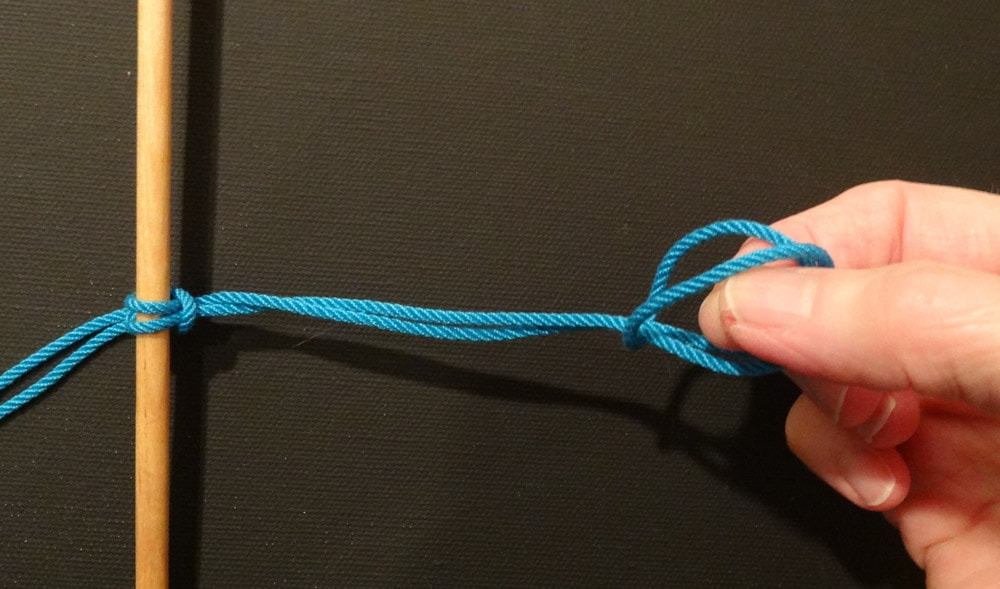
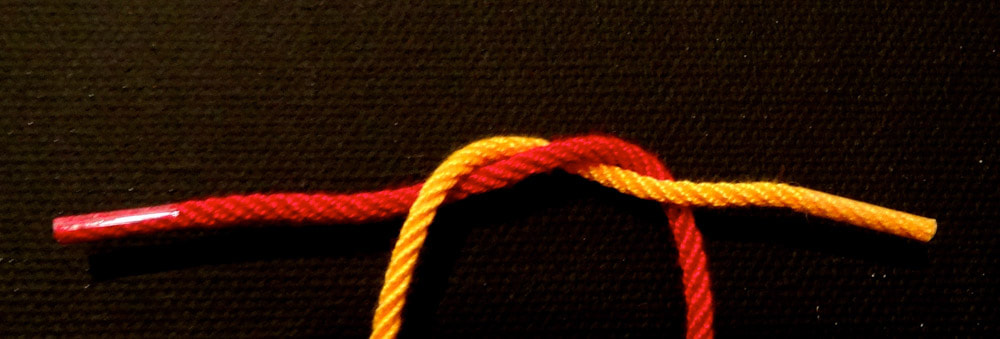
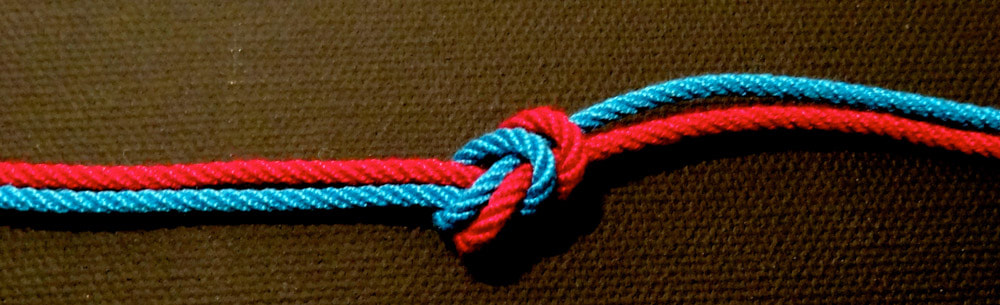
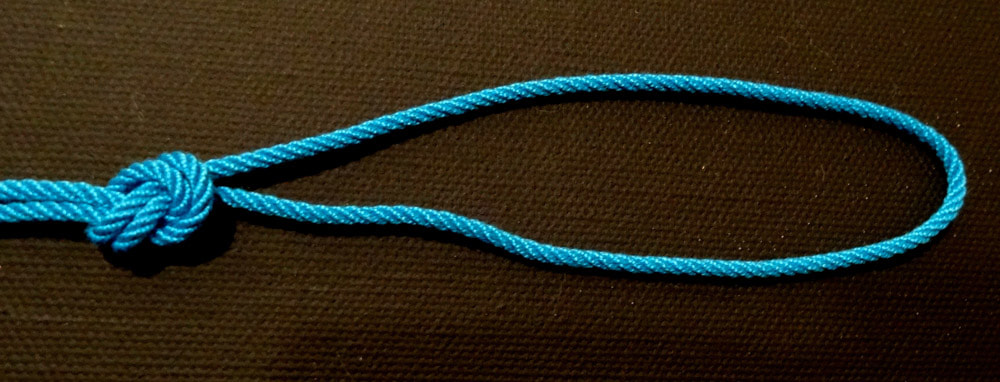
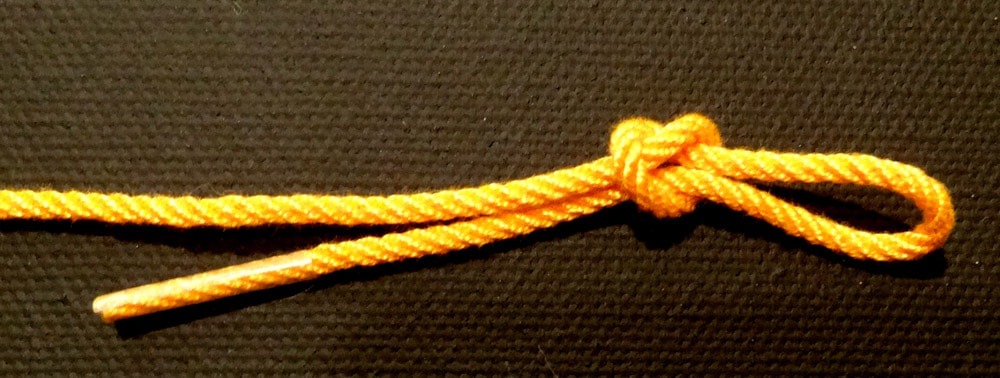
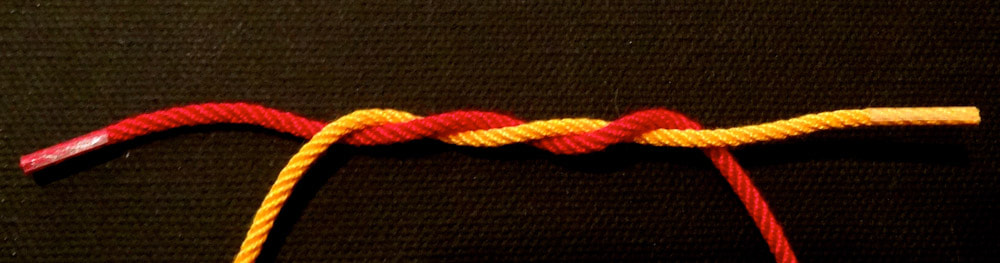
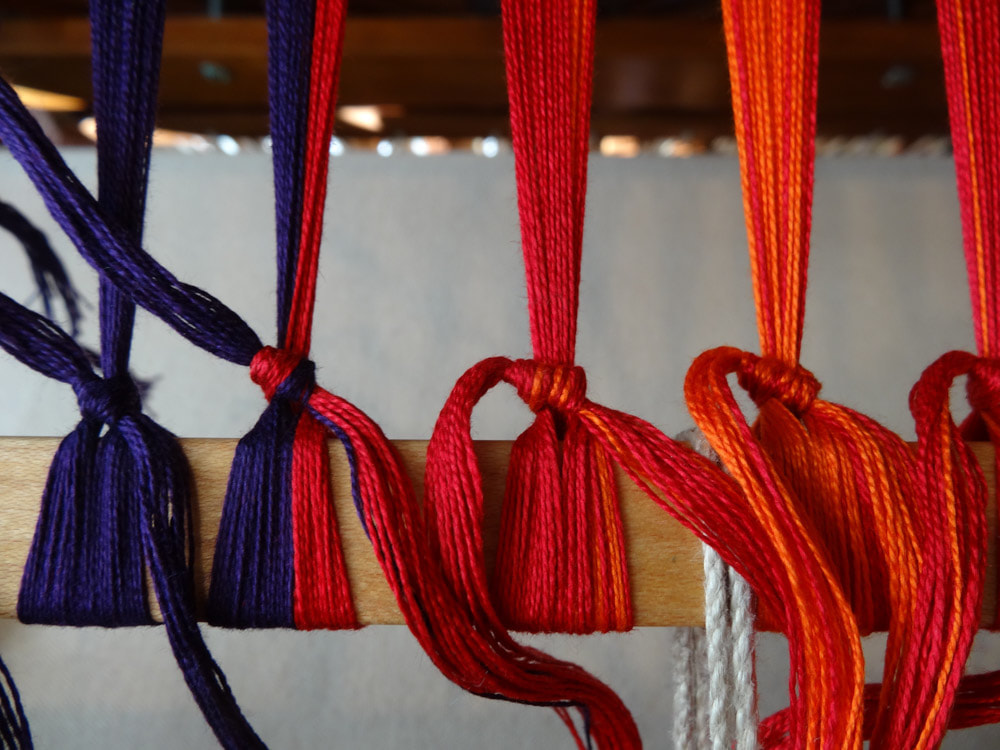
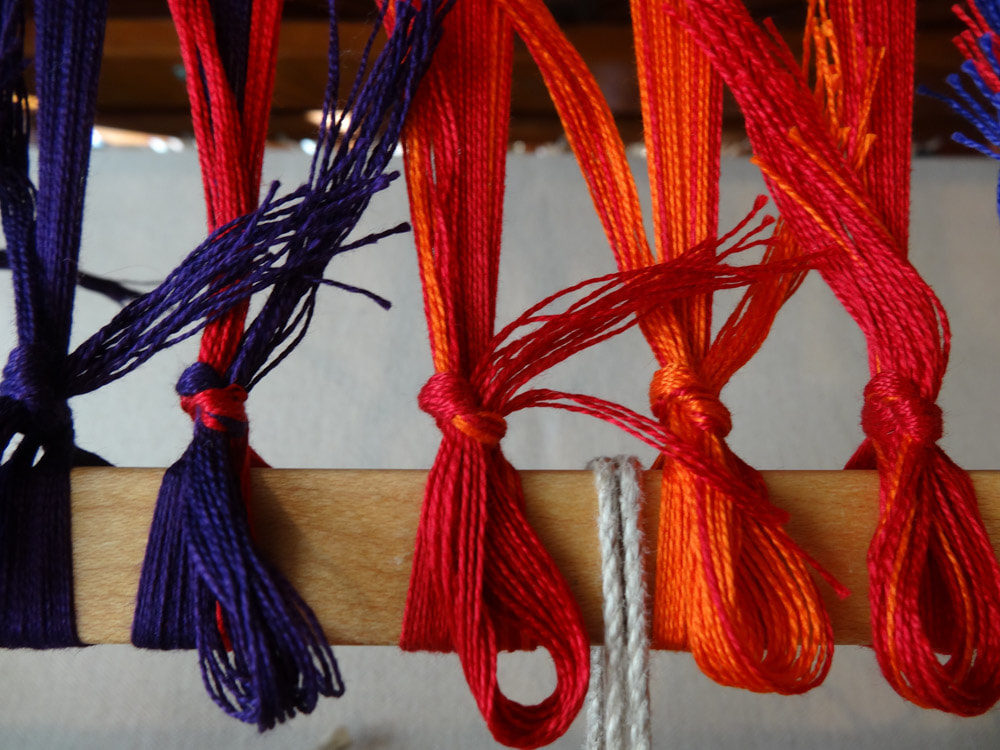
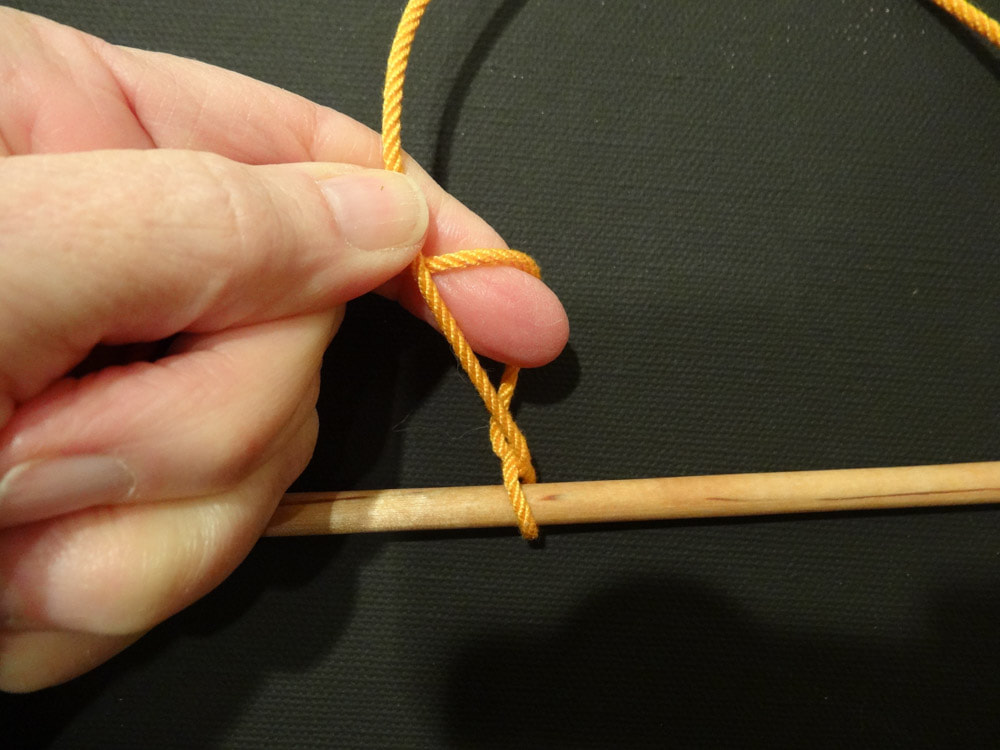
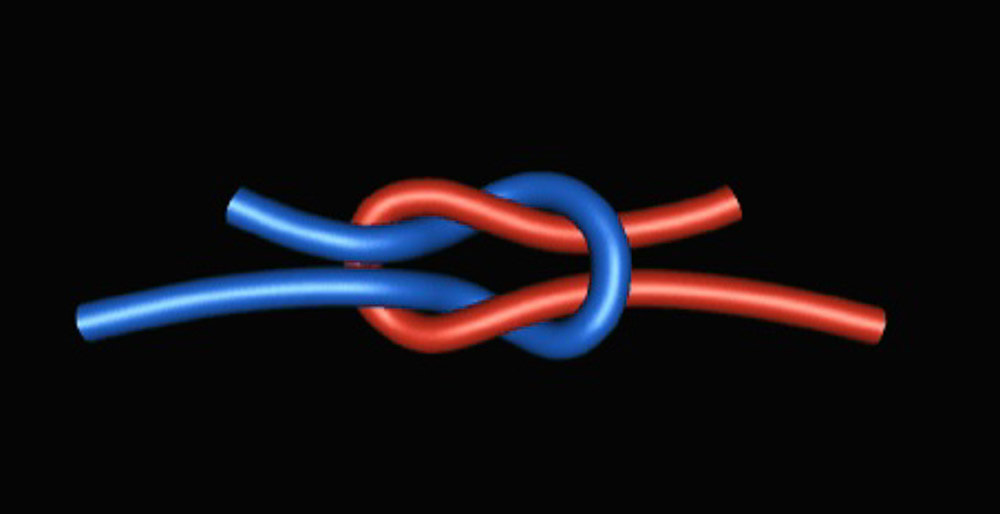
Knots are a tough thing for some weavers to incorporate into their work process.  They can be tricky to tie unless you have a bit of experience using them.  It is definitely worth learning a few good knots because they are helpful with the entire warping process.   
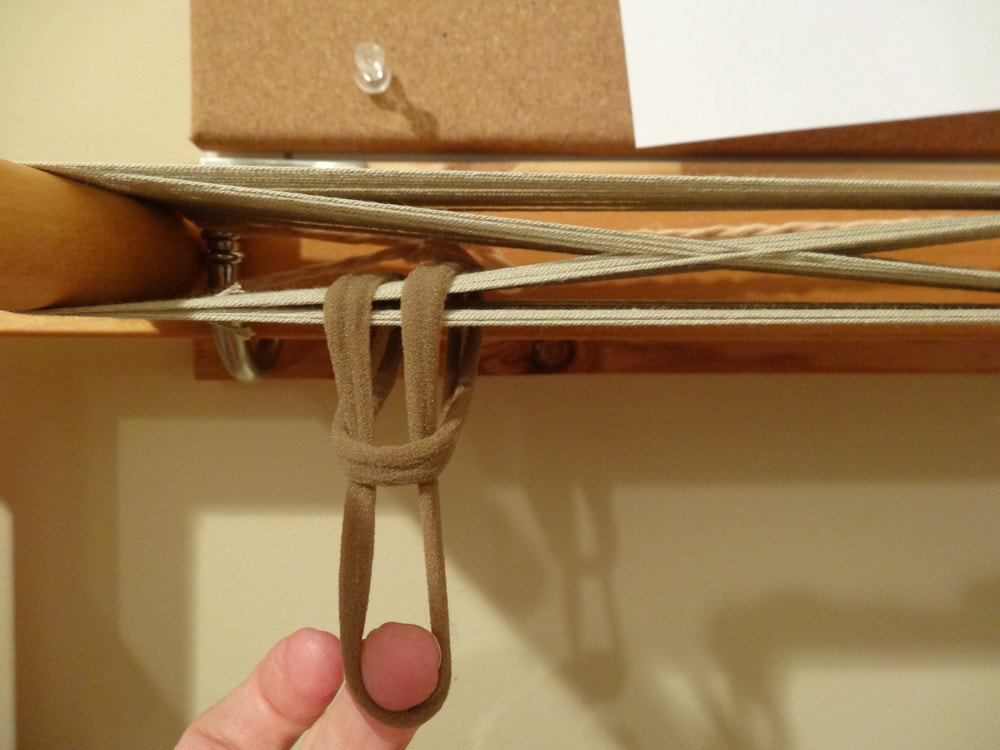
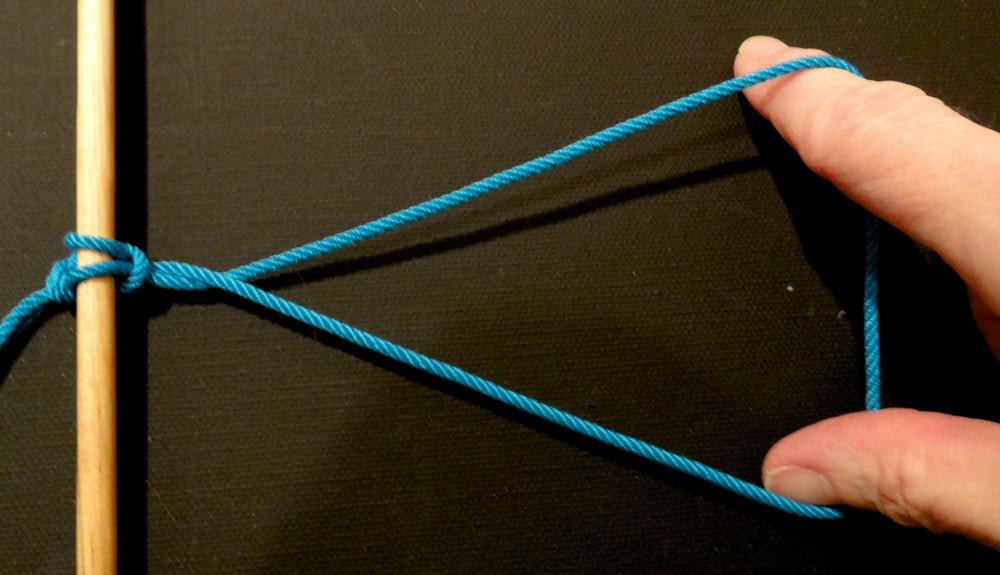
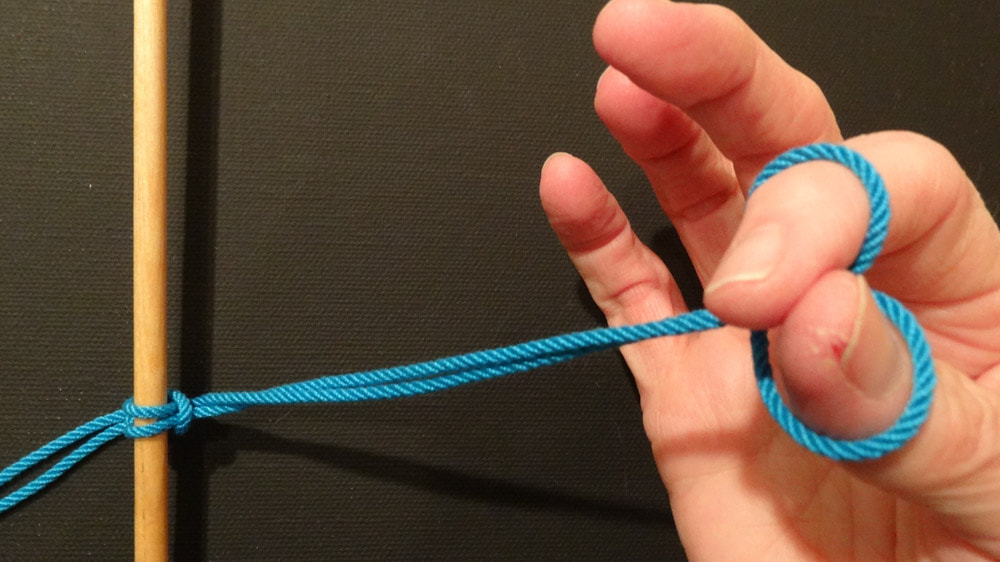
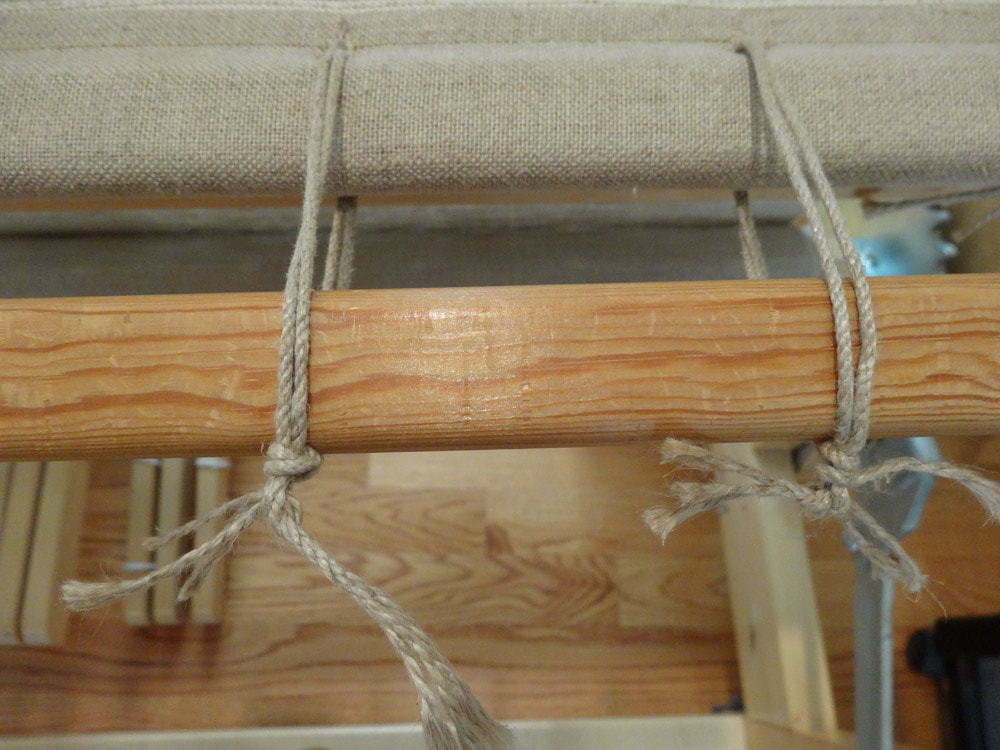
You will find the following knots described below, so grab some string and practice, practice (click on the links below to go directly to the knot description):
  • Lark's Head Knot
  • Basic Overhand Knot
  • Overhand Knot
  • Overhand Loop Knot
  • Slip Knot
  • Half Surgeons Knot
  • Half Bow
  • Weaver's Knot
  • Counting Thread or Infinity Tie
  • Half Hitch
  • Repair "Knot"/ Figure 8
  • A new way to tie your shoes

Where I use these knots:
Every weaver uses different combinations of ties and knots in their warping process.  The following is simply the way this weaver uses these knots when warping back to front:
On the warping board:
  • Overhand loop knot on both ends of the guide string
  • Slip knot or Lark’s head knot to start a color on the starting peg
  • Overhand knot to join new color to old color at the cross end of the warp (because at the cross end, I want a permanent knot that won’t slip)
  • Slip knot to join new color to old color at the starting peg of the warp (so I can release the knot before cutting the warp chain loop for threading)
  • Infinity Tie placed at the cross is twined to count off 1” bouts as I measure the warp.
  • Tying off the warp chain:
    • Infinity Tie secured with a simple bow tie
    • Cross ties – simple bows on either side of the cross peg on each of the 4 “arms” of the cross
    • Cinch ties (I use shoelaces) comprised of a tight double wrap around the warp secured with a half surgeon’s knot and a half bow. One about 12-18” from the cross and then one every yard along the warp.
    • Pantyhose loops attached with lark’s head knots one on either side at the cross post and the starting posts of the warp chain.
On the loom:
  • Apron rods attached with adjustable closed loop cords formed with larks head knots and secured with overhand knots.
  • Slip knots used to secure 1” bouts in heddles and reed while threading
  • Warp bouts tied to front apron rod with half surgeon’s knots and secured with half bow
Sources:
  • IPad App: Knots 3D ($.99) – great little app shows knot tying in slow-mo, can save favorites.
  • You-tube videos
  • “The Weaver’s Companion” by Interweave Press

 
Lark’s Head Knot
This is the knot I use most in my studio.  Can be used to:
  • Attach yarn to starting peg on warping board when measuring your warp
  • Attach pantyhose loops to warp chains
  • Attach apron rods to front and back of loom
  • Attach closed loop of cord to a stick like an apron rod
  • Attach warp bout to back beam apron rod for front to back warping
  • Temporarily attach one cord to another cord
  • Make an adjustable closed loop from one cord
Picture
Picture
Larks Head with continuous loop
Larks’s Head How-To Method 1 (use when using an unanchored cord or loop):
Fold cord in half, put loop end around whatever you are anchoring to (stick, other cord, or warp chain) and pull both ends of cord through its own loop.  If using a closed loop, put one end of the loop around whatever you are anchoring to and pull the other end of the loop through that end of the loop and snug up.

​
Larks’s Head How-To Method 2 (when using an anchored cord or loop):
Place your right thumb and forefinger into the loop pointing away from you and spread the end of the loop out to form a triangle.  Now bring your thumb and forefingers together around the sides of the triangle until your fingers touch.  Use the fingers on your left hand to slide the “sides” of the triangle off of your right fingers to form the larks’s head loop.  Insert stick, another cord, or warp bout into the loop as desired and tighten.

Picture
Picture
Picture
Picture
Picture
Picture
​EXAMPLE: Closed cord loop attached to apron rod on one end and warp bout on the other – both with lark’s head knots
Larks’s Head How-To Method 3 (use when making an adjustable closed loop):
Fold cord in half with loop on the right side.  Form the lark’s head loop as in Method 2.  Insert the loose ends of the cord into the newly formed loop and snug up.  Adjust your adjustable loop to the desired size and secure with a basic overhand knot with the loose ends (like the beginning of a bow knot when tying your shoes

​
Picture
Picture
​EXAMPLE: Adjustable closed loop between two apron rods on front of the loom – formed with lark’s head knot and secured with a simple knot (first half of a square knot)


​​Basic Overhand Knot

Joining two cords or yarn by wrapping one around the other one time – like the beginning of a bow knot when you tie your shoes.
Picture

 
Overhand Knot
Permanent knot that ties 2 lengths of yarn together
  • Use to join 2 threads as a repair when a smaller knot is not needed
  • Use to join 2 threads when changing colors on the warping board at the cross end
Picture
  • When warping front to back, use to tie a bout of threads together before cinching to the back beam with a lark’s head loop (if that is your chosen method of tying on).
  • Use to secure fringe at the fell of the cloth when finishing a piece
  • Use to secure  the end of a bout of twisted fringe
Overhand Knot How-To:
To join two pieces of yarn, lay the 2 pieces of yarn side by side, wrap the ends together around 2 or 3 fingers and pull both ends all the way through the loop on your fingers.  Pull tight.
To secure the end of a bout of twisted fringe, wrap the end of the twisted fringe around 2 or 3 fingers and pull the cut end through the loop on your fingers.  Pull tight.

 
Overhand Loop Knot
Knot that can be used at the end of a length of cord or yarn to create a permanent loop
  • Use an overhand loop knot at the ends of your guide thread on your warping board
Picture
Overhand Loop Knot How-To:
Depending on the size of the loop you need, fold end of yarn over, wrap the loop formed around 2 or 3 fingers and pull the end of the loop all the way through the loop on your fingers.  Pull tight.


Slip Knot
Temporary knot to create a loop in the end of a length of yarn, for example to attach a length of yarn to a post
  • Useful for starting a new color on a warping board
Picture
  • Slip knot 2 strands together when changing colors on the warping board
  • Use to prevent bouts of yarn from pulling out of heddles or reed after sleying.  Good practice to tie slip knots after sleying every inch or so.
  • Any time you need a temporary knot that can easily be untied​
Slip Knot How-To:
Similar to the Overhand knot except you do not pull the end all the way through:  With one piece of yarn proceed as if you were going to tie a basic overhand knot in the end of a single piece of yarn.  Wrap the short end around 2 or 3 fingers and pull the short end through the loop on your fingers, but DO NOT PULL THE END ALL THE WAY THROUGH.  Only pull the loop through, and snug up the loop (it helps to hold both the short and long ends while you snug).  Now if you pull on the short end you can quickly release the knot.

 
Half Surgeon’s Knot (a.k.a.Double Overhand Knot)
More secure, non-slip start to a bow or half bow. 
Picture
  • Great to use on the warping board for your cinch ties.
  • More secure start to tying your warp bouts to the apron rod on the loom.  For added security, finish with a half bow on top of each half surgeon’s knot after you have tied all of your bouts across the warp.
  • Good way to start tying your shoes
Picture
EXAMPLE: Tying onto the front apron rod
Half Surgeon’s Knot How-To:
You know what you normally do to start tying your shoes – before the bow.  This is the same; only you go around twice instead of once.

 
Half Bow
Used with a half surgeon’s knot (double overhand knot) to secure the knot or use instead of a normal “bunny ears” bow.  Easier release than a bow.
  • Use instead of a bow anywhere you normally use a bunny ears bow.
  • Great to secure the surgeon's knot when tying onto the front apron rod.
Picture
Securing the surgeon's knot on the front apron rod
Half Bow Knot How-To:
Start like you would to tie you shoes (a basic overhand knot) or with a half surgeon’s knot (a double overhand knot).  Hold the cord that is in your left hand taut and push it toward the right with your left index finger.  With the cord in your right hand, make one “bunny ear” bow around the cord in your left hand, pull it through, and snug it up.
Picture
Picture
Picture

 
Weaver’s Knot
A tie to join two pieces of thread or yarn.  Very secure and makes a small knot.
  • Traditional weaver’s choice of knot used to repair a broken thread on the loom.
  • Used for tying on a new warp end to an old warp end
  • Forgive me if my instructions are not clear (I rarely use this knot).  Refer to online YouTube videos or the Knots-3D app for clarity
Picture
Weaver’s Knot How To Method 1:
Make a loop in the end of cord 1 and hold in your left hand.  Poke the end of cord 2 up through the loop (back to front) and pass it around the loop (over the top, behind and out from the bottom).  Now poke the end of cord 2 behind itself but in front of the loop formed by cord 1.  Tighten.
Weaver’s Knot How To Method 2:
Make a slip knot in the end of cord 1 (red) and hold in your left hand.  Poke the end of cord 2 (blue) up through the slip knot.  Pull both ends of the slip knot tight.  You should feel a “snap” as the knot tightens around cord 2.

 
Square Knot
A tie to join two pieces of thread or yarn. A more secure version of a Granny knot. It is this weaver’s opinion that this knot is easier to tie than the weaver’s knot
  • Can be used to repair a broken thread on the loom. 
Picture
  • Can be used for tying a new warp end to an old warp end although some believe the weaver’s knot to be more secure
Square Knot How-To:
Tie 2 cords together as follows.  Take the left cord in front of and around the right one.  It is now on the right.  Take the “new” right cord (in other word, continue tying with the same cord) in front of and around the cord on the left.  Snug up the knot.  Your Mantra:” Left over right, right over left.”

 
Counting Thread or Infinity Tie
A single cord that twines in and out of a warp chain to divide into sections.  You can use any scrap yarn for this.  Shoelaces work well and last forever.  Secure with a simple bow or half bow.
  • Use to section off bouts of warp into 1” sections for warping or ½” sections for laying into the raddle.
Picture

 
Half Hitch
A twist placed in the yarn to create a basic overhand knot when the free end is not available.
  • Use it to wrap around the bobbin holding a weight for a repair warp thread or floating selvedge – allows easy advancing of thread when needed, while preventing slipping while the weight dangles off the back of the loom. 
Picture
Picture
Picture
Picture

 
​Repair “Knot”
Nothing more than a figure eight around a T-pin of the loose end of the repair thread.  Pin the t-pin into the woven cloth, wind the repair end around the T-pin “figure-8-wise” 2 or 3 times, and insert the end of the pin into the cloth to secure.
Picture

 
A new way to tie your shoes
Bet you thought you knew how to do this! This is a free tip passed on to you by a mom with a medical background who got tired of re-tying her kids’ shoes:

Tie the first pass with a Half Surgeon’s Knot, then tie with a double bow (bow on top of another bow).  Your shoes will RARELY come untied!  Why should this be for kids only??  I hate bending over!
Picture
1 Comment
Sarah warren
4/7/2020 08:00:36 pm

Thank you for another great lesson
Hope you are doing well during these crazy times
Best
Sarah

Reply

Your comment will be posted after it is approved.


Leave a Reply.

    Pattie Lamb

    I have been happily weaving since my son was born in 1988.

    All pictures on my blog are "zoomable" - just click on them to enlarge.

    Archives

    March 2023
    June 2022
    November 2020
    October 2020
    February 2020
    October 2019
    June 2019
    May 2019
    June 2018
    July 2017
    June 2017
    May 2017
    April 2017
    February 2017
    January 2017
    August 2016
    July 2016
    May 2016
    February 2016
    February 2015
    January 2015
    October 2014
    September 2014

    Categories

    All
    Artificial Intelligence
    Baby Wraps
    Blankets
    Block Twill
    Block Weave
    Block Weaves
    Cat's PJs
    Challenges
    Charity
    ChatGBT
    Classes
    Commissions
    Deflected Doubleweave
    Design
    Doubleweave
    Dyeing
    Facebook Challenge
    Felting
    Hemstitching
    John C Campbell
    Knitting
    Lace Weaves
    Leftovers
    Life History-Day 1
    Life History-Day 2
    Life History-Day 3
    Life History-Day 4
    Life History-Day 5
    Life History-Day 6
    Life History-Day 7
    Life History-Day 8
    Life History-Day 9
    Life History-Final
    Life History Of A Scarf
    More Than Pink
    Paper Quills
    Plain Weave
    Ply Split
    Process
    Rugs
    Runners
    Scarves
    Selvedges
    Shawls
    Storyboard
    Study Group
    Tencel
    Tie-ups
    Tip Of The Month
    Tips
    Tools
    Towels
    Travel
    Treadling For Dummies
    Turned Twill
    Twill
    Videos
    Walking Pink
    Warping
    Weaving
    Weaving Pink
    Weaving Tips
    Wedding
    Yarn Wraps

    RSS Feed

         HOME        //      SHOP      //       BLOG       //        EVENTS       //       GALLERY     //      ABOUT       //      CONTACT

  • Home
  • SHOP
    • Scarves
    • Shawls & Wraps
    • Throws & Baby Blankets
    • Bags & Purses
    • For the Home
    • Odds & Ends
    • Shop All Handwovens
    • Schacht Equipment
  • Blog
  • Events
  • Gallery
    • Scarves
    • More Scarves
    • Shawls
    • Baby
    • For the Home
    • Just for Fun
    • The Wedding
    • Komen
    • Baby Wraps
  • About
    • Storyboard