Lamb...on the Loom
  • Home
  • SHOP
    • Scarves
    • Shawls & Wraps
    • Wool Scarves & Shawls
    • Blazing Shuttles
    • Throws & Baby Blankets
    • For the Home
    • Odds & Ends
    • Shop All Handwovens
    • Schacht Equipment
    • Gift Cards
  • Blog
  • Events
  • Gallery
    • Scarves & Shawls
    • Baby
    • For the Home
    • The Wedding
    • Komen
  • About
    • Storyboard

Treadling for Dummies Part 2 / No Peeking Allowed

10/27/2019

0 Comments

 
No Peeking Allowed - Treadling Tips

Forgive me if I am repeating things I talked about in other posts, but some things bear repeating.
​
Everyone
handles their treadling differently, and that is just the way of weaving: everyone has their own way.
Personally I hate peeking at my feet while I weave. I feel it disrupts my rhythm and flow.
I do several thing to make sure I do not have to peek.

Walking the treadles:
I almost always walk my treadles.  Inside to outside. I find it easy to walk left right left right as I treadle.  My shuttle is (almost) always moving toward the foot that is depressed.  This is ergonomically preferably to using one foot over and over.  And it is surprisingly easy to manage walking the treadles with most treadling patterns.  My treadles on a 10 treadle loom would be set up for walking as follows:
Picture
Notes:
  • The suggestions outlined below will work as well even if you are opposed to walking your treadles.
  • Not all patterns lend themselves to walking but I have found that those drafts are few and far between.
  • I use computer software that would allow me to rearrange the treadles in the draft.  I COULD rearrange the treadles in the draft to match the way I have tied up the treadles.  But in actuality I DO NOT because I find it much more confusing to follow a pattern with that type of treadling diagram.
Treadling on the LEFT shows a point twill, treadles numbered left to right: 12345678.
I find this easier to follow even though my treadles are actually arranged like the treadling shown on the right.

​Personal preference.
Picture
Picture
Treadling on the RIGHT shows the same point twill with shafts shuffled  to the position used for walking.  Treadles in the tie-up are numbered left to right: 75312468 as if for walking. 
I would have a much harder time following this layout so I do not use the shaft shuffler for this purpose.

​Root your feet:
I NEVER move my foot off of a treadle until I need to use that foot again.  That helps keep me and my feet oriented` as to what treadle comes next.
  • Left foot presses treadle 1 and stays there
  • Right foot presses treadle 2 and stays there
  • Left foot then presses treadle 3 (moving my foot from treadle 1) and stays there
  • Right foot presses treadle 4 (moving my foot from treadle 2) and stays there...
You get the idea.  Not all treadles are a straight draw, but very few treadlings skip around in random order.  Generally you will only have to move your foot to the neighboring treadle or perhaps skip a treadle and move over 2 treadles.  This is easy to do without peeking.
Tip!
Lunatic Fringe Jazz Bands (designed for Schacht Baby Wolf and Wolf Pup looms), work really well to add a little tension to the treadles.  This helps prevent you from accidentally lifting or slightly lifting a shaft you are not using - even if you leave your foot on that treadle.

​Hair bands & treadle divider:
I have hair bands on each of my treadles.  In fact I put 3 hair bands on each treadle because I simply can feel them better with my feet. The purpose of the hair bands is to help my feet identify which treadle is which. Depending on my pattern, I slide the hair bands down where I can feel them or up out of the way.
Typically, I am walking my treadles from the center to the outside, so I might move hair bands down on the middle 2  treadles (treadles 1 & 2), I leave the next 2 treadles (3 & 4) in sequence “naked”, move bands down on the next 2 treadles and so forth.

No need to remove the hair bands between projects.  Just move them up or down on the treadle as needed.

If desired you can put a divider between the center treadles to remind your feet not to cross the midline.
Tip!
Heavy rubber bands can be used instead of hair bands, but BEWARE: they dry rot fairly quickly and will have to be replaced.
Picture
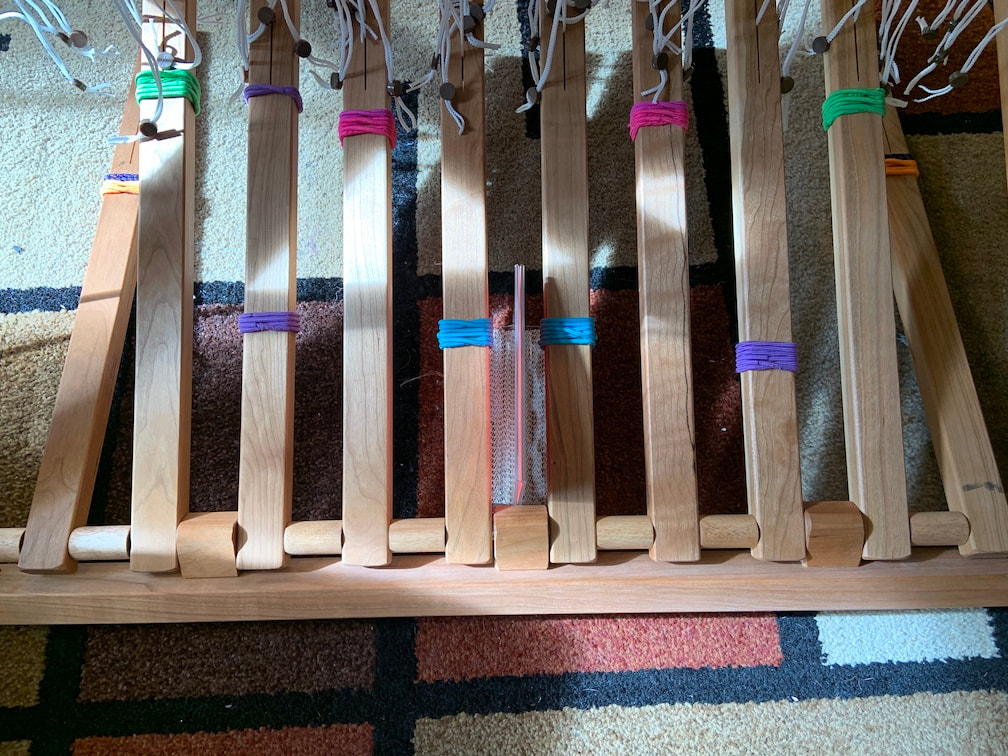
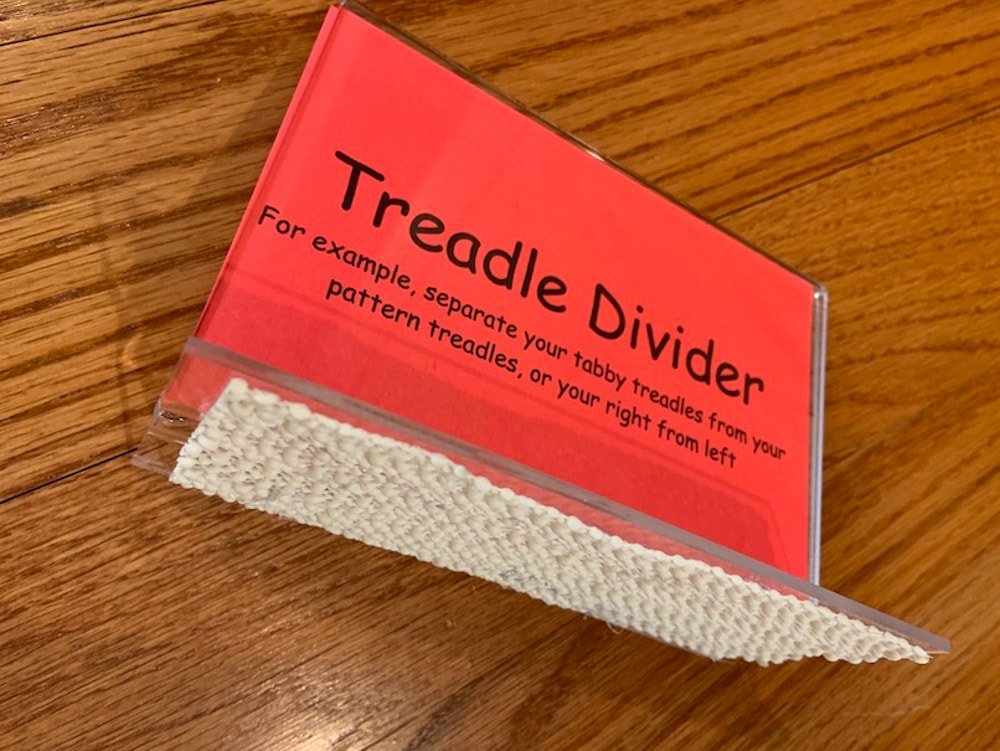
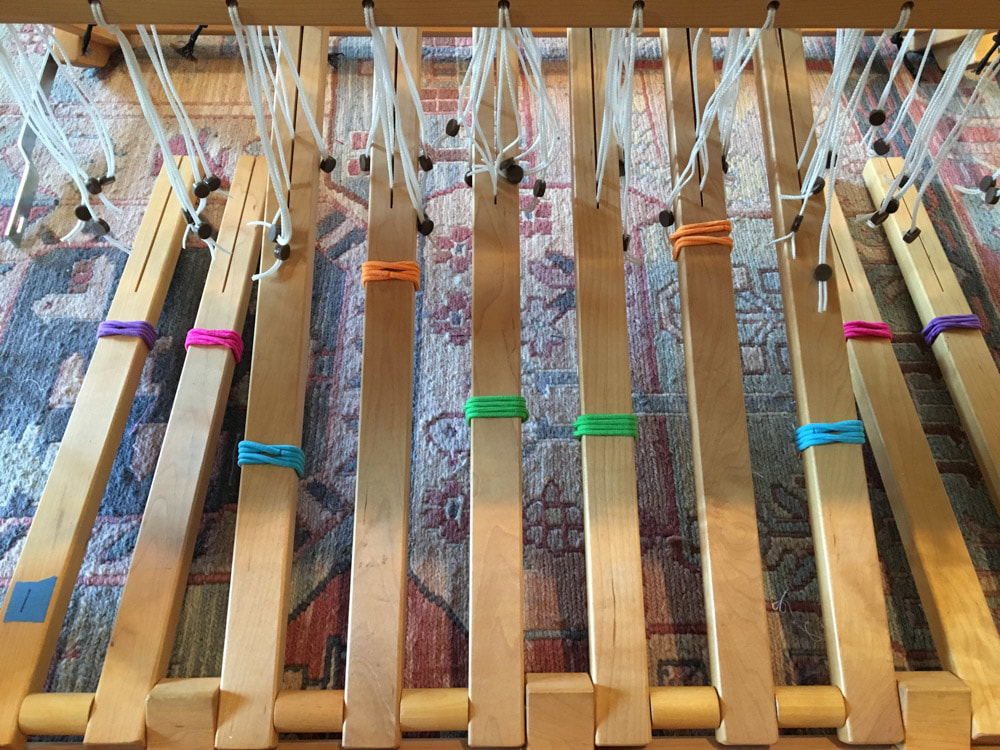
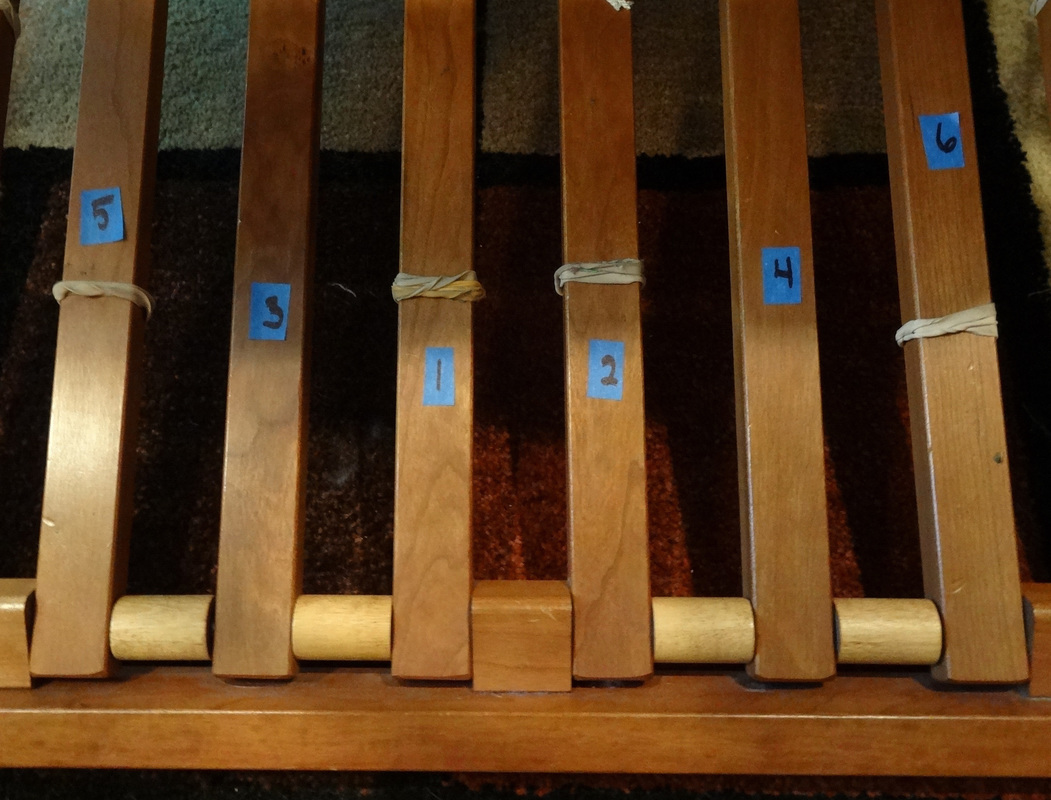
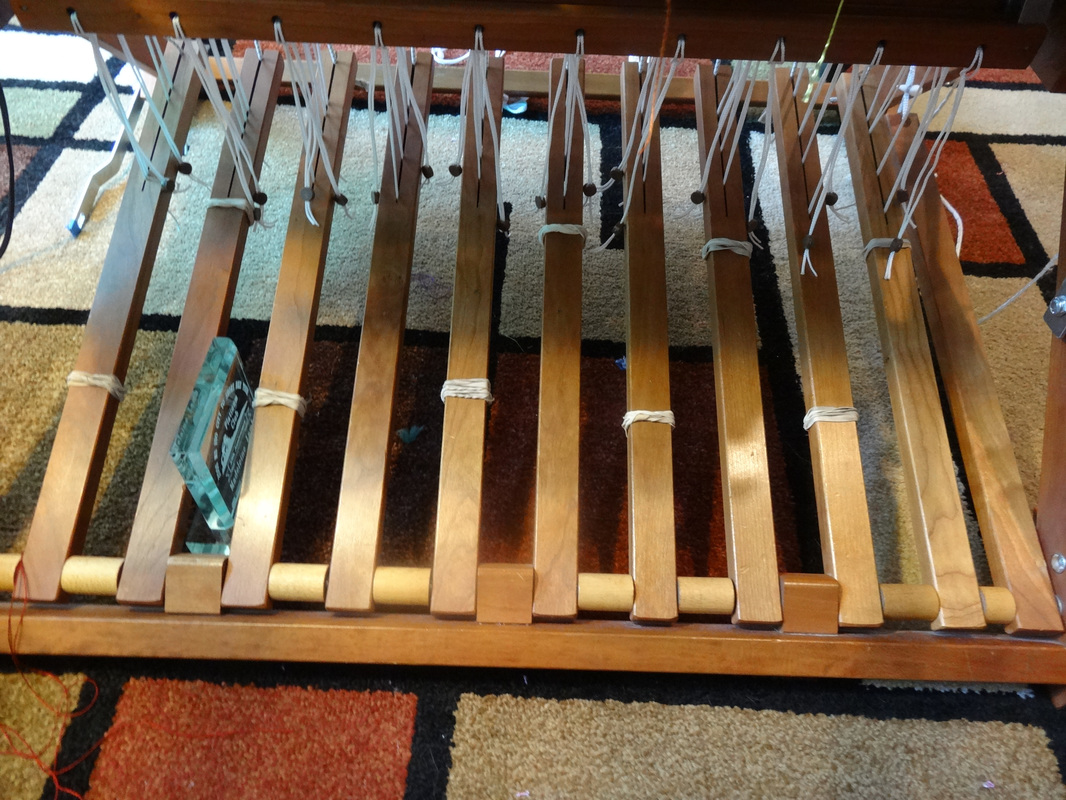
The hair bands and divider for a typical draft would look like this: hair bands on the odd treadles, divider in the center.
Picture
Treadles tied up for walking a twill, treadle divider in the center.
Picture
Hair bands
Picture
Divider made from a picture frame


​Weaving tabby and pattern:
When I am weaving a pattern that requires tabby picks to alternate with pattern picks, I will put my 2 tabby treadles (a & b) on the left and the pattern treadles (1 - 8) on the right.  I will move a hair band down so my foot will feel it on ONE of the tabby treadles and on every other pattern treadle.

I definitely use a treadle divider in this situation because my left foot has a tendency to need a reminder to only travel between the far 2 left treadles
Picture
The hair bands and treadle divider for a draft that requires tabby would look like this
Tip!
If you are weaving a draft that requires tabby and pattern to alternate one for one, there is an added bonus.  For tabby a (left treadle), throw the tabby shuttle to the left, for tabby b (right treadle), throw the tabby shuttle to the right.  This will help you keep track of which tabby is next if your feet get confused.

​Note:
  Many people place their tabby treadles in the middle or on the outside, but this requires moving your foot off of a tabby treadle to find the next pattern treadle.  I personally cannot keep track of which pattern treadle comes next if I do that.  If I use my left foot for the tabby treadles and my right for the pattern treadles, I can follow my rule of never moving my foot until it is needed again.  I will treadle tabby A and leave my left foot there, treadle Pattern 1 and leave my right foot there.  This way when I go back to weave the next tabby, I know I have to use the other tabby treadle (in this case Tabby B).  When I go back to treadle pattern, the fact that my foot is already on Pattern 1 reminds me of where I was and makes it easier to find the next required pattern treadle.

Exception:  On my Spring loom there are 14 treadles and they are quite far apart.  Placing the tabby on one side is pretty uncomfortable, so on that loom, I will put them in the center.  When I am weaving left sided pattern treadles, I weave tabby with my right foot and pattern with my left. When I am weaving right sided pattern treadles, I weave tabby with my left and pattern with my right.

Cheat Sheets:
Any complex treadling warrants using a cheat sheet.
I attach the cheat sheet to my castle.  If your loom does not have a castle, tape it to one side of the beater.
My cheat sheet consist of a strip of card stock and a large paper clip.
I write the treadling sequence on the strip and use the paper clip to mark my place as needed.
I store the cheat sheet with the notes I keep on each project.
Tip!
When you are first learning to walk the treadles, you can create a second cheat sheet to remind you  which treadles are where and which treadles have hair bands on them.  Once you get used to this system, you will not need this second cheat sheet.

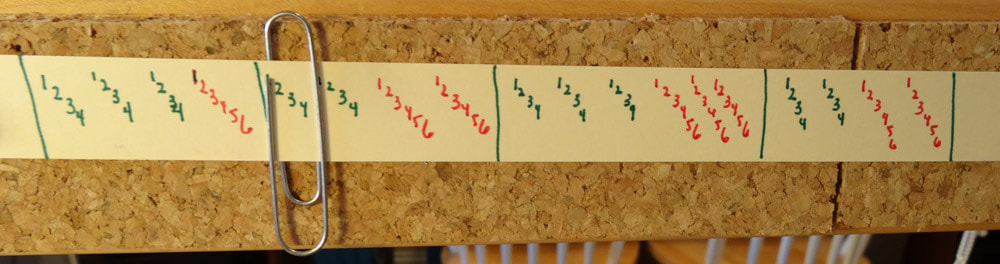
​Examples of my cheat sheets:
Picture
Cheat sheet for an irregular point twill. I created duplicate treadles 5 & 6 to deal with the turn in the draft. They are duplicates of 3 & 2. This allows me to walk treadles 123456 ,and that is easier for me to keep track of than treadling 123432
Picture
Treadling for a simple advancing twill
Picture
Treadling for a plaited twill. The top line of numbers refers to the picks woven with my left foot, the bottom line to picks woven with my right foot. The circles indicate which treadles have hair bands down where my feet can feel them.
Picture
Treadling for a block lace weave. In this case I treated treadles 1 & 2 as tabby and tied them up for my left foot. I treadled the pattern blocks with my right foot. So the treadles were arranged like this: 2 1 3 4. Block A is treadled 13132. Block B is treadled 14142. "2A" means repeat block A twice, "8B" means repeat block B 8 times. "8pw" refers to 8 plain weave picks. "END" refers to the final sequence at the end of the scarf.

No peeking:
With my hair bands are in place and the treadling recorded on my cheat sheet, I can walk my feet happily along my treadles, and I never have to peek at those treadles again.

Try it!  You will like it!
Added bonus: 
​I do not ever have to label my treadles with that dreaded tape!

0 Comments

​Hemstitching Can Be (More) Fun

5/3/2019

4 Comments

 
Well, that is really questionable in my opinion.  I have never enjoyed hemstitching.  However, I have 2 really good tips to make it a little easier.


​Tip 1:
The first tip is outright stolen from Jane Stafford’s Online Guild episodes.  If you are not a member of her guild, I highly recommend it: https://janestaffordtextiles.com/online-guild/
 
I used to weave a header, begin my woven fabric by weaving 8-10 picks, and then hemstitch the leading edge of the piece.  There is a problem with that technique.  Isolating the 2, 3 or 4 picks and the warp ends you want to hemstitch around can be a real challenge, because you have weaving on both sides of the picks to be hemstitched.
 
I even tried weaving in a slippery yarn as a separator pick before I would start weaving the piece.  This slippery yarn, in theory, would be removed after weaving a few picks of the piece, thereby making the hemstitching a little easier.  Well,  the “slippery” yarn is not always so easy to remove.
 
Along comes Jane Stafford who showed me that you really only need to carefully lay in the picks you want to hemstitch around and begin hemstitching.  No header, no weaving extra picks before starting the hemstitching. 

This is SO much easier that I cannot believe it never occurred to me.   Simply hemstitch around those picks and then proceed to weave you piece as usual.
Picture
  • Lay in the picks you want to hemstitch around.
  • Be careful to wrap the weft cleanly at the selvedges.
  • Begin hemstitching as usual
Picture
After hemstitching simply continue weaving your piece, being careful to beat the first couple of picks in well.

Tip 2:
The second tip improves your visibility for hemstitching.  Depending on the color of my warp, I find that seeing t​he warp ends and counting them correctly can be challenging.  I place a contrasting sheet of paper UNDER the warp, and voila: visibility improves dramatically.
Picture
BEFORE...
Picture
And AFTER adding white paper under the warp.

4 Comments

Some of my Favorite Tools (and where you can find them)

6/4/2018

6 Comments

 
Over the years I have gathered many tools that have become indispensable to me in my studio.  Here are a few that are easy to find online.

Picture
Heddle Bar Clips
​Officemate OIC Slide On Plastic Clips, Assorted Translucent Colors, Tub of 60
Amazon $4.29 as of 6/2018

​I use these on my heddle bars to keep the extra, unused heddles back away from the weaving - a vast improvement over tying them back with string and MUCH easier to use than those little binder clips


Shoelaces!
​These are "DIY White Shoelaces"
Oriental Trading Company $5.99 for 12 pairs as of 6/2018

I use shoelaces for tying off my warp chains, among other things in the studio.   These are great because they last forever.  I have shoelaces in my studio that are 25 years old!
These are 48” long.  I cut them in half, so 12 pairs gives me 48 shoelaces!
Picture
Picture
Picture

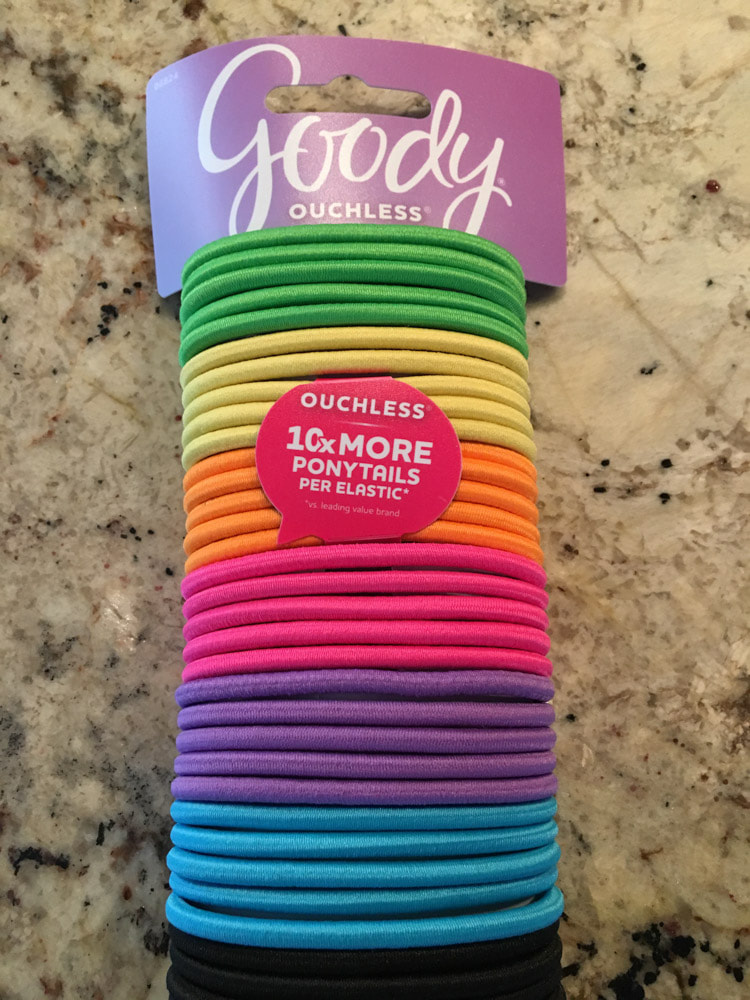
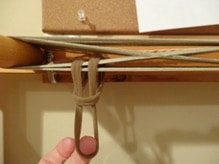
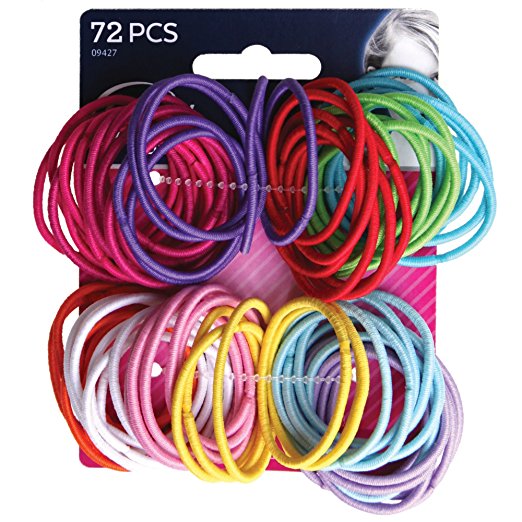
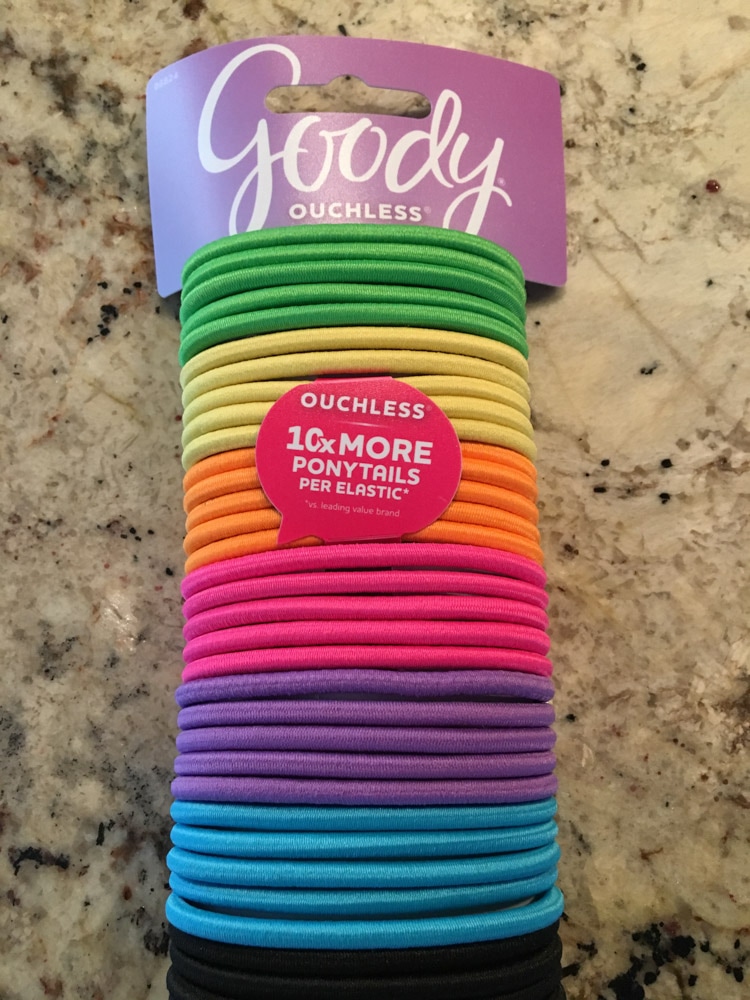
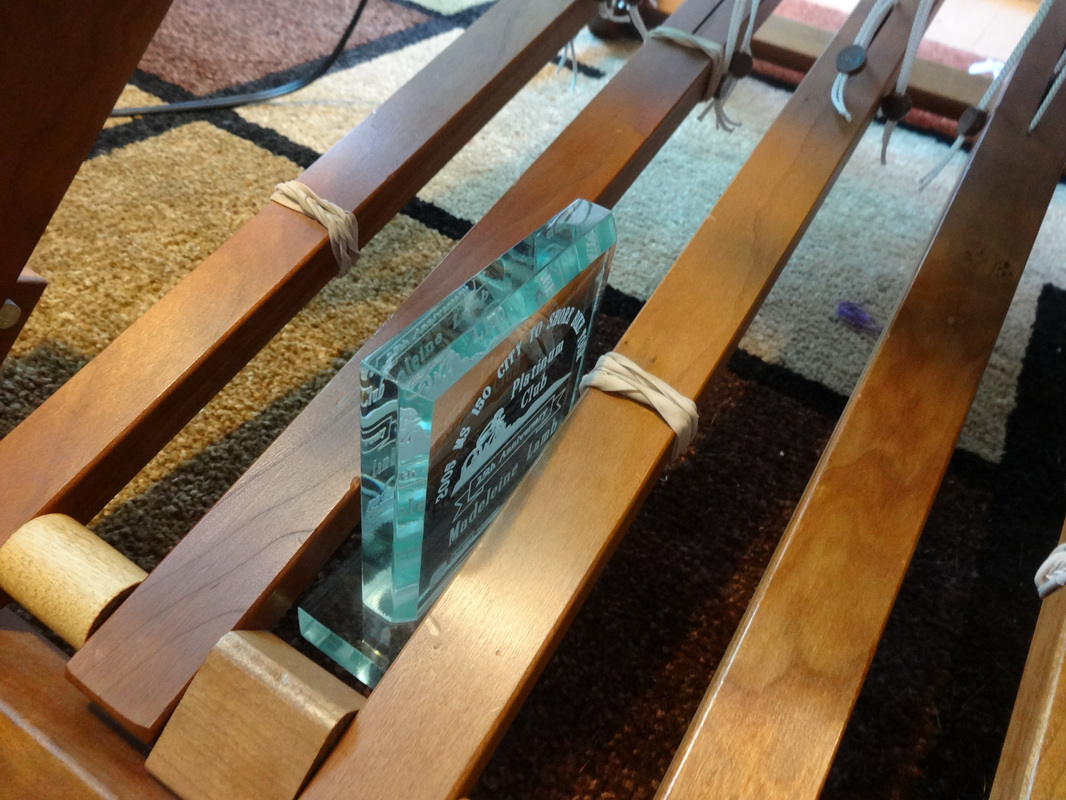
Treadle Bands
Goody Girls Ouchless Elastics, 2 mm, No metal
Target or Amazon, various counts and prices

I use these on my treadles so I can treadle without peaking:  “Braille” for my feet.  I put them on all of my treadles and slide certain ones down so my feet can feel them and others up out of the way so I cannot.  I like to put 3 on each treadle so they are "bulkier" and easier to feel with my feet.
Picture
Picture

Pick Counter
UltraOptix Linen Tester-Loupe Magnifier
Amazon, $9.52 as of 6/2018

This is an inexpensive magnifier that helps you count picks per inch (or examine your cloth for errors).  The window is exactly 1” square.  You place the window on the cloth and look through the magnifier while you count.
Picture

Picture
Curved Scissors
Beadalon Squeeze Scissors, Curved
Amazon, $7.79 as of 6/2018
​
I use these for trimming threads close to the surface of my finished cloth. The curved blades let you get close to the cloth without cutting the cloth.

Fringe Twister
This one is the Lacis Fringe Twister
A newer version is on Amazon, $21.96 as of 6/2018
​
I use this for twisting all of my fringe (I only use 2 of the prongs).  It is battery powered and has been a life saver.  There are other versions of this on the market.  Shop around.
Picture

6 Comments

Out Out Damned Cat: Repairing Yet Another Rug

7/19/2017

4 Comments

 
Picture
Lizzie, the culprit

​​She looks really innocent, doesn't she?
She is a very sweet cat.  
Her name is Lizzie.  
She is two now,
​Lizzie narrowly escaped death by weaver at age one. 
​
​I have (had) a handwoven wool rug at my front doorway.  I wove the rug over a decade ago when we lived in Buffalo.  So about a year ago I bent over to pick up what I thought was a dead moth on the rug. Much to my horror, I discovered it was a severed knot from one of the fringe bouts.  On further inspection I realized that the knots had been chewed off of no fewer than THIRTY FIVE fringe bouts!
Picture
1 of 35 severed fringe bouts
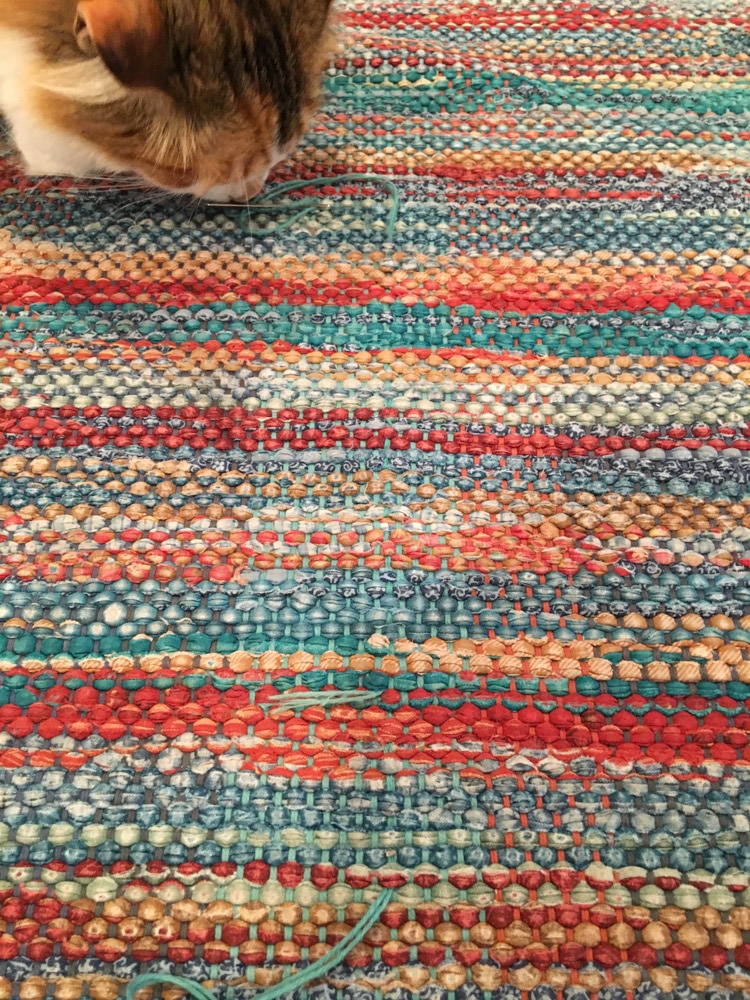
​There were only three possibilities (all cats):
  1. Pressy who was 21 years old and could hardly walk
  2. Dexter who was 16 years old and literally has no teeth
  3. Lizzie the baby in the family, full of vim and vigor and still teething and about to be murdered by her loving mother

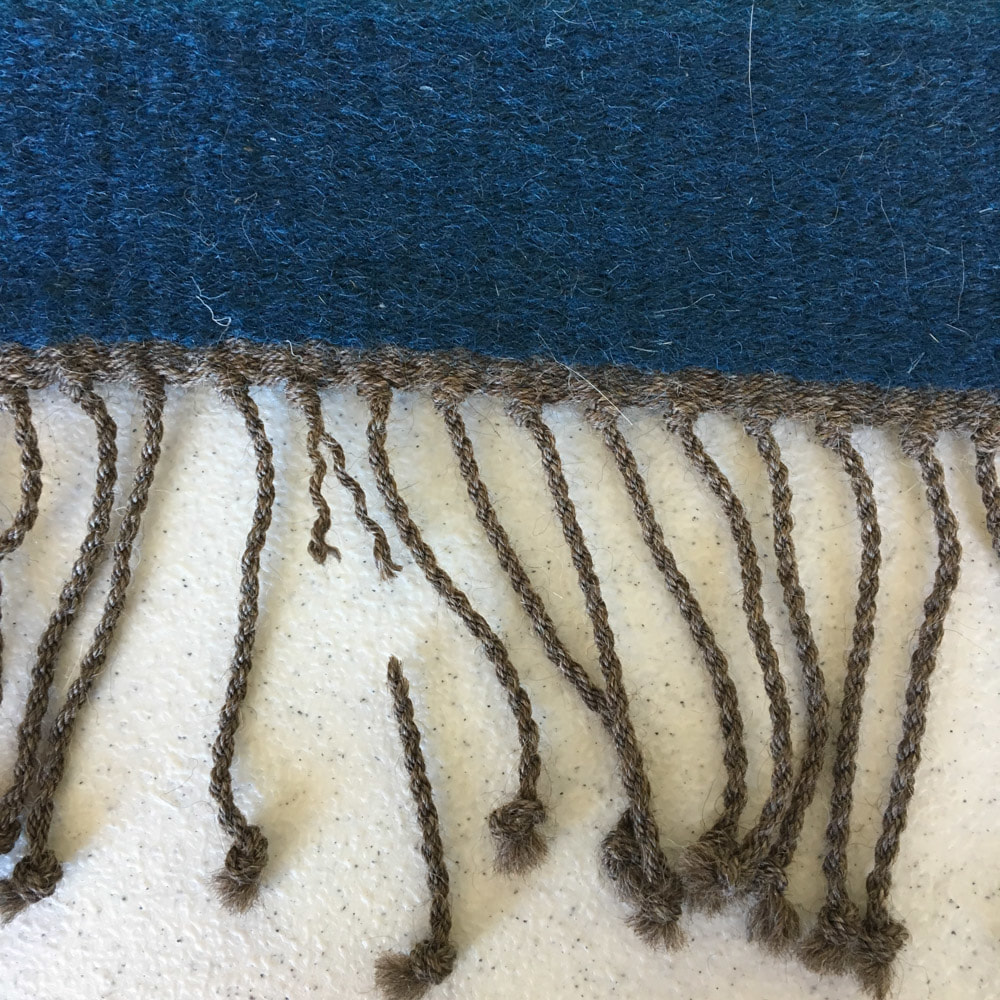
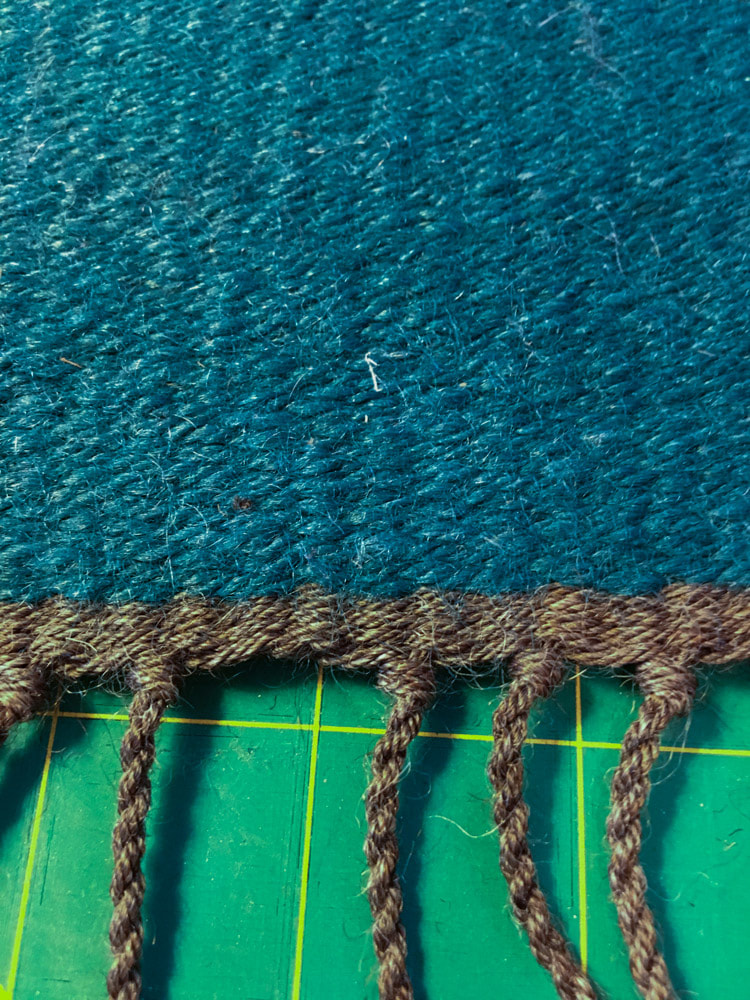
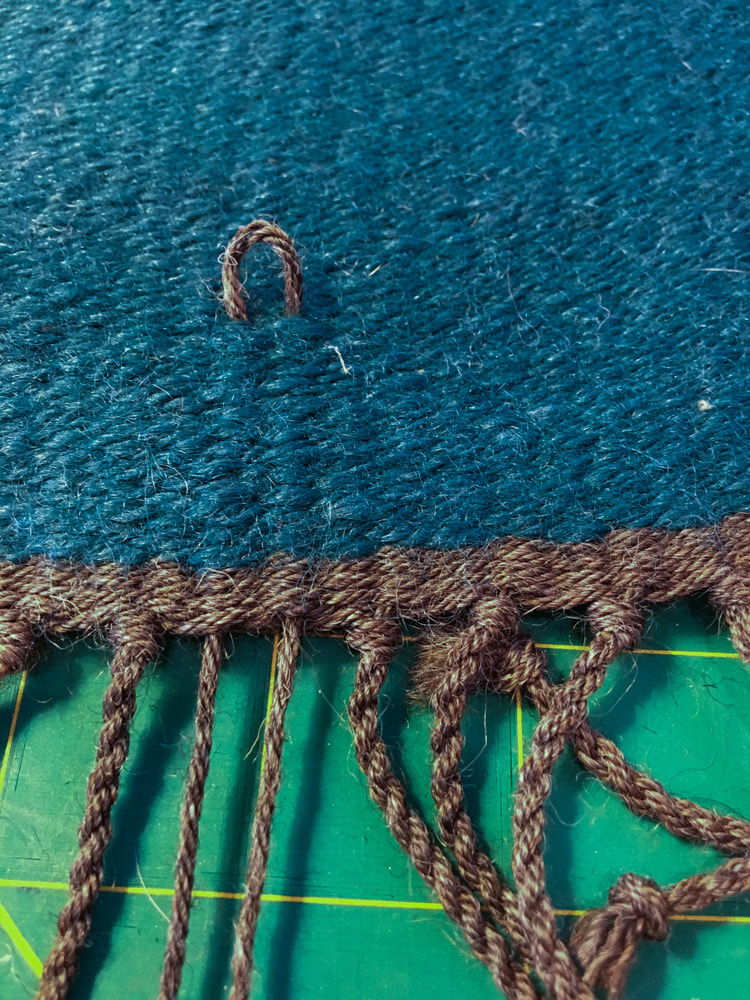
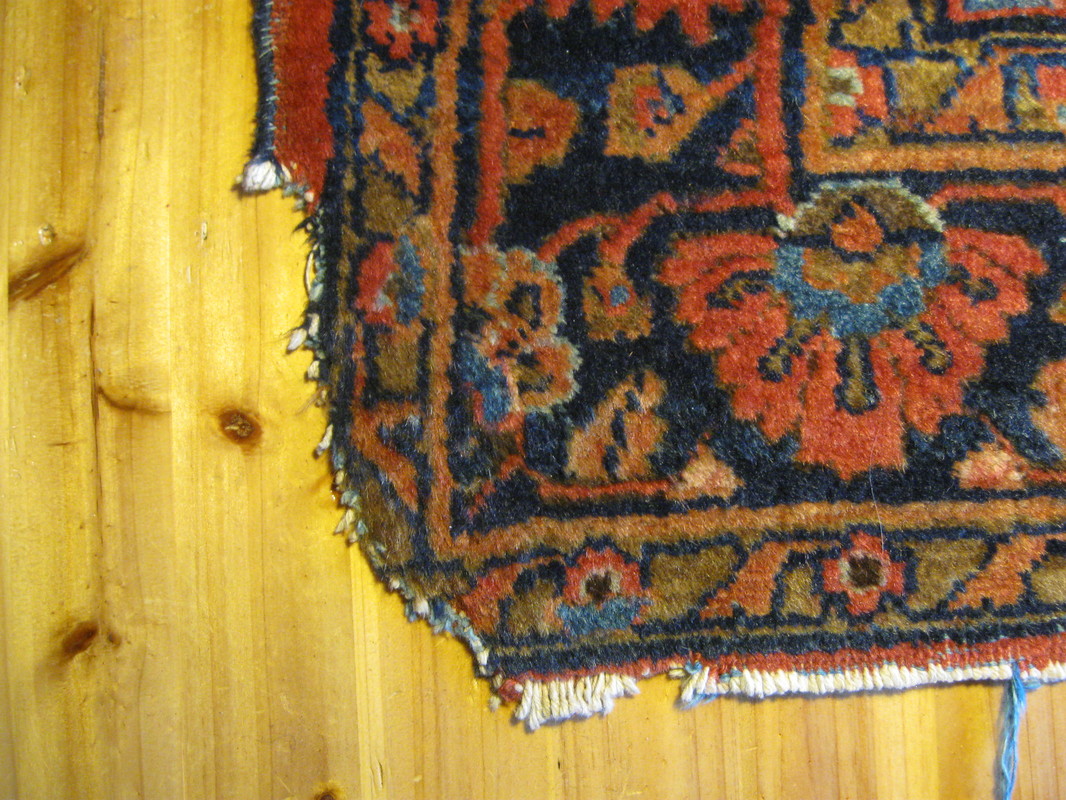
So Lizzie was found guilty by a process of elimination.  I pulled the rug up and growled and fumed for a few days while I debated what to do.

Fully a year later, I finally got around to repairing this debacle.  Fortunately, I still had some of the linen I used for the warp for the rug.  And the structure of the rug was a simple plain weave.
 

​Tools needed:
  • Heavy duty needle with a sharp point for undoing linen knots
  • Linen Warp
  • Tapestry needle for weaving in new fringe
  • Scissors
  • Fringe twister
Picture
The tools
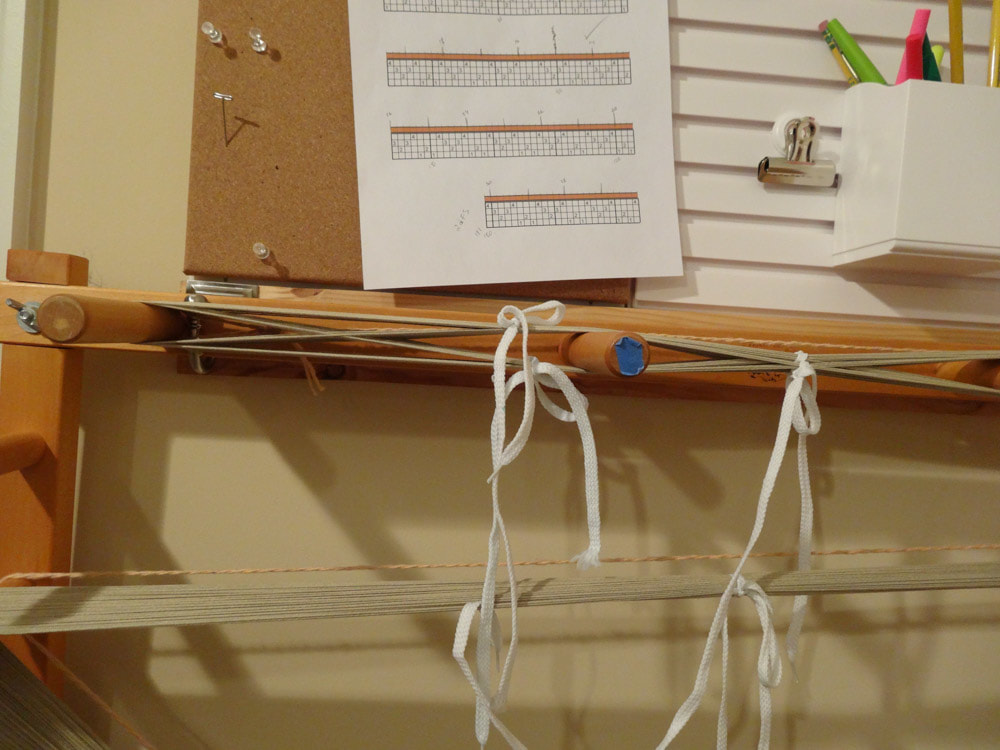
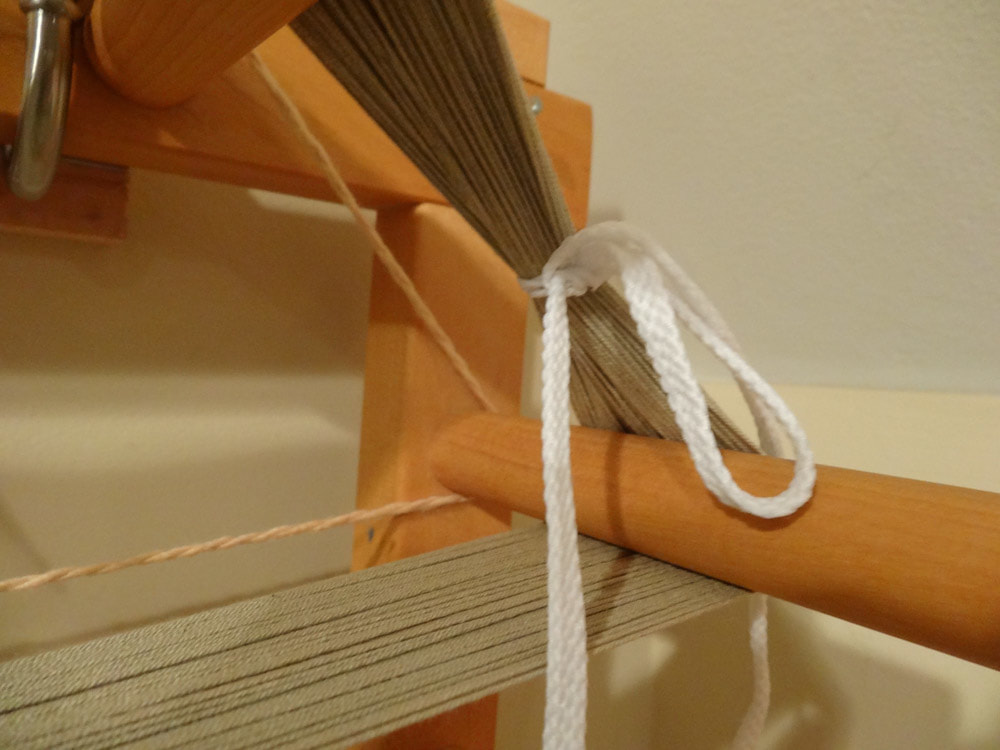
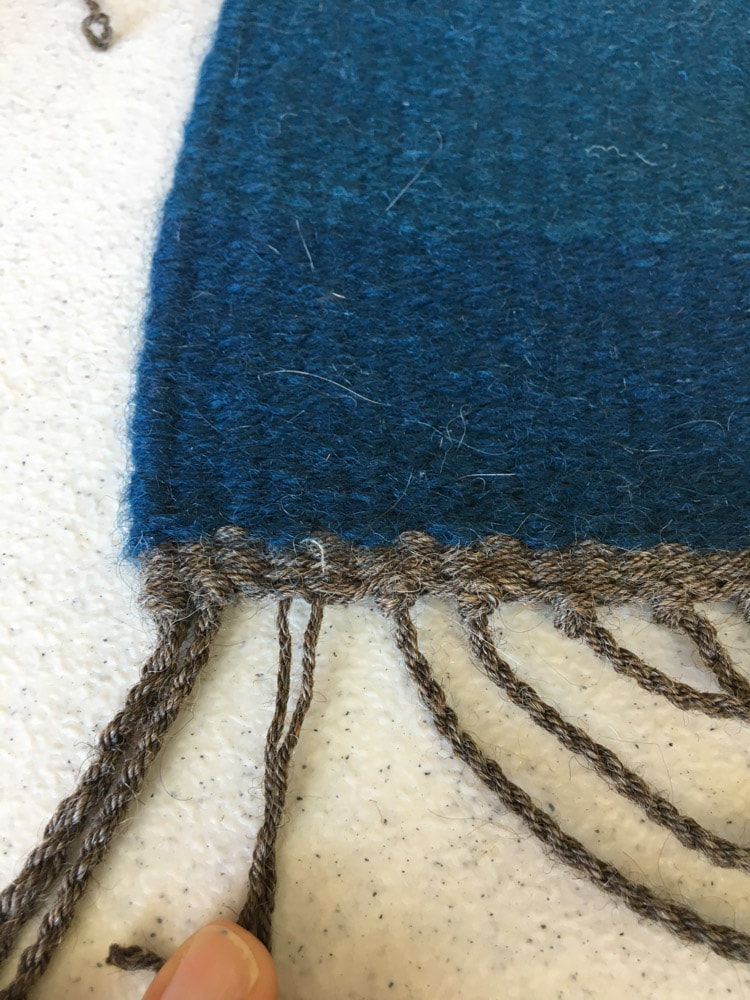
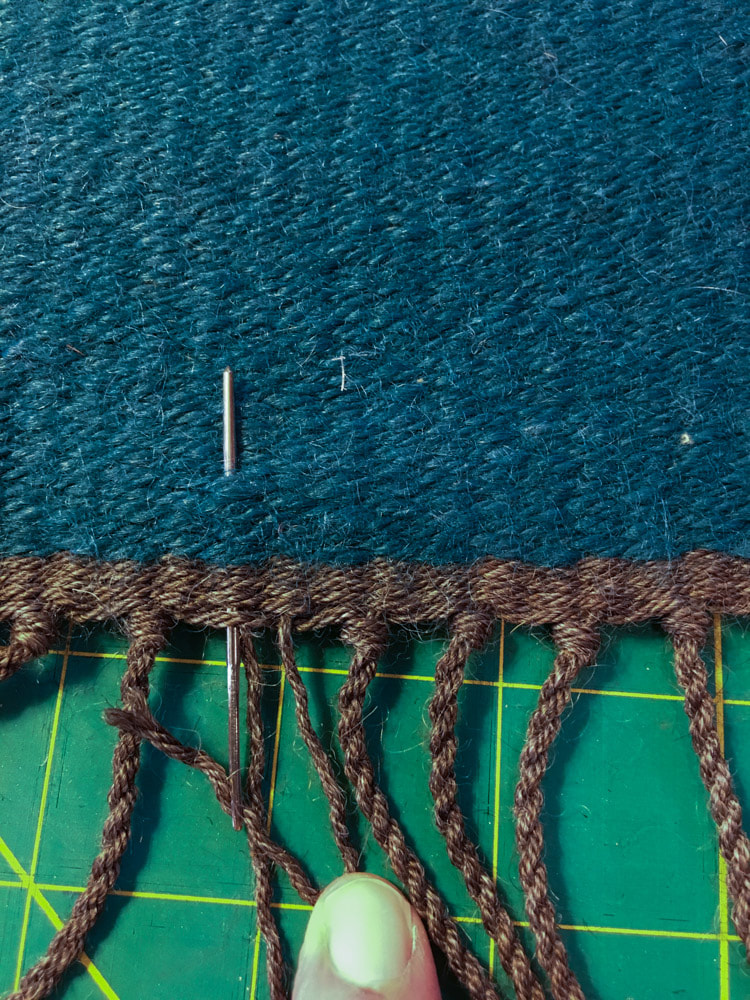
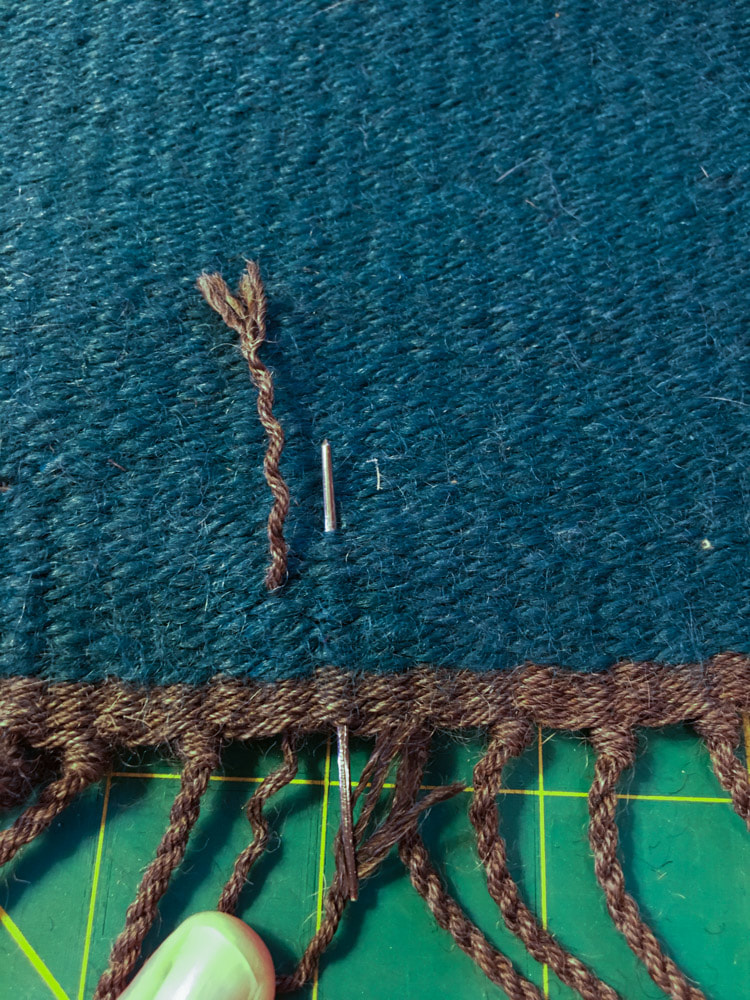
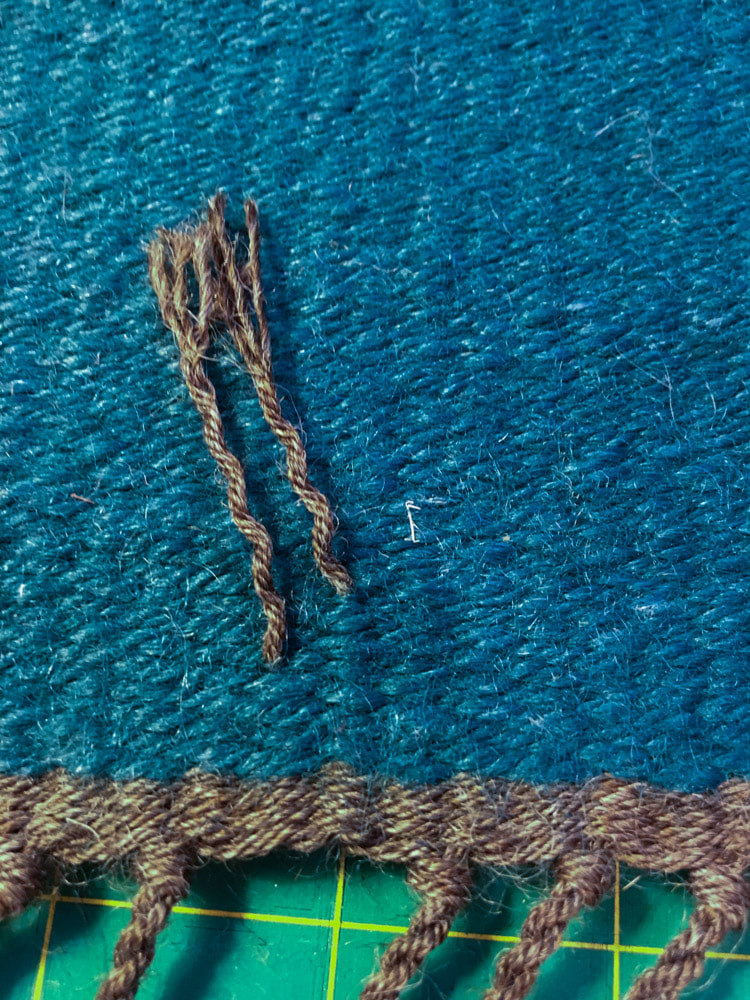
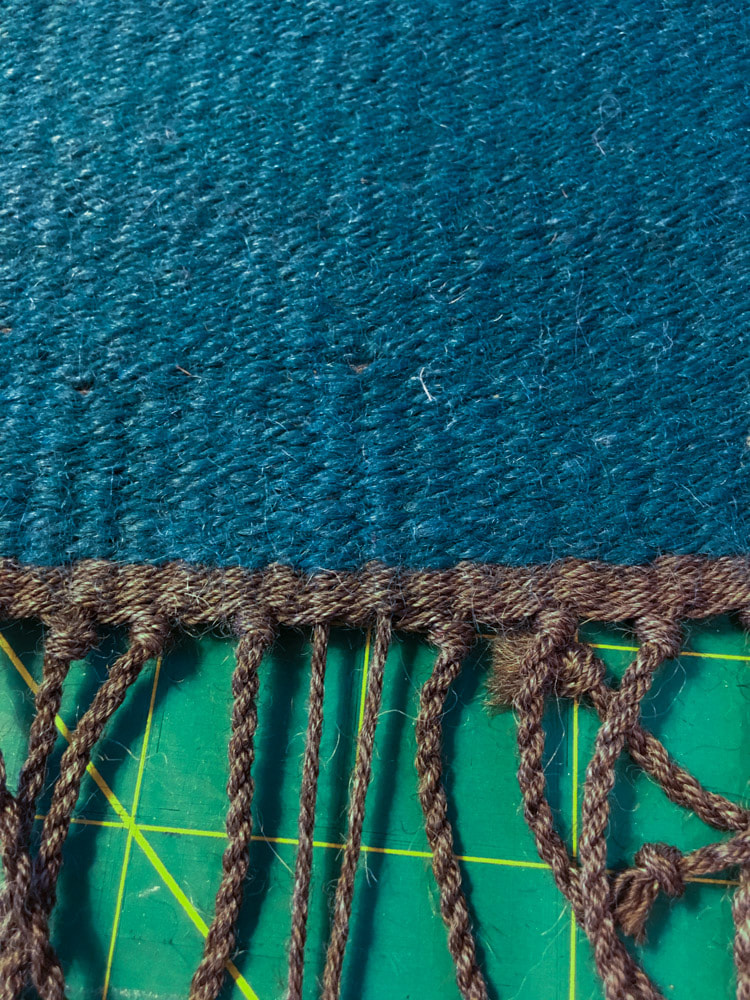
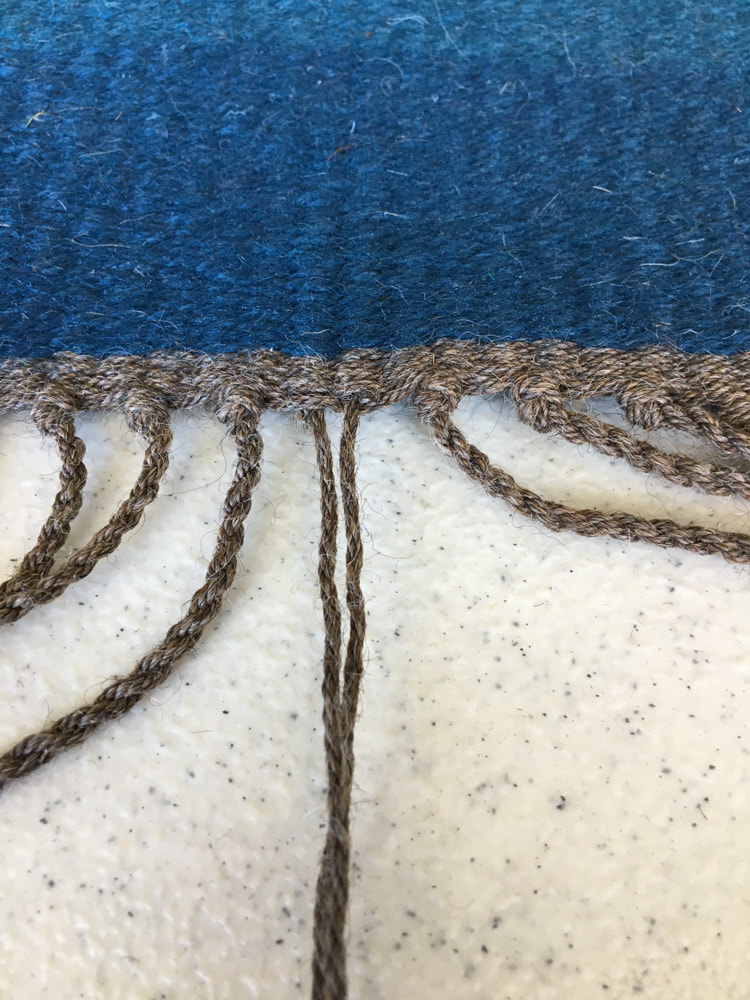
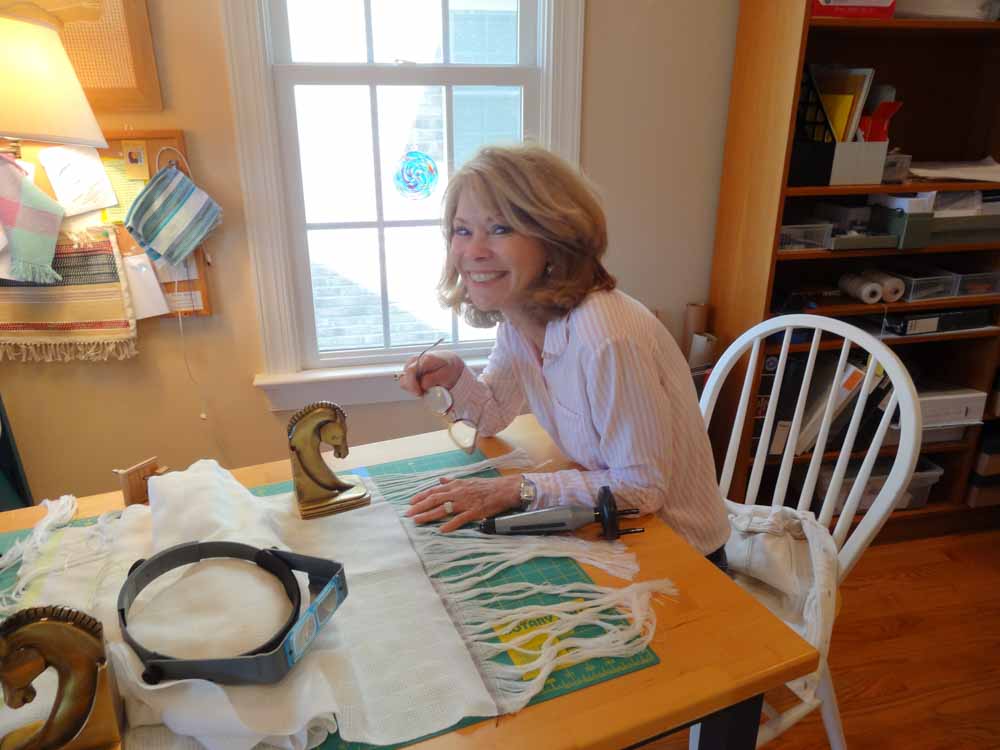
A photo journal of the steps for replacing the fringe follows.  The basic steps are:
  1. I untwisted the fringe of the severed bout (for this rug the fringe bouts consisted of only 2 warp ends)
  2. I untied the knot at the fell of the cloth (using the sharp needle to help pick out the knot)
  3. With the tapestry needle, I wove the loose ends 3/4-1" back up into the rug alongside the warp thread NEXT to the thread I was weaving in
  4. I trimmed the ends close to the surface of the rug
  5. I cut a piece of rug warp that was about 14" long and wove it 1 1/4" - 2" up into the rug along one warp end, turned and wove down along the other warp end back to the fell of the cloth
  6. I knotted the 2 ends together at the fell (like the original 2 warp ends were knotted) 
  7. I twisted the fringe (the 2 new warp ends) and knotted at 3" and clipped close to the knot
  8. I repeated this for 23 bouts on one end of the rug and 12 on the other end of the rug, until my fingers were raw and the rug was almost back to new!
 
Picture
The fringe has been untwisted
Picture
The knot at the fell has been untied
Picture
Weaving the right warp end up alongside the left warp end
Picture
Weaving the left warp end up alongside the right warp end
Picture
Both warp ends woven back into the rug
Picture
Old warp ends trimmed close to the rug surface
Picture
New warp ends woven up 2" into the rug and back down to the fell
Picture
New warp ends pulled snuggly into the cloth
Picture
New warp ends ready to knot at the fell
Picture
Warp ends knotted at the fell, twisted, knotted at 3" and ready to trim
Picture
The finished repair
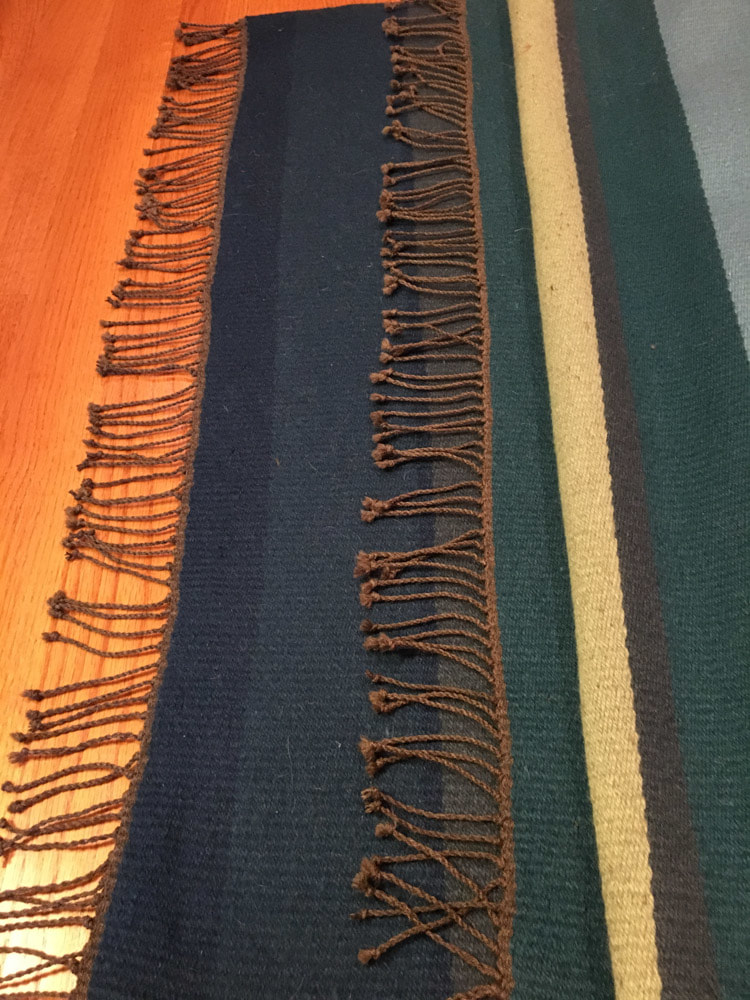
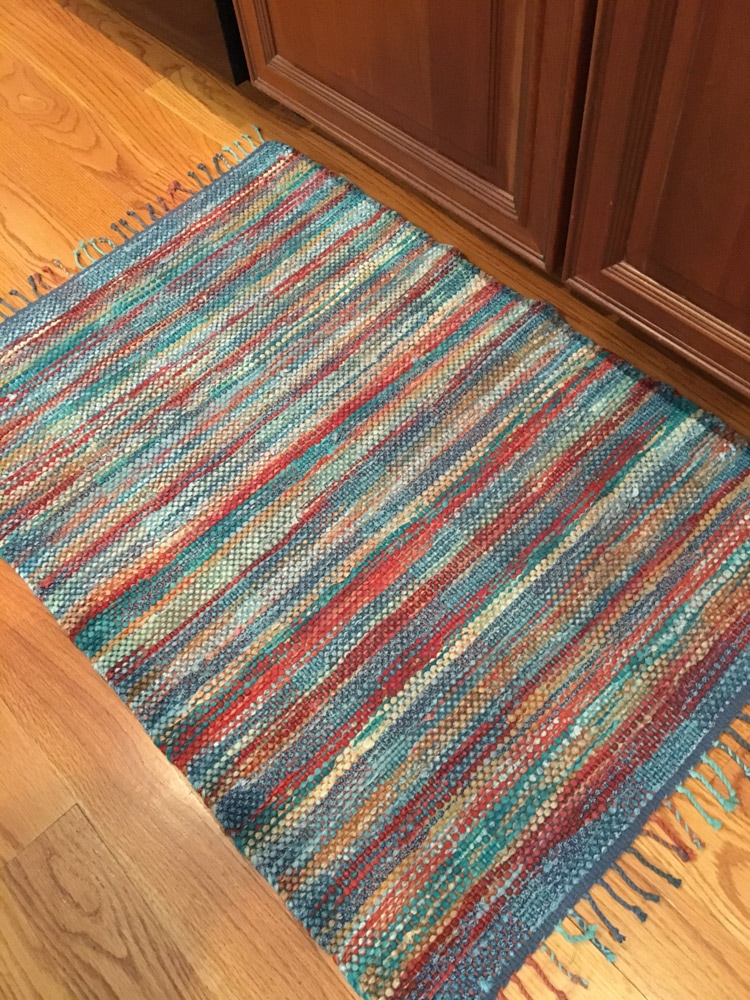
What a relief to finally have this little project done and the rug repaired.  I have missed having it at my front door.  ​

​But unfortunately now it will probably go back into storage for another two years because....

​Piper has arrived.
Piper is 2 months old.
She is a good kitten.
She has teeth.

Picture
Piper, the new kitten
Picture
Truth be told, the rug would probably have stayed in the closet waiting to be repaired if I had not been inspired and shamed into doing this simple repair after watching this incredible post on Facebook.  Watch and be amazed:  Oriental Rug Rebuild

4 Comments

Tip of the Month: Braille for the Feet

7/2/2017

3 Comments

 
​
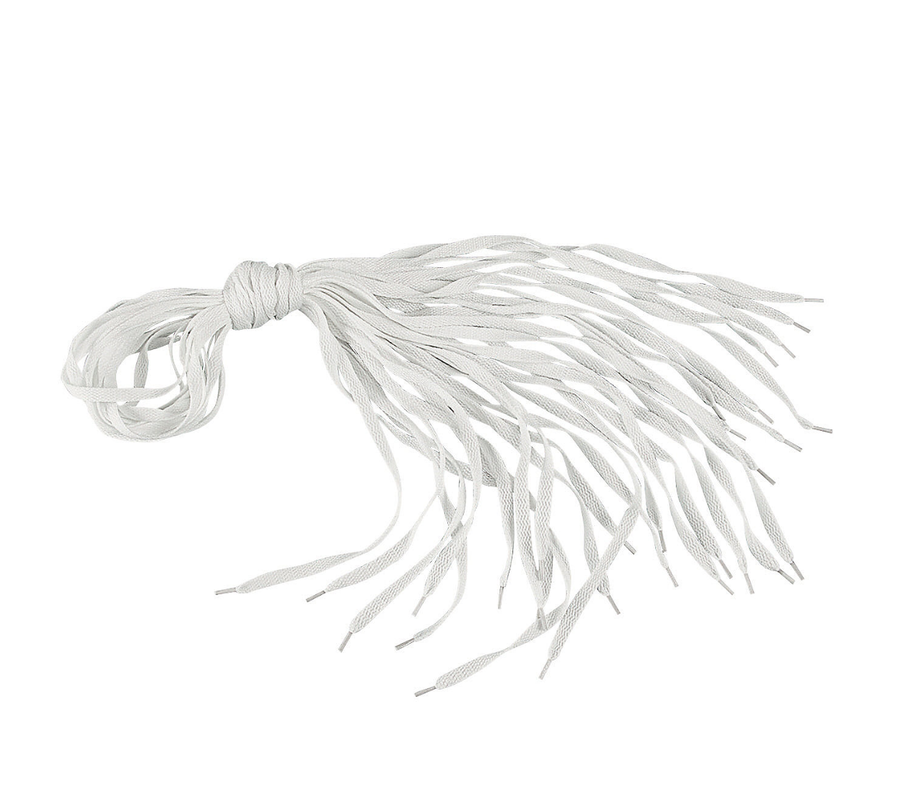
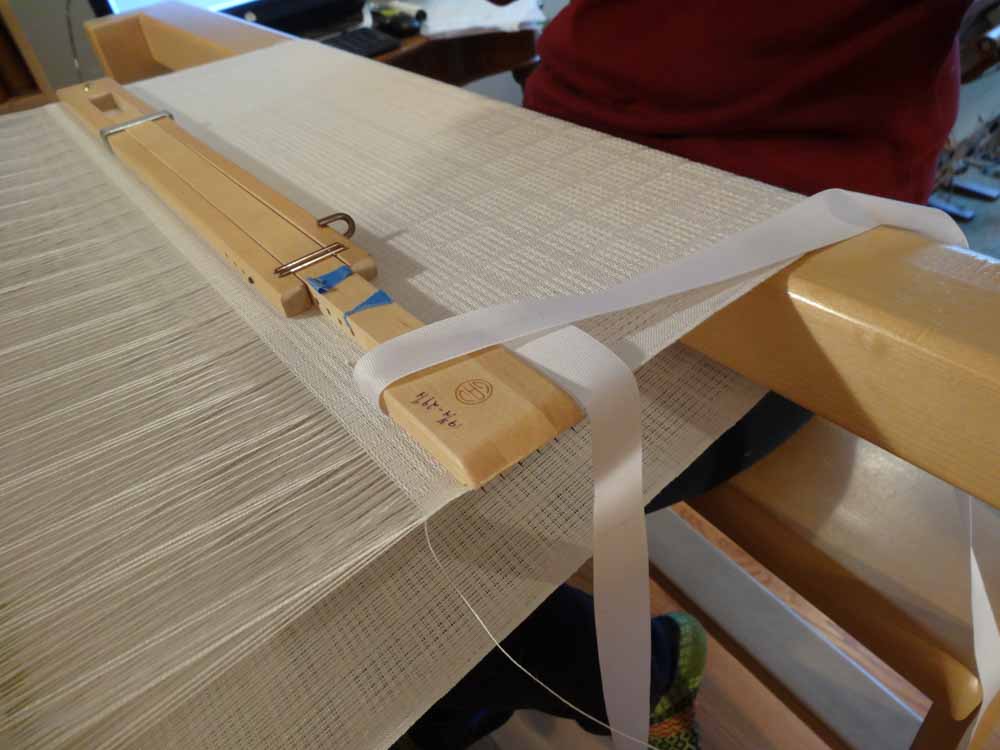
​I have long used rubber bands on my treadles to mark my path and help me treadle without peeking.  It is a great tip.  But I go through rubber bands like they are water because they dry rot very quickly.  And they are hard to roll up and down the treadles between projects.
​
​Enter my student Jane Hunt.  She told me she liked my idea so much, she went to Target and bought a handful of ponytail holders!  She found that they slide up and down the treadles easily, and they are bulkier than the rubber bands. Bonus: I am sure they will hold up much longer too!  Thank you, Jane!  Why didn't I think of that??

As it turns out there are dozens of kinds of ponytail holders.  I picked the ones that I could double up and would fit well over my treadles.  Hence my unabashed ad for Goody.  These are nice because they have no metal joins on them that could scratch the wood.
 
Picture
Picture
BEFORE: Rubber bands on the treadles, ready to walk the treadles for a point twill
Picture
AFTER: Ponytail holders in place. The blue and green ones have been pulled down where my feet can feel them. I will walk this pattern from the center out, just as I did in the photo to the left.

​Walking the treadles:

I tend to walk my treadles from the center out whenever my pattern allows me to do so.  When I do that, I will put bands on the two center treadles so I can find my way back to center without peeking.  I also place bands on every other treadle going out from the center.
Picture
​
​Treadling straight across:
On the rare occasion that I tie up my treadles straight across, I simply put bands on the odd treadles and leave the even numbered treadles naked.
Picture
​
​Treadling pattern with tabby
If I have 2 tabby treadles and a group of pattern treadles, my personal preference is to have the tabby treadles on one side and the pattern treadles on the other.  If the tabby treadles are on the left, I will put a band on tabby a and leave tabby b naked.  I will then put bands on all of the odd numbered pattern treadles and leave the even numbered pattern treadles naked.
Picture

3 Comments

New Life for a Little Rug

6/18/2017

12 Comments

 
Picture
This is what the fringe USED to look like.
​Years ago I wove a little Rag Rug to use in front of my kitchen sink.  I finished the rug with twisted fringe and left the fringe about 4" long - probably too long.  Over the years I have had to periodically retie some of the fringe bouts,  but slowly but surely more and more of the bouts had become untied, frayed and I could no longer re-twist them and knot them back to their original length. In addition, some of the warp threads in the body of the rug had broken and the rug was really looking shabby and worn.
Remember: You can click on any picture to zoom in!
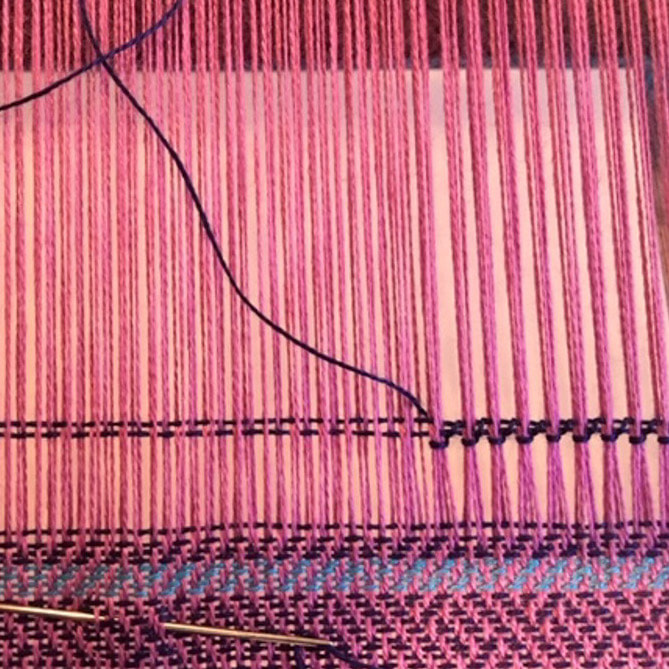
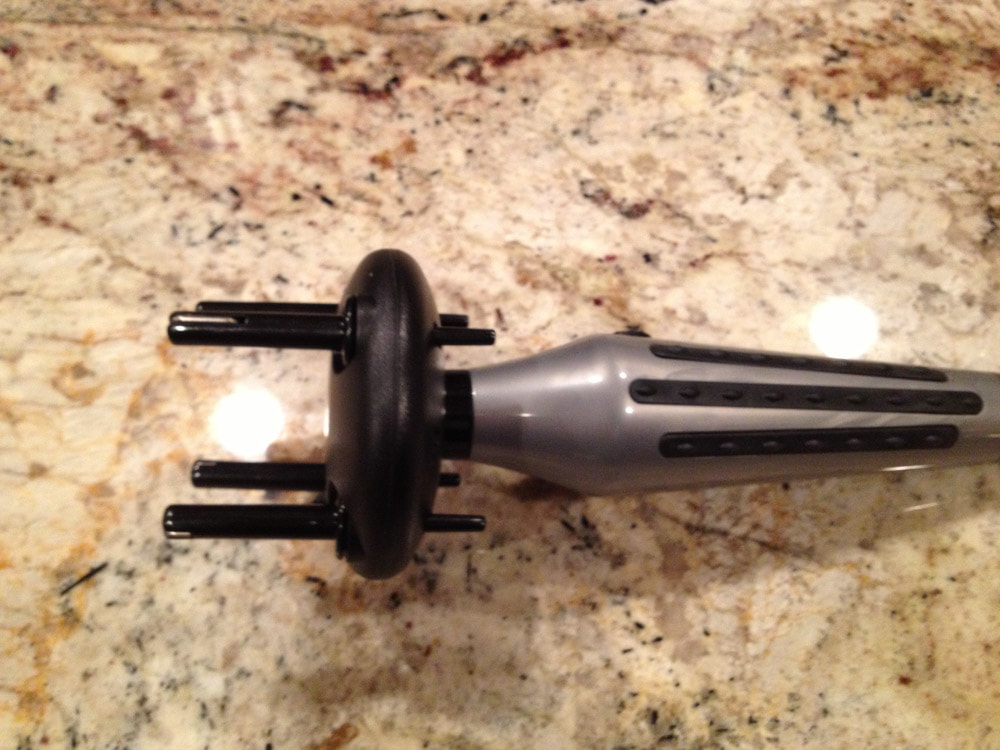
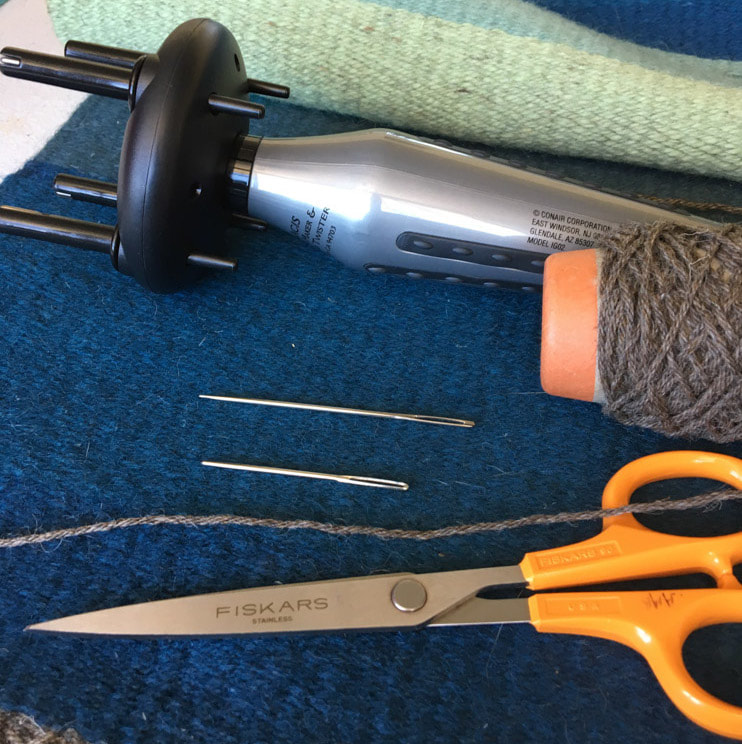
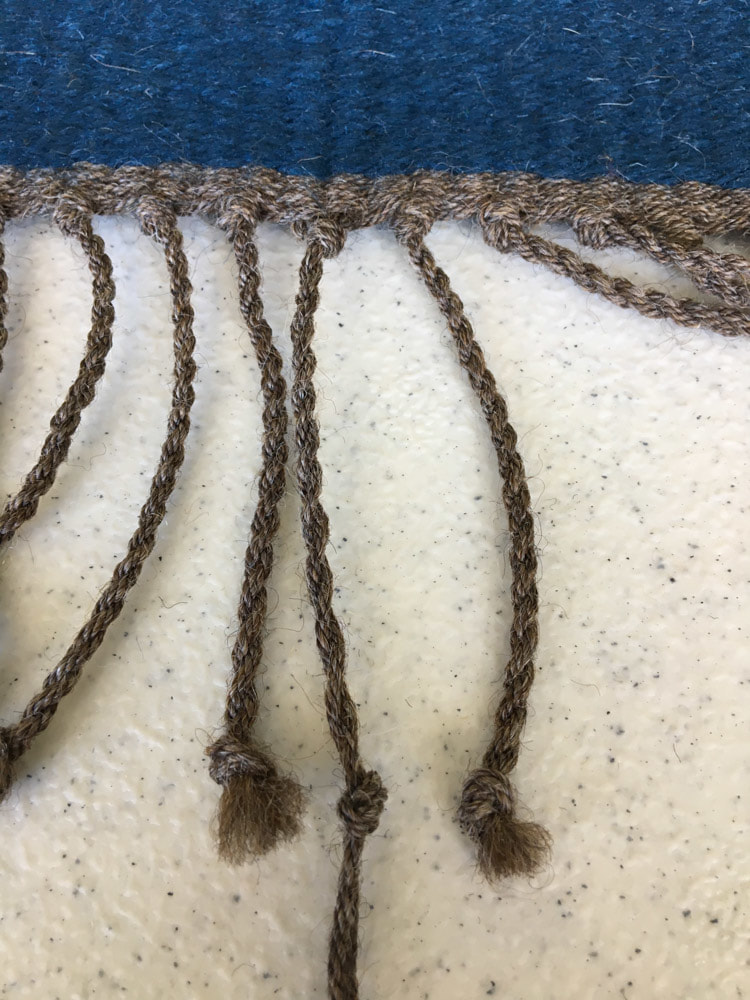
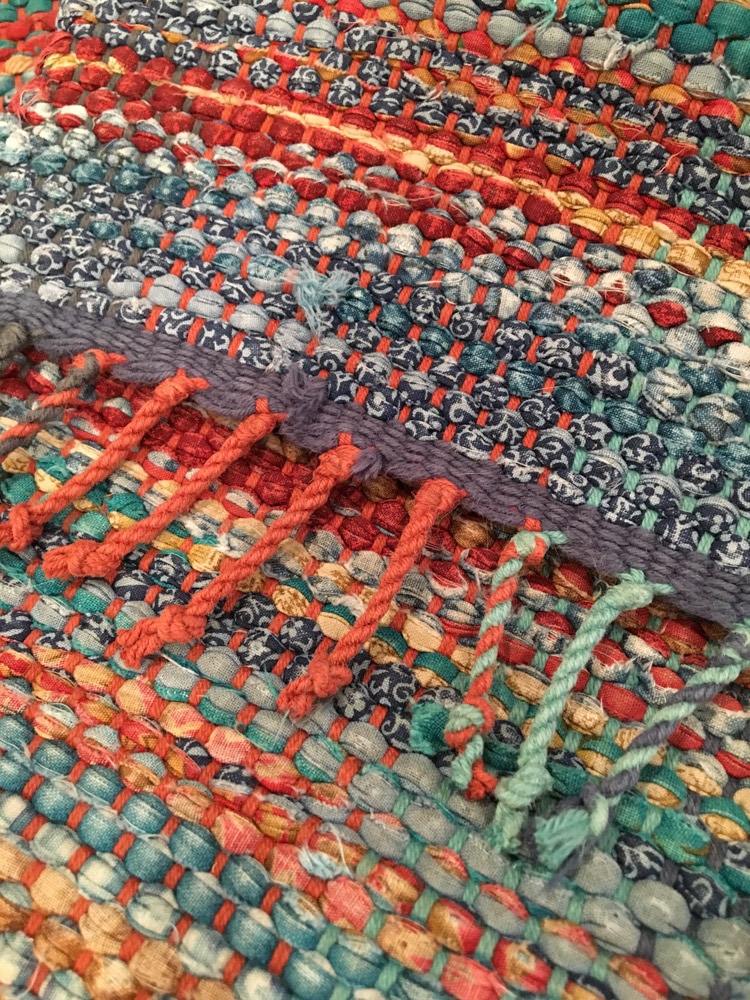
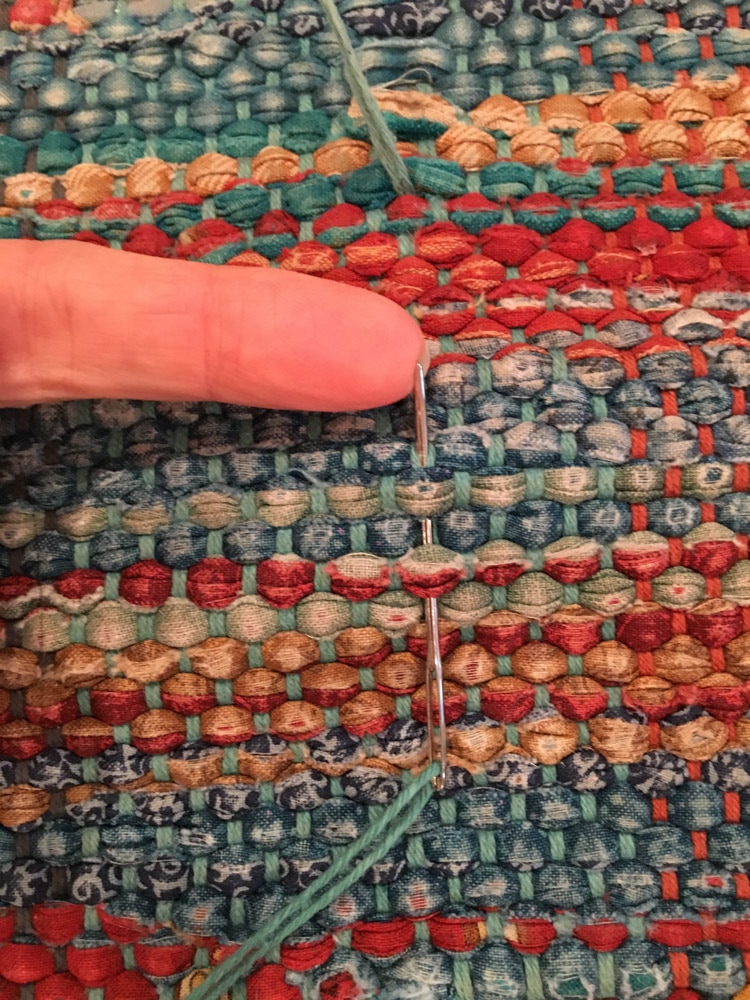
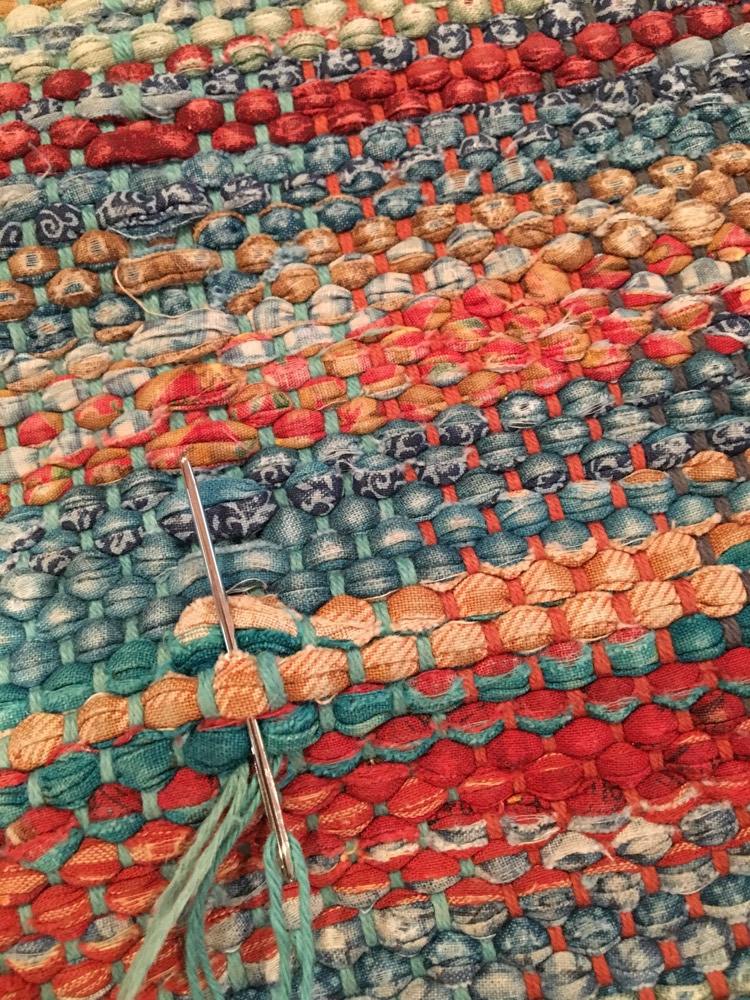
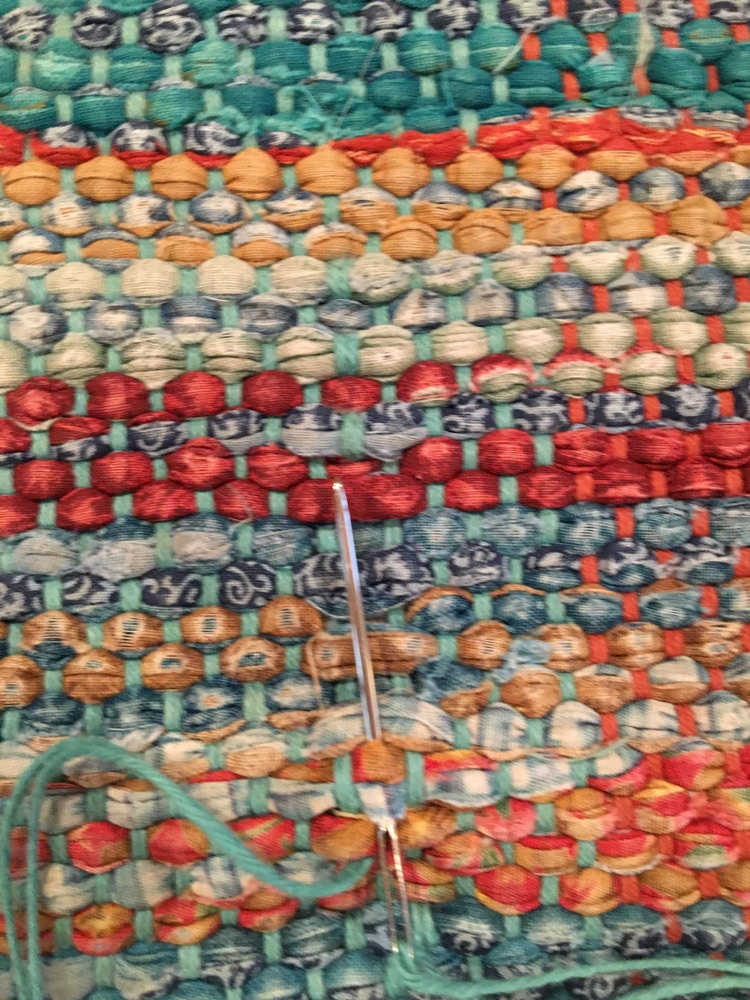
​Step 1:
I first decided to re-twist the fringe bouts that had come undone and to shorten all of the bouts to the shortest common denominator.  It seemed that I could get away with shortening them all to about 1 1/2". There are a couple of bouts where the ends were so frayed that I do not have high hopes for them holding up for much longer, but at least they are shorter now..
Picture
The newly shortened fringe
Picture
This shows a broken warp thread and a row of rag weft floats above it. These need to be repaired.
Picture
These are the only tools I need: a tapestry needle and the matching rug warp

​Step 2: 
​I gathered the tools I would need for repairing the broken warp threads The warp used in this rug was 8/4 cotton rug warp used double, and luckily I still had some on hand (this will not surprise anyone who knows me and has seen my yarn stash).  

So now all I need was a tapestry needle threaded with a doubled strand of the warp thread and a little patience. The weaving should be easy because the rug was woven in plain weave.

​Step 3 - Fixing the Broken Threads
  • I started about 2-3" below the broken warp thread (photo 1)
  • I wove along the same warp thread with the repair thread for the 2" until I got to the break (photo 2)
  • At that point I have to weave over and under the rags in the same way the missing warp thread used to.  It helped to hold the needle in my right hand and put my left hand underneath the rug for support (photo 3)
  • When I reached the end of the damaged area, I continued to weave along the same warp thread for another 2-3 inches.  When I finished with the weaving I checked the weaving on both sides of the rug.  
  • When I was satisfied, I pulled on the ends of the repair threads where it entered and exited the weaving to "seat it" in the cloth.  
  • Then I trimmed the tails of the repair thread and the broken warp thread from the surface of the rug.​
Picture
Photo 1: Starting 2-3" below the break. Broken warp thread can be seen at the top of the photo.
Picture
Photo 2: Weaving up to and just beyond the break in the warp thread.
Picture
Photo 3: Weaving continues above the break - over and under the weft floats.
Picture
My supervisor
Picture
Weaving is finished. The tails have not been trimmed yet. Lizzie is checking my work.
Picture
The finished rug. Hopefully with a few more years of life in it.

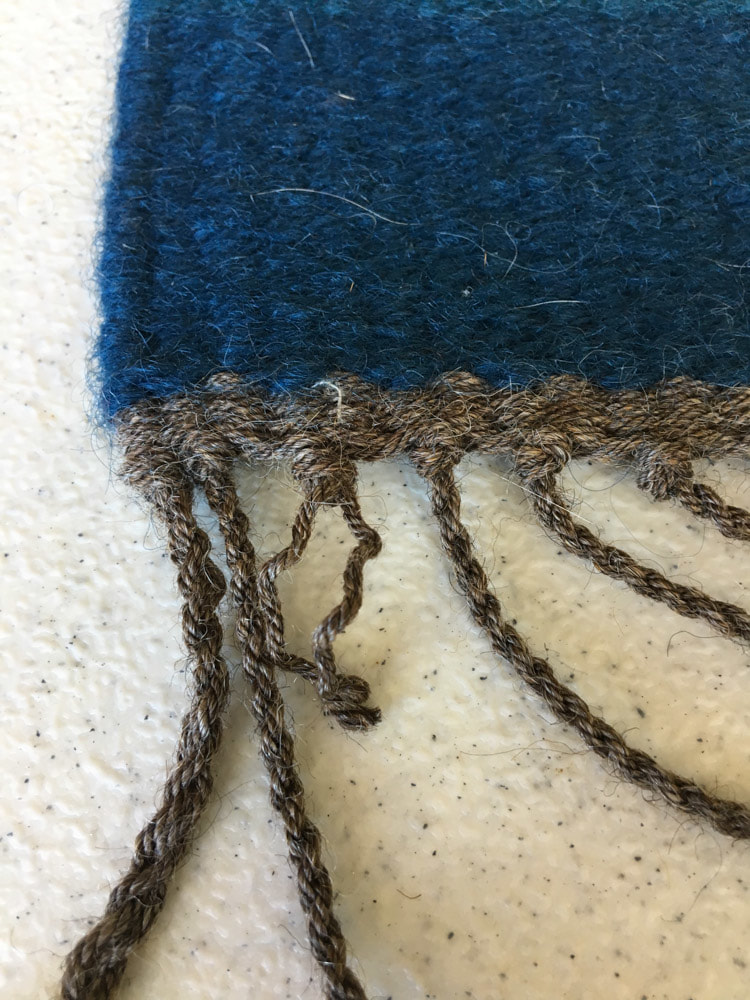
​All done!  
And I think the rug looks better with short fringe anyway.
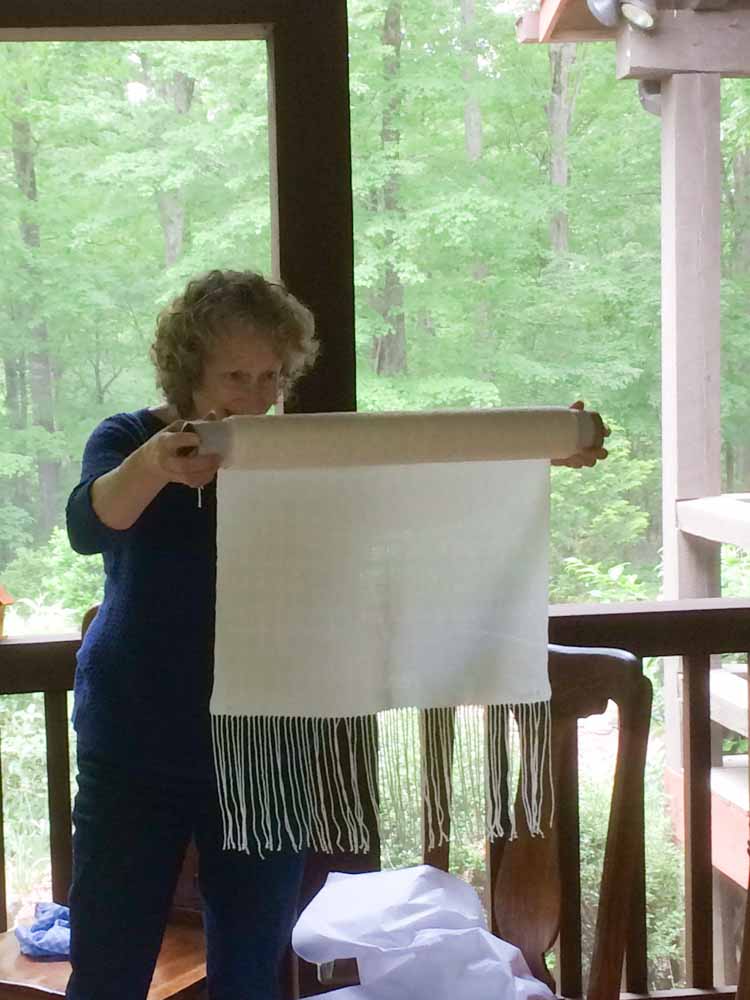
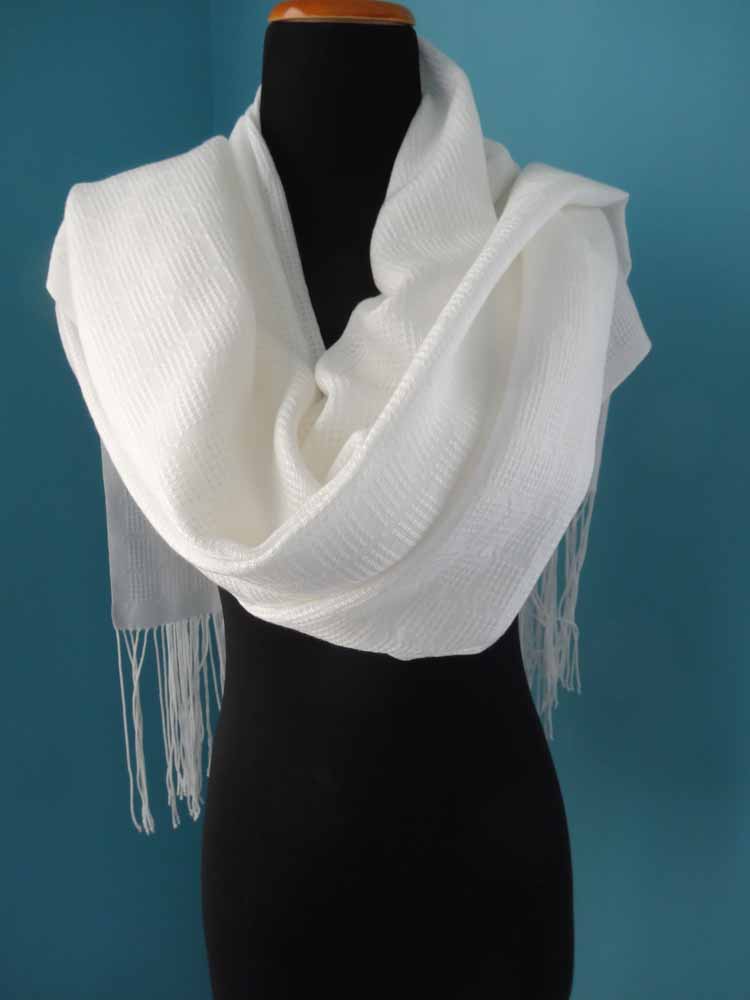
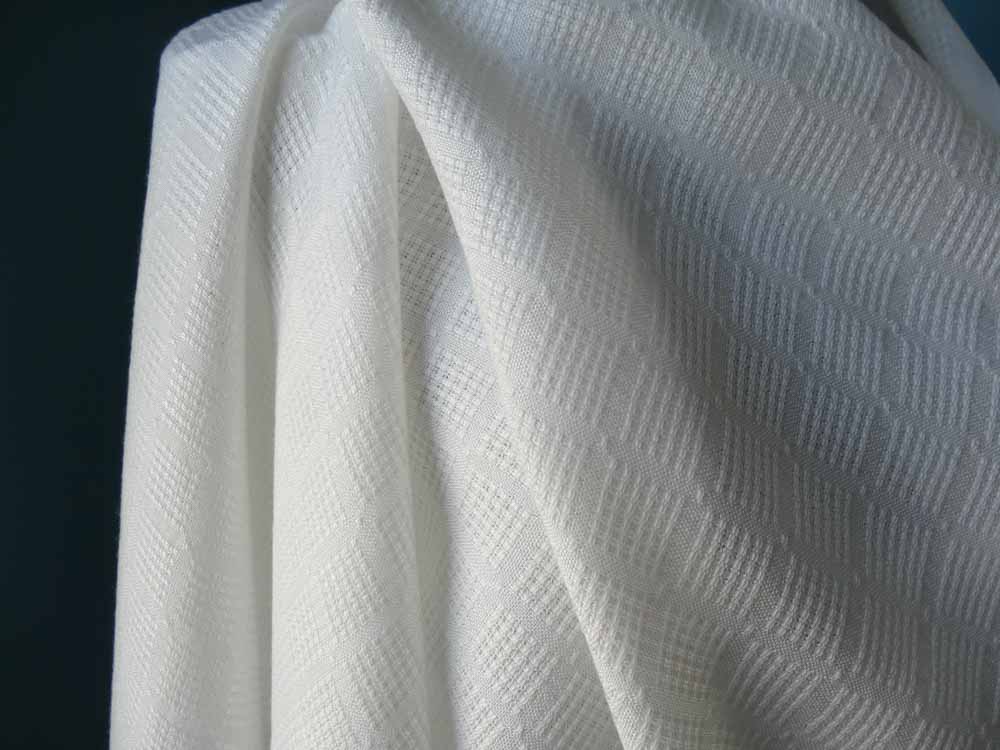
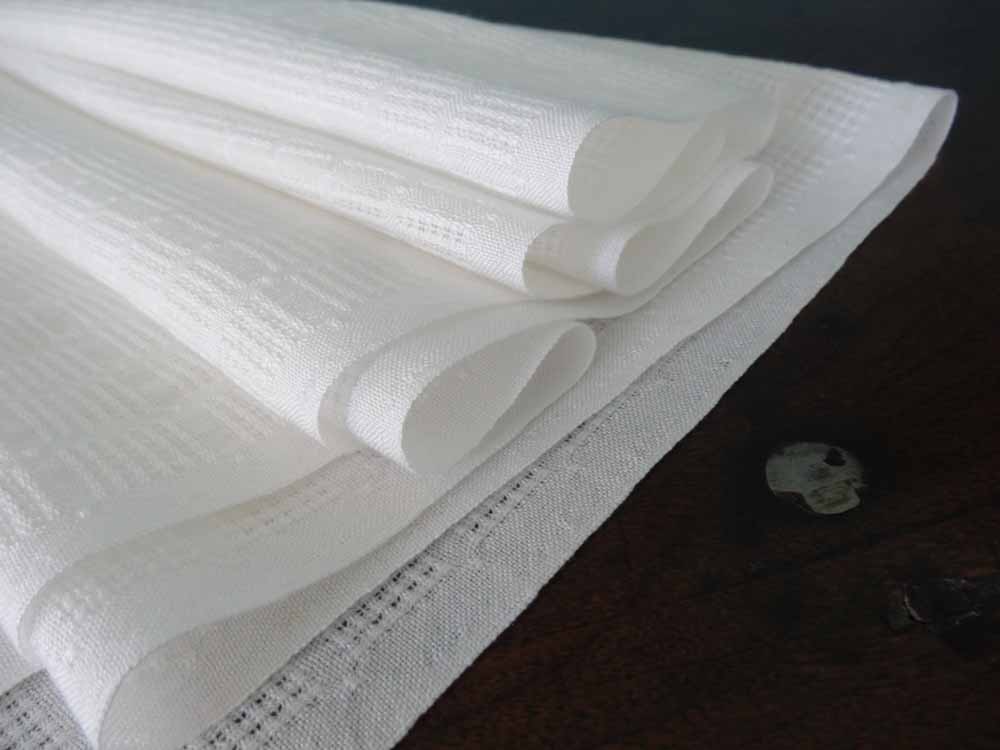
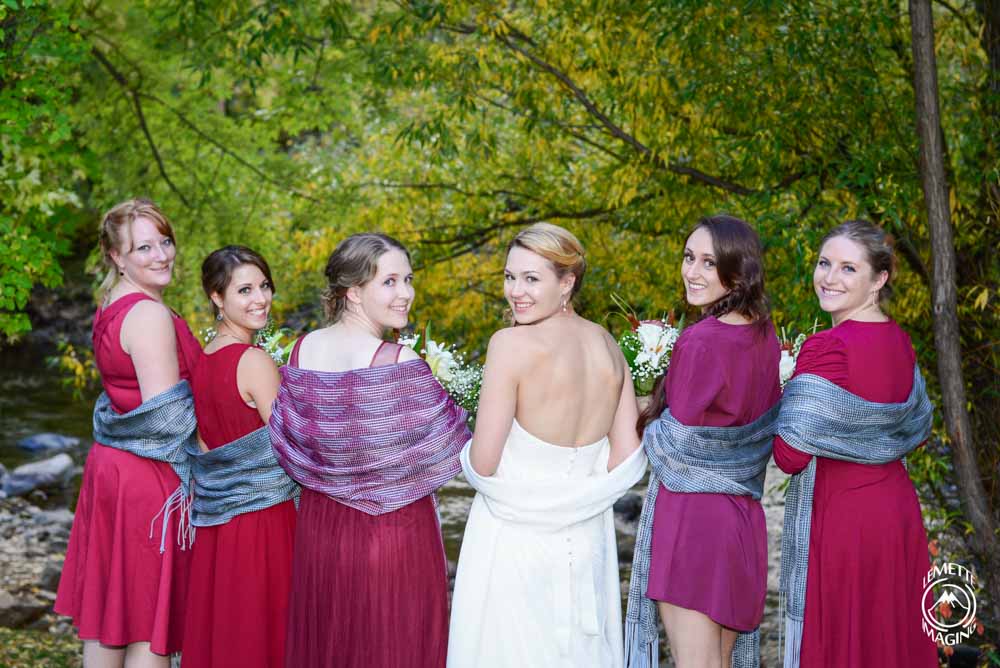
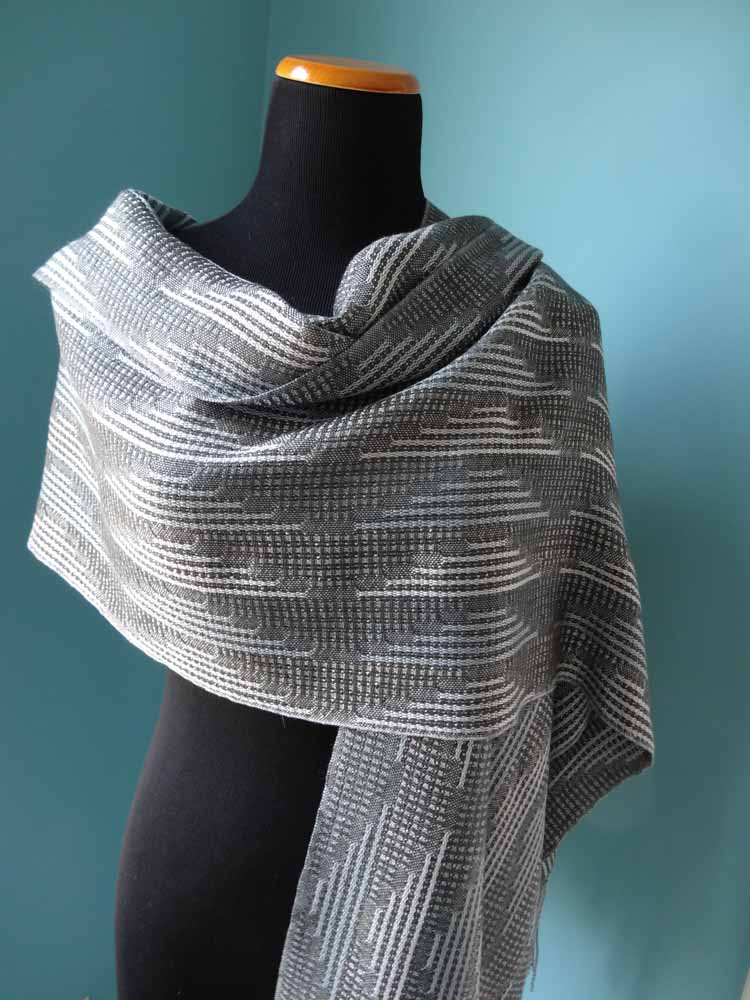
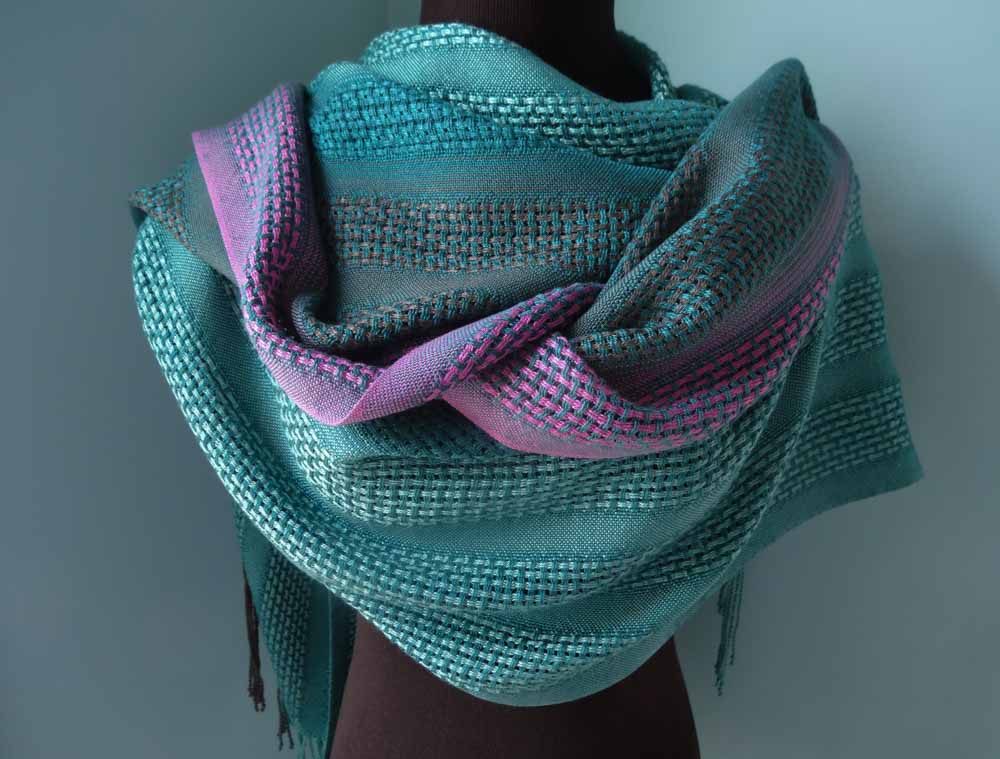
12 Comments

Weaving for a Wedding: A Labor of Love

1/19/2017

6 Comments

 
Picture

​My son, Ryan married his darling bride Alex in Boulder, Colorado this past October.  I have posted pictures in my Gallery of the weaving I did for the wedding, but I have not yet shared much of the story of how the weaving got done.  Nor had I shared pictures of the finished pieces in use.  

​So now that story begins.  

The Bride's Shawl

The bride's shawl was the first project I undertook.  I wove samples for her shawl last winter and took them to her in March for her approval.  Originally I had intended to surprise her with the shawl but quickly realized that that was a really bad idea: a) she might not want a shawl, b) she might buy her own shawl, and c) the shawl might not look good with her dress.  I was very relieved that she loved the idea and that the samples of the Bronson Weave lace in 20/2 natural tencel matched her dress perfectly!
Picture
Bronson Lace samples
Picture
So the shawl warp was planned:  Hoping for shawls of 20" x 95", I put on a warp of 839 ends of 20/2 tencel sett at 36 epi (3/dent in a 12 dent reed), measuring 23.3" wide in the reed,  No floating selvedge was needed because the draft had a plain weave edge on each side.  I put on enough length to allow for weaving 2 shawls to 104" and allowing for 12" of fringe on each end and loom waste.

The draft was a simple 4 harness Bronson Lace weave with plain weave borders.  Click on the draft to zoom in
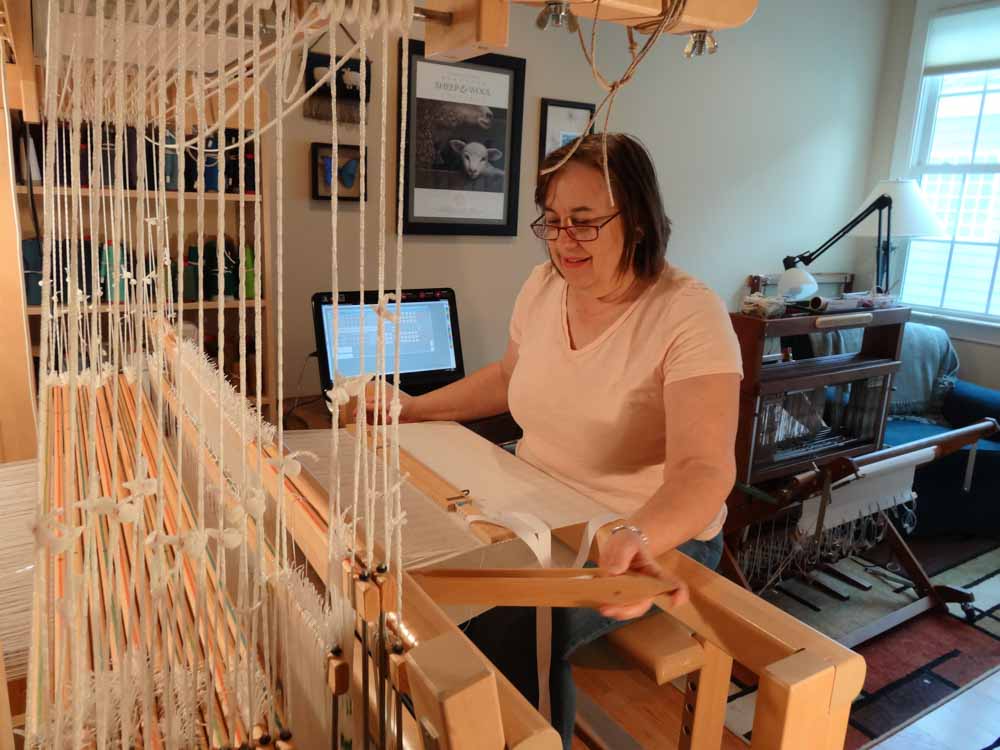
So the warp for two shawls went on the loom: one for the bride and one for a gift our outgoing guild president, Janice.  A dozen of our guild board members took turns in April weaving off the first shawl so that we could present it to her at the May board meeting.  I wove the bride's shawl off in  May.
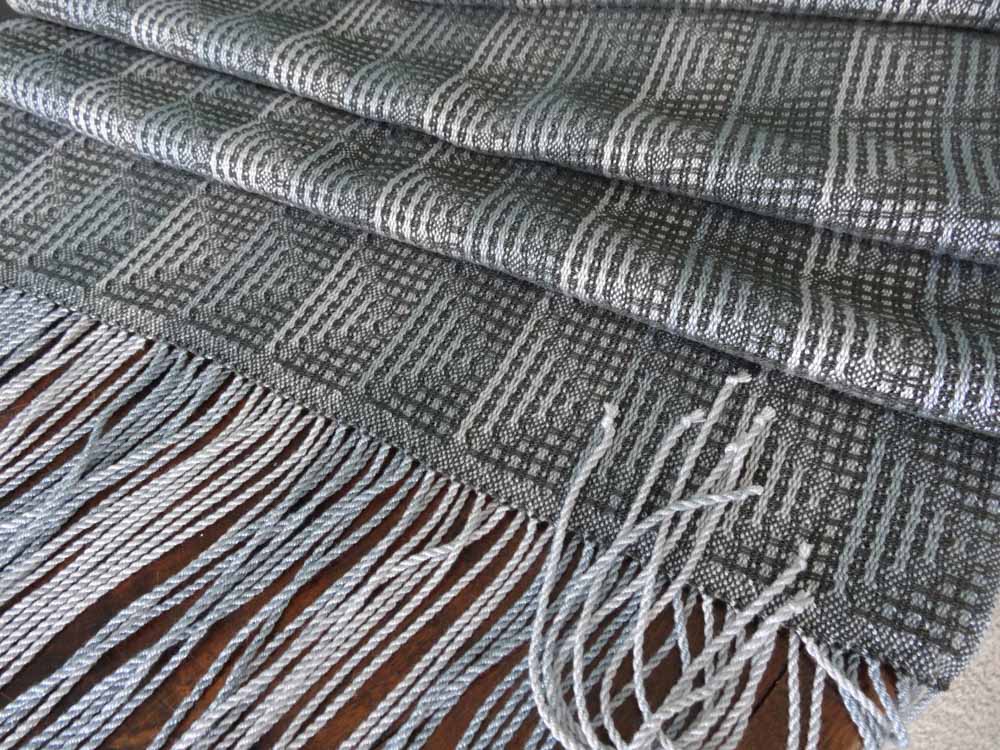
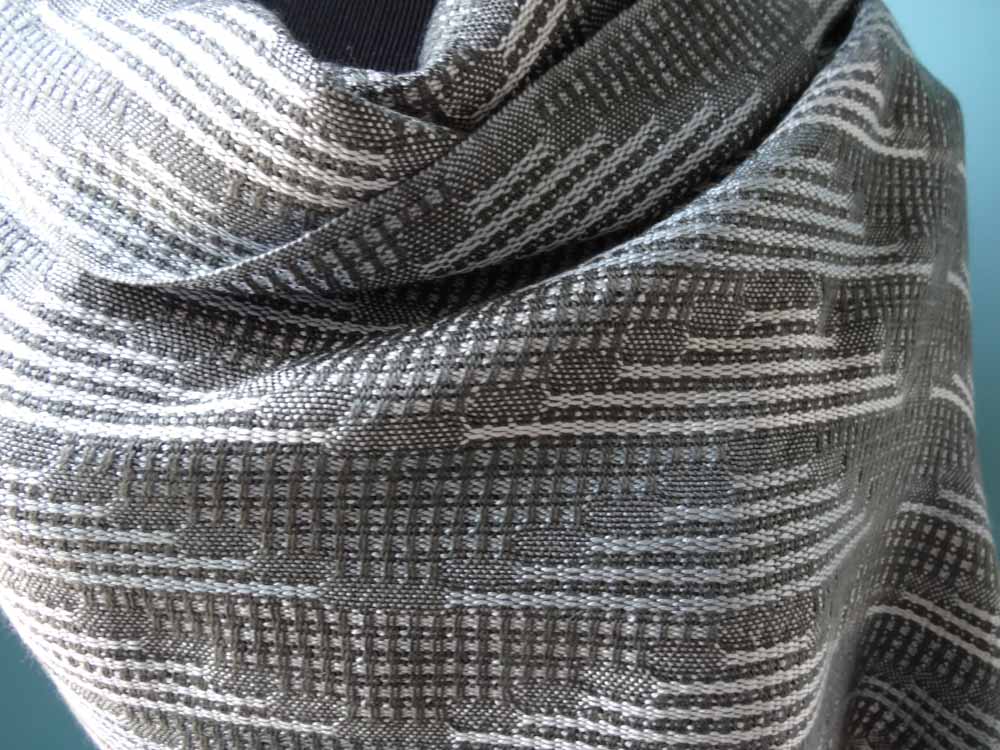
  • Weaving with the 20/2 tencel was surprisingly trouble free
  • The fact that 12 people could weave on 1 shawl for our guild president and have virtually no problems and a very even beat was the biggest surprise of all!
  • My sister-in-law embroidered the bride and groom's initials and their wedding date on one end of the bride's shawl as a lovely finishing touch.
Picture
Shawls on the loom
Picture
Another guild member taking a turn on Janice's shawl
Picture
Guild member weaving on Janice's shawl
Picture
Guild member fringing Janic'e shawl
Picture
Janice opening her shawl
Picture
The bride's shawl
Picture
The bride's shawl, detail
Picture
The bride's shawl, detail
Picture
The bride

Next... Shawls for the Wedding Party

I offered to weave shawls for each of the four bridesmaids and my daughter, the "best sister".    I put on a warp for 6 shawls: 5 for the wedding party and an extra:
  • 8/2 warp tencel in silver and light gray stripes sett at 20 epi
  • 22" in the reed, woven to about 95" in length.
  • Hemstitched on loom and  finished with 8" long twisted fringe 
  • Bronson weave threading that allowed for several treadlings: triangles, curves and extended curves
  • Charcoal gray wefts for all 4 bridesmaids' shawls and the extra shawl which is for sale in the SHOP
  • Burgundy weft for the "best sister" shawl
Picture
Bronson Weave Triangles with charcoal weft
Picture
Bronson Weave Curves with charcoal weft
Picture
Bronson Weave Curves with burgundy weft
Picture
The bride with her bridesmaids & my daughter/ "best sister" 
Picture
The extra shawl, extended curves
For sale in the SHOP

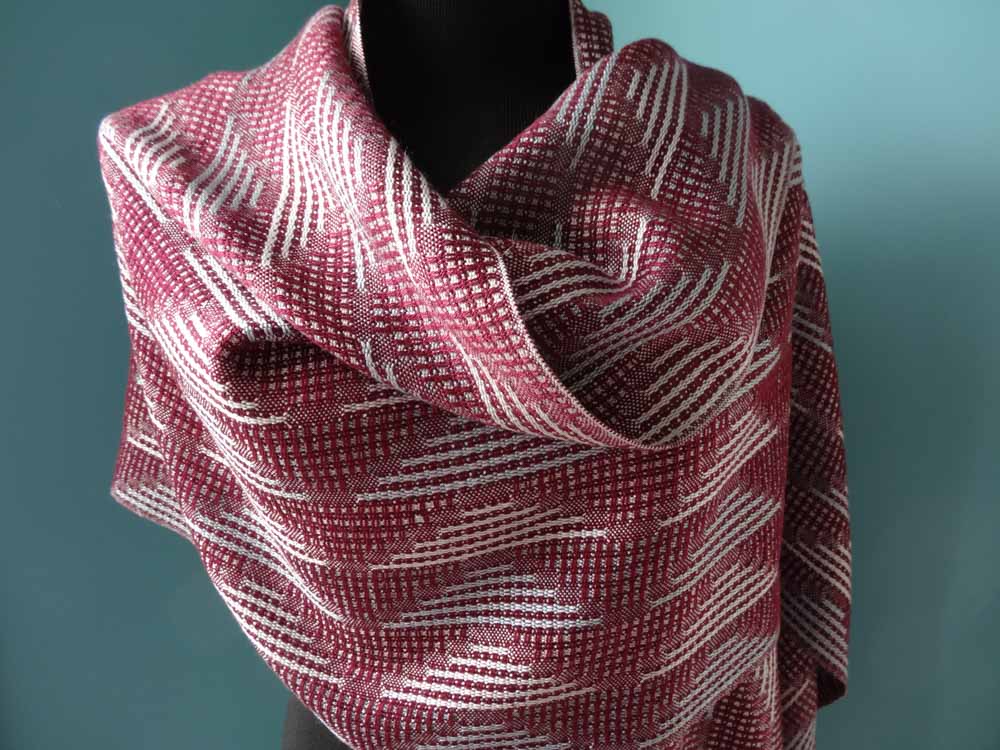
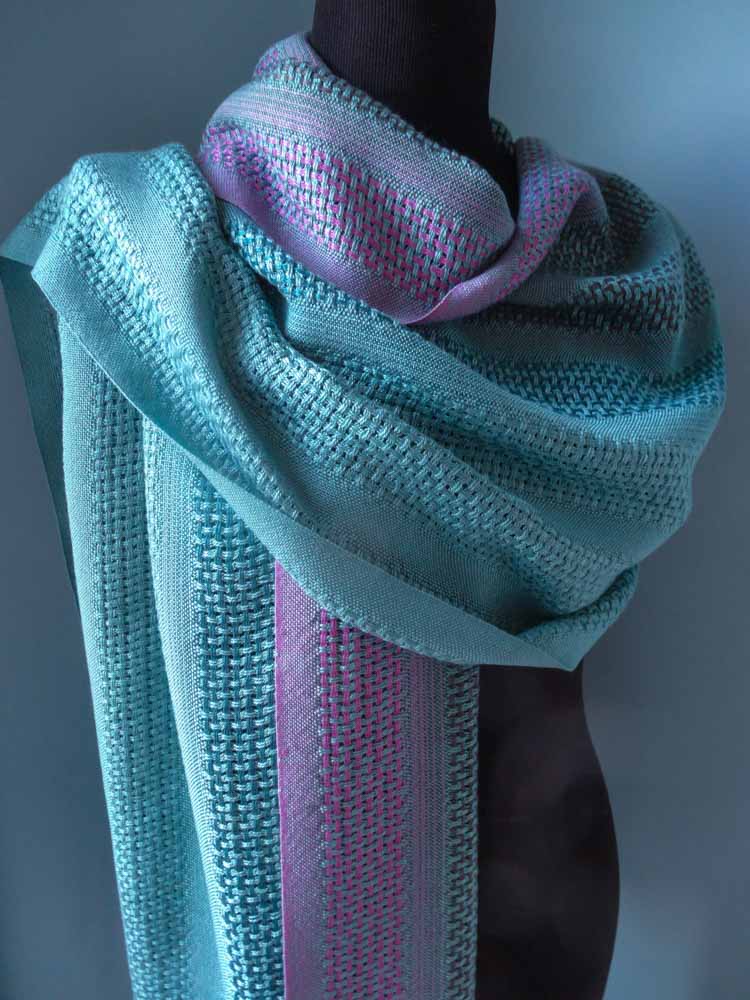
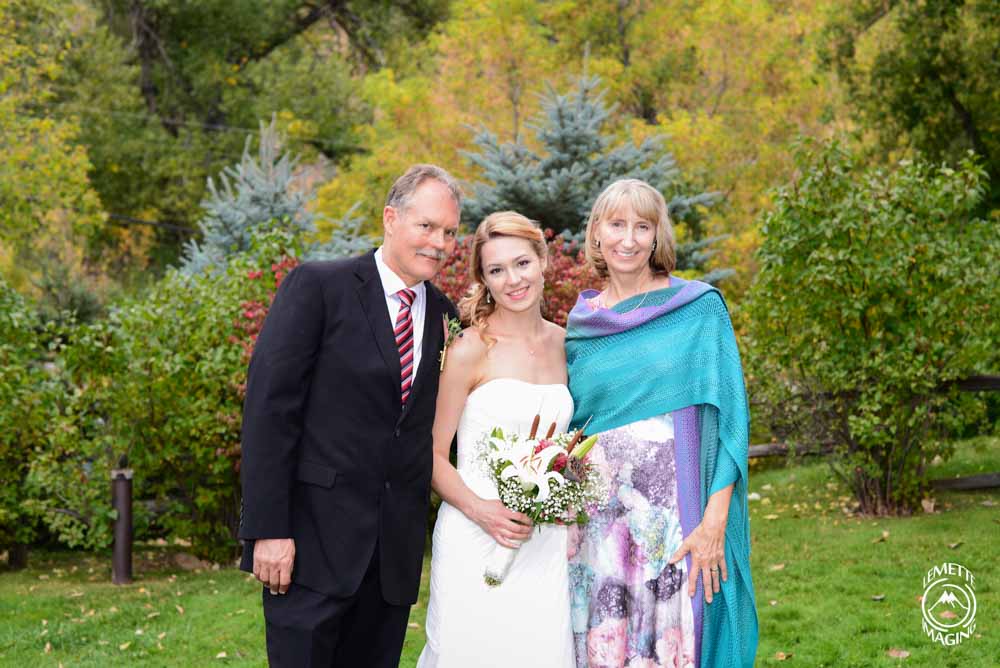
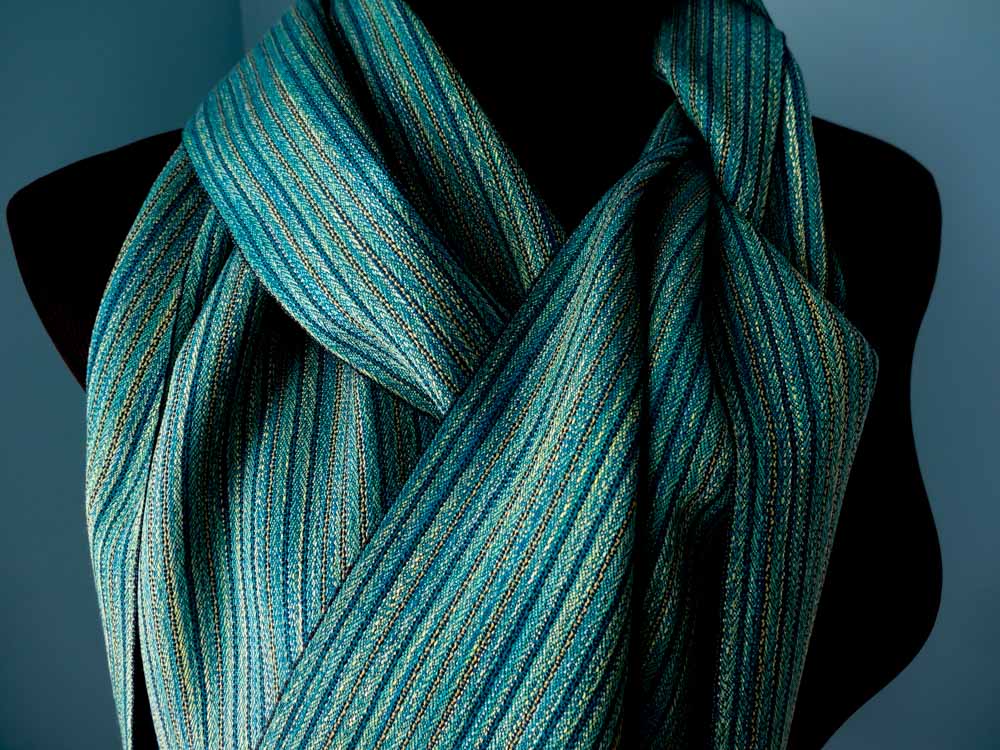
Next... A Shawl for the Mother of the Bride

This shawl was a little more of a challenge.  Or at least it caused me a little more angst.  Mostly because I only had a photograph of Jamie's dress.  So after exchanging photos and yarn samples, I finally decided on a huck lace shawl in 2 shades of teal, charcoal gray and mauve in the warp.

​The huck lace pattern I used was adapted from a Handwoven scarf pattern (March/April 2008, p. 30–32).  I widened the draft to 22" and I used 4 colors in the warp.  I "ombred" the colors at each color change so there were no harsh stripes in the warp.
Picture
Picture
Sticks padding the loose warp areas at the back of the loom
Tip!
This draft has huck lace stripes alternating with plain weave stripes.  Because the takeup was much less in the lace areas than the plain weave areas, it did not take long for the warp to get loose in the lace areas, and tension was becoming a problem.  I solved that by doing 2 things:
  1. After 20-25" I "wove" a stick under the loose area at the back of the loom and tied it to the back beam.  Every 20-25" I added another stick.
  2. I cut off after the first shawl and retied for the second shawl.

​Again, I wove 2 shawls: the first I wove with the greyed teal for the mother of the bride., and the second with the dark teal to sell.
Picture
Mother of the Bride's shawl, woven with a greyed teal weft
Picture
The bride and her parents, Jamie and David
Picture
Extra Shawl, woven with a dark teal weft

Finally... Pocket Squares for the Groom and the Dads

I really wanted to weave a pocket square for my son, but I wasn't sure if I would have time and I wasn't sure exactly what would work.  After sampling quite a bit with 60/2 silk, I settled on a very simple plain weave square with some burgundy stripes on 2 sides and hemmed on 4 sides.  I made 4 squares: 1 for Ryan, 1 for each of the Dads and 1 extra.
  • 60/2 silk in natural and burgundy
  • 632 ends, sett at 40 epi , 15.8" wide on loom
  • woven in plain weave at 40 ppi
  • After hemming on all 4 sides the squares measured about 13.5" square
  • Weaving with the silk was a breeze
  • Hemming and mitering the corners was definitely the hardest part for me
Picture
Pocket squares

And What Did I Wear?

Picture
My scarf

​I don't often wear my own handwovens - other than a couple of beloved, very beat up scarves and shawls.  I was dressed in a simple sweater, silk pant and silk top and so I didn't think a shawl would work for me.  But I knew I would get cold.  So I did wear one of my silk scarves, woven with 60/2 silk in a pretty twill in my favorite color: teal.

6 Comments

Treadling for Dummies: Walking the Treadles

8/8/2016

13 Comments

 
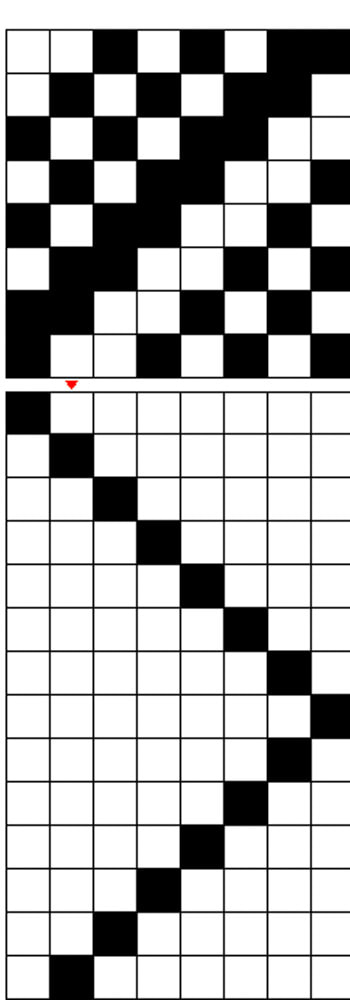
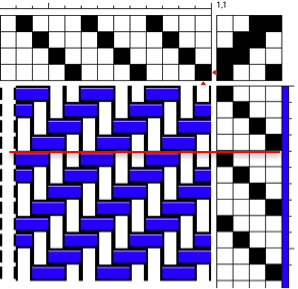
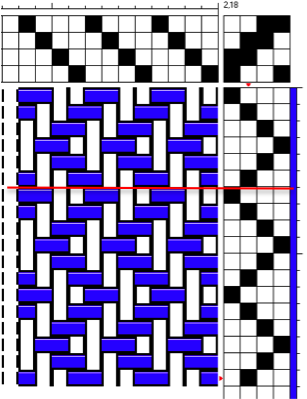
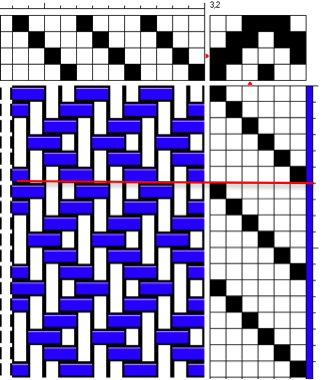
When we first learn to weave we usually are taught to tie up our treadles from left to right just as they are written in a typical draft.
Picture
​

​​In a simple example, to weave straight twill you would need to set up 4 treadles as indicated below:
  • Treadle 1 lifts harnesses 1 & 2
  • Treadle 2 lifts harnesses 2 & 3
  • Treadle 3 lifts harnesses 3 & 4
  • Treadle 4 lifts harnesses 4 & 1
Traditionally, you would set up the treadles from left to right as they are written in the tieup:
 
           Treadle           1        2     Center      3       4
            Lifting           12      23                34     41
            Foot                --Left--                   --Right--              
 
To weave this pattern, you would use your left foot to weave treadle 1 followed by treadle 2, then switch to your right foot to weave treadles 3 followed by treadle 4.

Walking the treadles is a much more comfortable, ergonomic alternative to this.  The treadles still lift the same harnesses in the same order in order to get the same pattern.  The difference is that the treadles under the loom are not tied up from left to right.  They are tied up so that you can “walk” the treadles left-right-left-right from the center out.  Your odd numbered treadles will be on the left, even on the right.  ​
For the straight twill shown above the treadles would be tied up as indicated in the draft above, but they would be in a different order under the loom as follows:
 
           Treadle           3        1     Center     2       4
            Lifting           34      12               23     41
            Foot                --Left--                   --Right--               
 
This allows you to comfortably rock from left to right as you throw the shuttle from left to right. ​​
Picture
Note the rubber bands on the center treadles.
My personal preference is to throw the shuttle towards the foot that is treadling, so I treadle 1(left foot is down) and throw to the left, treadle 2 (right foot is down) and throw to the right, treadle 3 and throw to the left, treadle 4 and throw to the right.  Then I move both feet back to the center (where I have rubber bands to help me find the center without peeking).
Tip!

Advantages to walking the treadles:
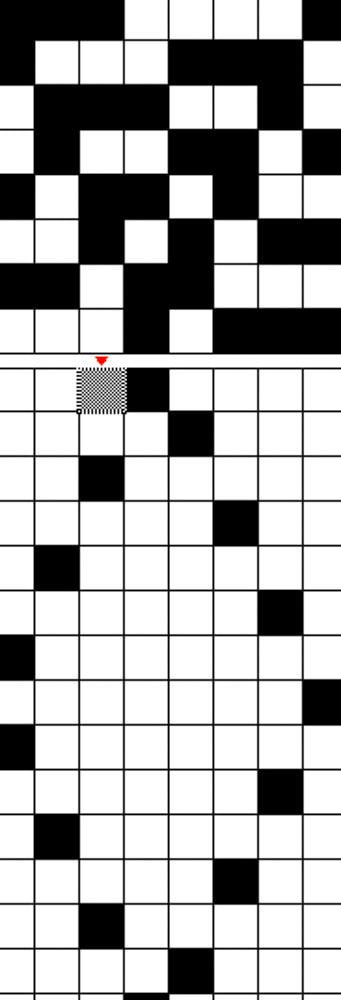
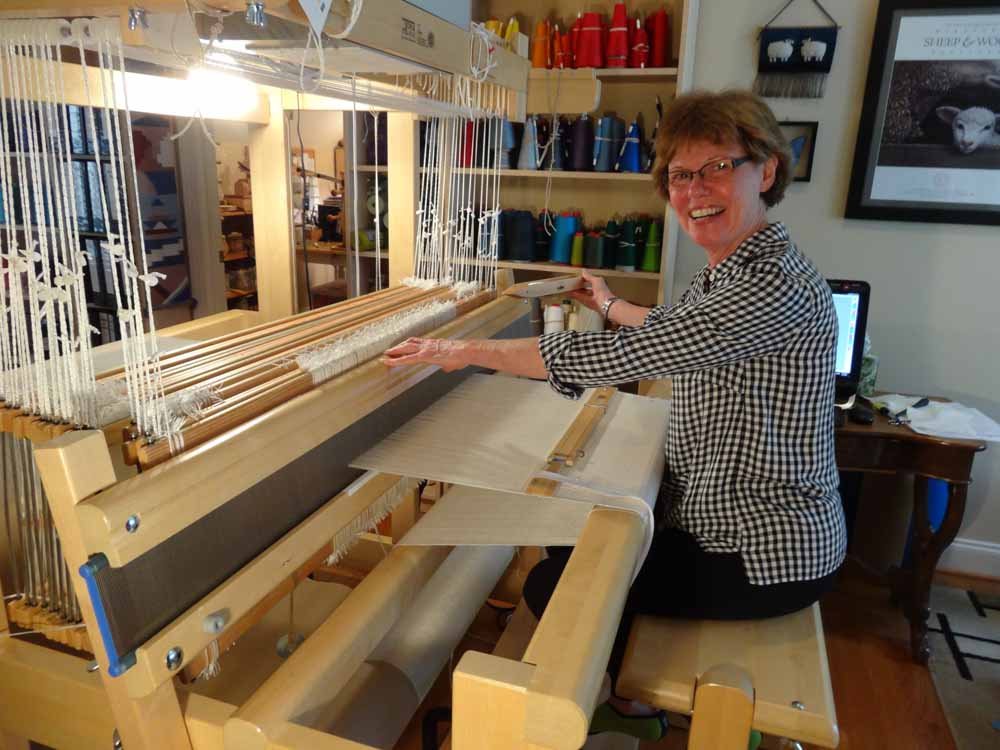
  • You develop a nice rocking motion that is very comfortable,
  • It allows you to improve your rhythm and speed up your weaving
  • The fact that your shuttle is always heading towards the depressed foot helps “cue you in” if you accidentally get off pattern.  If suddenly your shuttle is going left and your right foot is down, it means you have made a treadling error.

Tips for not losing your place and other notes:
  • After pressing a treadle, I keep my foot there (lightly) until ready to use that foot again.  In other words I never move my foot completely off a treadle so I always know what I did last.
  • If I am doing a sequence that starts over at treadles 1&2 (center treadles), I move my feet back to center together.
  • I use heavy rubber bands to mark my center treadles and other significant treadles to help my feet find the correct treadles without peeking. 
Tips!
  • For example, if I am doing a straight twill with 4 treadles, I would put rubber bands on just the center treadles (1&2). 
  • If I have a twill pattern that I am walking with 6 treadles like the point twill pattern below, I would put rubber bands on the center treadles and the outer treadles (5&6).  This helps me easily find the center treadles when I am returning to center but also helps me distinguish between 3 vs 5 and 4 vs 6 so that I don’t accidently press a treadle in error (because 3&4 are “naked” and 5&6 have bands).
  • Note: I do NOT recommend leaving “space” (untied) treadles between your treadles.  I think it disturbs the rhythm of weaving and the farther from center your treadle is, the more tiring the weaving will be.  SO keep them as close to the center of your body as possible.

A harder example:
 
​Suppose you have a simple point twill treadling.  Normally the tieup would be presented as shown with 4 treadles.  One full repeat consists of the six shots or picks shown above the red line in the draft to the right:
  • Treadle 1 lifts harnesses 1 & 2
  • Treadle 2 lifts harnesses 2 & 3
  • Treadle 3 lifts harnesses 3 & 4
  • Treadle 4 lifts harnesses 1 & 4
  • Treadle 3 lifts harnesses 3 & 4
  • Treadle 2 lifts harnesses 2 & 3
You could set those 4 treadles up in the traditional left to right configuration or walking style.  The problem with this is that anytime you are treadling 2 or 3, you need to remember whether you were going toward treadle 4 or returning from treadle 4.  The possibility of confusion is high.
​

Picture
Everything above the red line is one repeat
6 treadle walking option​:
​

But we can take it one step farther (assuming you have 6 treadles) and assign each of the 6 picks in the repeat their own treadle. Set those 6 treadles up walking style and you will find this treadling pattern easier to weave with no confusion.
  • Treadle 1 lifts harnesses 1 & 2
  • Treadle 2 lifts harnesses 2 & 3
  • Treadle 3 lifts harnesses 3 & 4
  • Treadle 4 lifts harnesses 4 & 1
  • Treadle 5 lifts harnesses 3 & 4
  • Treadle 6 lifts harnesses 2 & 3 
Picture
Everything above the red line is one repeat and weaves the same cloth as the repeat in the draft above.

​​Set the treadles up for walking as follows:
     
    Treadle      5          3        1      Center     2       4        6
    Lifting        34       34      12                23     41     23
    Foot             -----Left-----                         -----Right-----      

Rubber bands on the center treadles help your feet find the center at the end of the sequence. Bands on 5 & 6 also help your feet with the "no peek" treadling.   
 ​
Picture

13 Comments

Treadling for Dummies: A Series of Tips / Part 1

7/15/2016

0 Comments

 
​My Treadle Minder
​When weaving my Bronson Weave tieup, my left foot travels from treadles 1 to 2 and back, while my right foot travels down the pattern treadles 3,4,5,6,7,8,9 and 10. My feet are always treadling left right, left right. But my left foot is going 1-2-1-2-1-2 while my right is going 3-4-5-6-7-8-9-10. For my brain this is a little like patting my head and rubbing my tummy, and I have always had the tendency for my left foot to "wander" to treadle 3.
Tip!
​SO... I am now using my MS 150 biking award between treadles 2 and 3 to remind my left foot not to stray. It's nice to know that award is good for something! If you don't happen to have one, I guess anything narrow and vertical would do.
Picture
Picture
​This would work well for any pattern where you left foot is working one set of treadles independently from your right.  For example, I use the left 2 treadles for tie down treadles and the treadles to the right for pattern treadles in summer and winter.
0 Comments

Tales of Bad Selvedges: Part 2  (Tencel Likes to be Wet)

5/16/2016

4 Comments

 
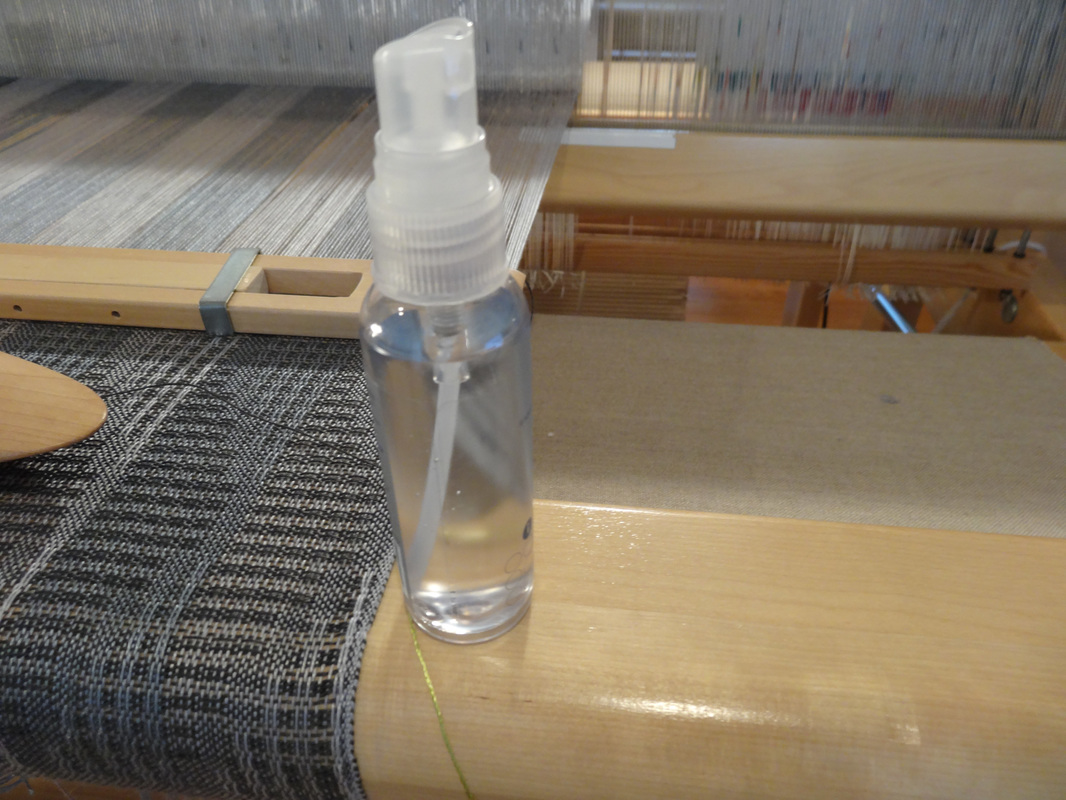
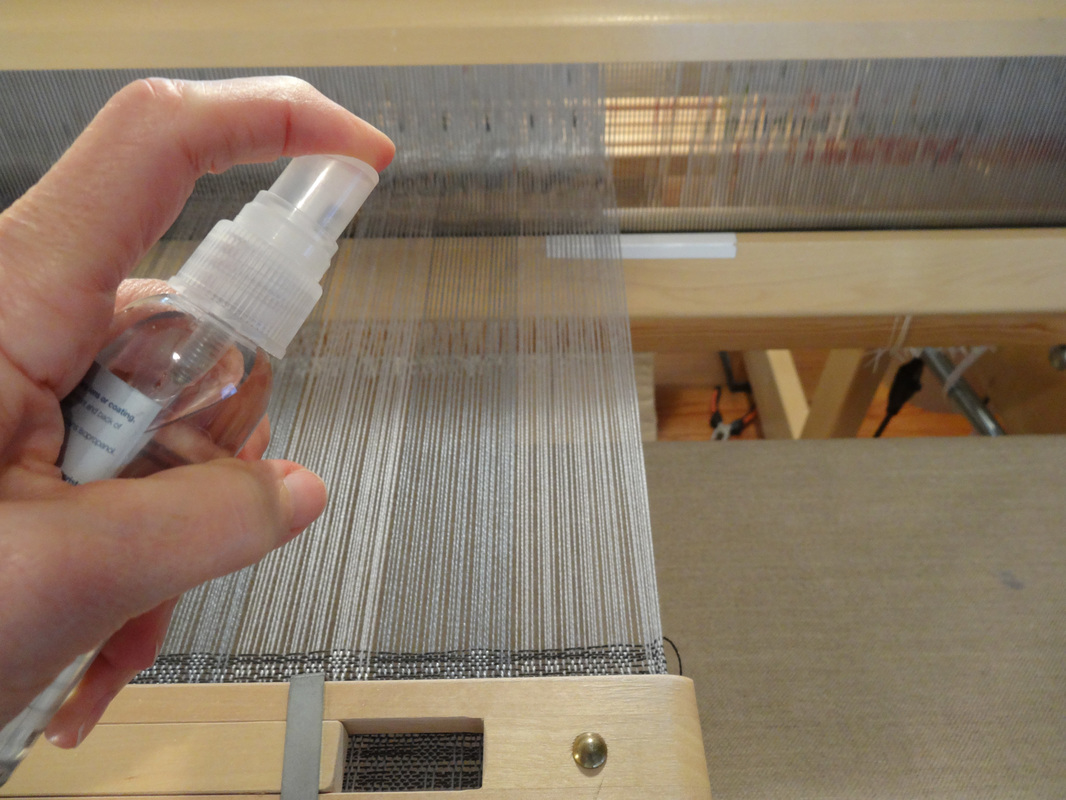
​Consider this an Addendum to yesterday's post about my attempts to weave off 6 shawls for my son's wedding attendants.
 
There was an additional adjustment to my weaving that I made midway through Shawl #1.  Once I realized that the tencel was going to be "sensitive" and prone to breaking, I began misting the warp lightly with water every time I advanced the warp.
 
The tencel experts of the weaving world have told me that tencel like to be wet and that keeping the warp damp (especially the selvedge threads) helps to strengthen the fiber.  This can be especially helpful if you have to unweave tencel!
​


​Tip!
Every time I advanced the warp I spritzed the warp lightly:
  • between the fell of the cloth and the reed
  • behind the reed
  • and between the heddles and the back beam
Picture
I use a little spray bottle with a fine spray so I don't soak the warp
Picture

4 Comments
<<Previous

    Pattie Lamb

    I have been happily weaving since my son was born in 1988.

    All pictures on my blog are "zoomable" - just click on them to enlarge.

    Archives

    June 2023
    March 2023
    June 2022
    November 2020
    October 2020
    February 2020
    October 2019
    June 2019
    May 2019
    June 2018
    July 2017
    June 2017
    May 2017
    April 2017
    February 2017
    January 2017
    August 2016
    July 2016
    May 2016
    February 2016
    February 2015
    January 2015
    October 2014
    September 2014

    Categories

    All
    Artificial Intelligence
    Baby Wraps
    Blankets
    Block Twill
    Block Weave
    Block Weaves
    Cat's PJs
    Challenges
    Charity
    ChatGBT
    Classes
    Commissions
    Deflected Doubleweave
    Design
    Doubleweave
    Dyeing
    Facebook Challenge
    Felting
    Finishing
    Fringing
    Hemstitching
    John C Campbell
    Knitting
    Knots
    Lace Weaves
    Leftovers
    Life History-Day 1
    Life History-Day 2
    Life History-Day 3
    Life History-Day 4
    Life History-Day 5
    Life History-Day 6
    Life History-Day 7
    Life History-Day 8
    Life History-Day 9
    Life History-Final
    Life History Of A Scarf
    More Than Pink
    Paper Quills
    Plain Weave
    Ply Split
    Process
    Rugs
    Runners
    Scarves
    Selvedges
    Shawls
    Storyboard
    Study Group
    Tencel
    Tie-ups
    Tip Of The Month
    Tips
    Tools
    Towels
    Travel
    Treadling For Dummies
    Turned Twill
    Twill
    Videos
    Walking Pink
    Warping
    Weaving
    Weaving Pink
    Weaving Tips
    Wedding
    Yarn Wraps

    RSS Feed

         HOME        //      SHOP      //       BLOG       //        EVENTS       //       GALLERY     //      ABOUT       //      CONTACT

  • Home
  • SHOP
    • Scarves
    • Shawls & Wraps
    • Wool Scarves & Shawls
    • Blazing Shuttles
    • Throws & Baby Blankets
    • For the Home
    • Odds & Ends
    • Shop All Handwovens
    • Schacht Equipment
    • Gift Cards
  • Blog
  • Events
  • Gallery
    • Scarves & Shawls
    • Baby
    • For the Home
    • The Wedding
    • Komen
  • About
    • Storyboard