Lamb...on the Loom
  • Home
  • SHOP
    • Scarves
    • Shawls & Wraps
    • Throws & Baby Blankets
    • Bags & Purses
    • For the Home
    • Odds & Ends
    • Shop All Handwovens
    • Schacht Equipment
  • Blog
  • Events
  • Gallery
    • Scarves
    • More Scarves
    • Shawls
    • Baby
    • For the Home
    • Just for Fun
    • The Wedding
    • Komen
    • Baby Wraps
  • About
    • Storyboard

​A Visit to John C Campbell Folk School

8/27/2016

0 Comments

 
Picture

​Earlier this month, my friends Jackie, Sue and I ventured to John C Campbell for our first ever adventure there.  We had signed up months ago for a class on Deflected Doubleweave (“Masters of Deflection” with Elisabeth Hill).  And a wonderful adventure it was!
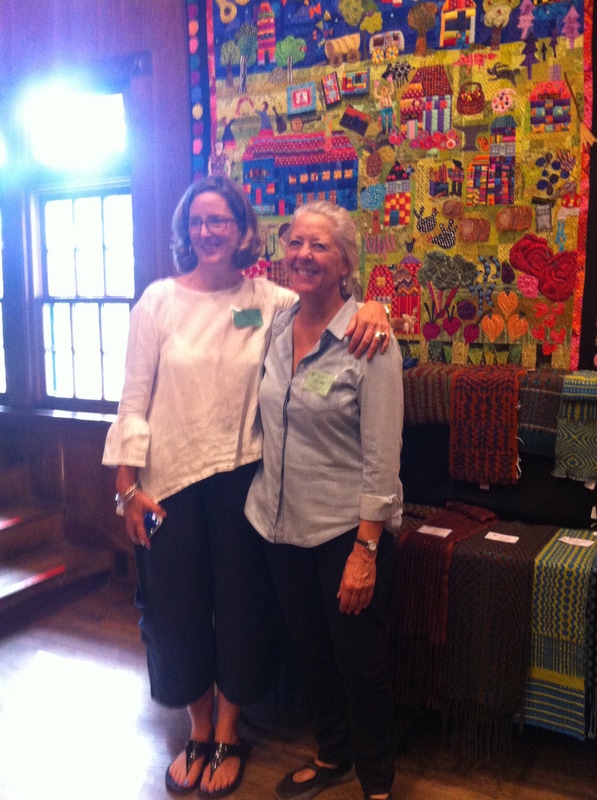
We met in Cary so we could drive to the mountains together.  Sue came in from Connecticut (she had planned to fly, but had to drive because her flight was cancelled) and Jackie came up from Pinehurst).  We packed up the car and headed out on our road trip with no real idea of what to expect.
​
The drive took us about 6 hours, and the ride up the mountains was beautiful.  Finally we arrived in Brasstown, NC (population 46) which is situated in the far west corner of the state right around the corner from Clay’s Corner, home of the infamous New Year’s Eve Possum Drop (you have heard of the Possum Drop, right?)
Picture

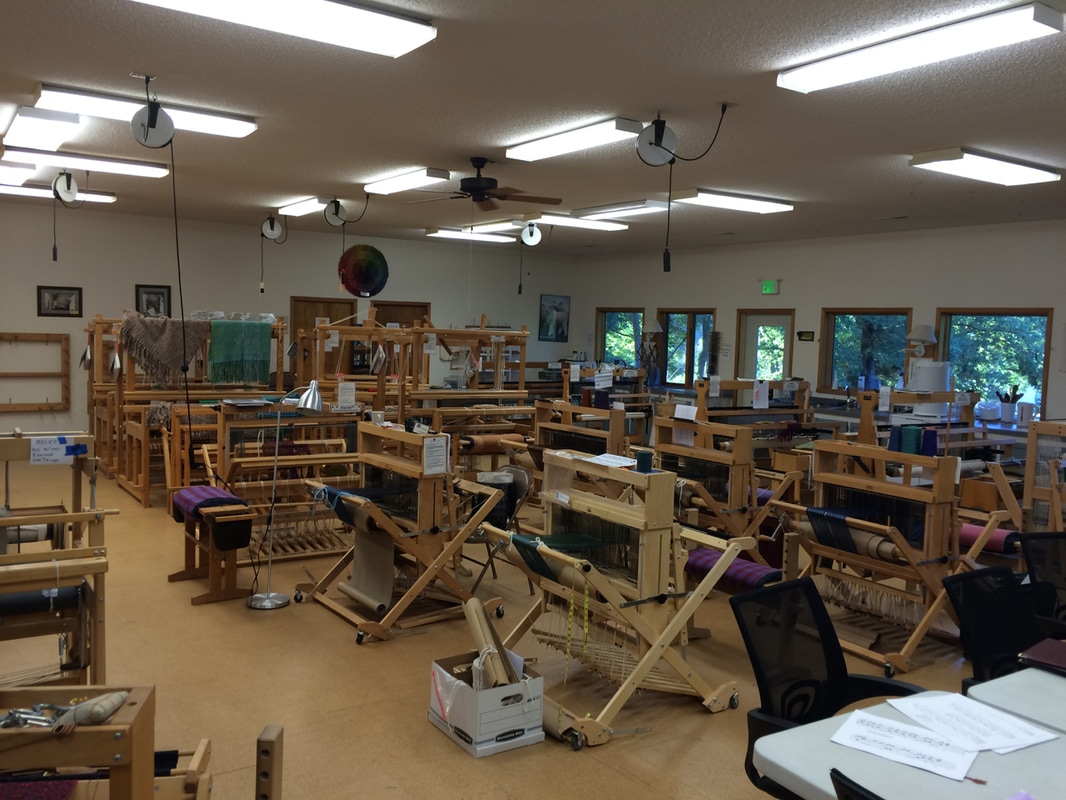
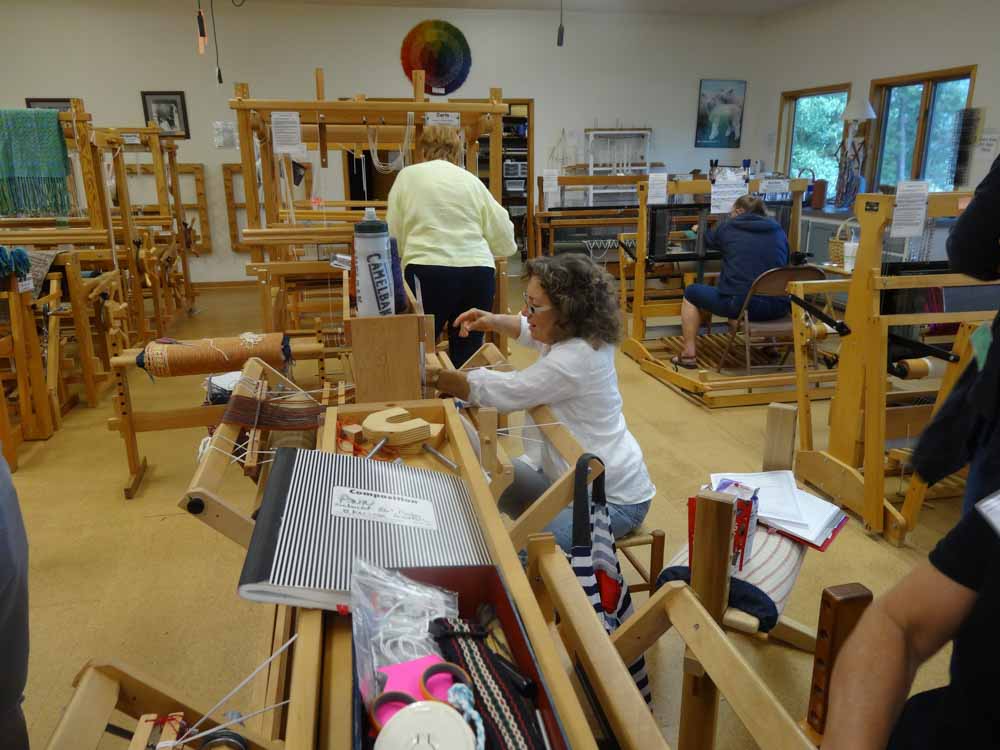
​The Folk School was founded in 1925.  It offers year-round 5-day and weekend classes on a large variety of topics including music, arts, crafts, and some unexpected subjects.  During the week that we were there, 140 people attended classes in weaving, nuno felting, enameling, jewelry making, Italian cooking, writing, mandolin playing, wood turning, wooden mantle carving, blacksmithing, watercolors, chair caning, woodworking, and book arts.
Picture
Keith House, the administrative building
Picture
View off the back porch of Keith House
Picture
No explanation needed
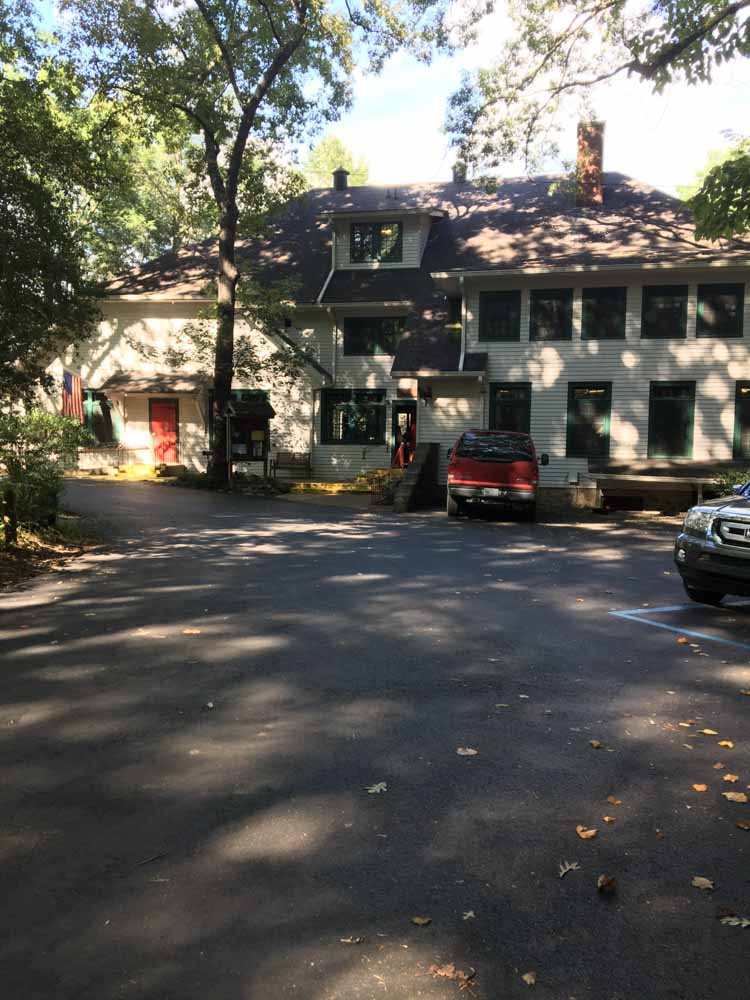
Classes actually began on Friday evening after registration and dinner in the dining room.  After that we had daily class for four days each morning and afternoon with optional sessions in the evening after dinner. We were treated to stories and music at Morning Song each day before breakfast.  All meals were served in the dining room.  There were many optional activities at all times of the day including morning walks, tours of the campus and studios, chair massages, clogging demonstrations, contra dances, and the list goes on. ​​


​The classes were held in separate buildings scattered around the campus.  The weaving building was very large and very well equipped.  We had a class of 12, all weaving on 8 harness looms, and there were many looms that were not used.  The yarn “closet” was the size of a small apartment and their weaving library is quite enviable.  I don’t think anyone wanted for a piece of equipment that they did not have, and I did not hear any complaints about the looms – Baby Wolfs, Mighty Wolfs, Glimakras, Louets, all in good condition.
Picture
The Weaving Building
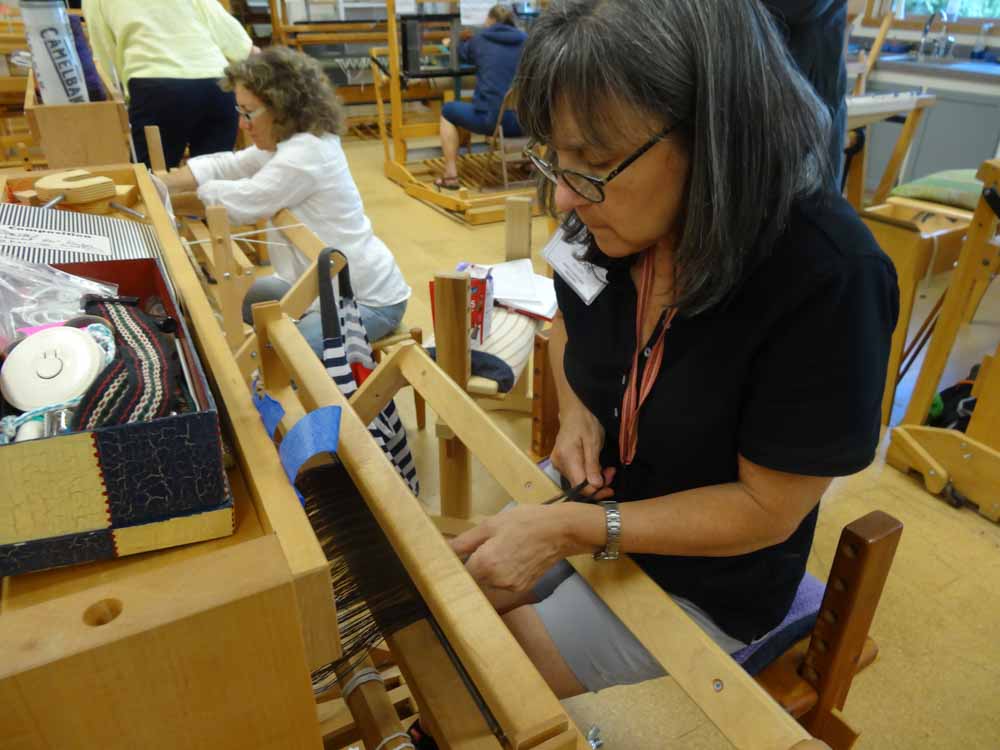
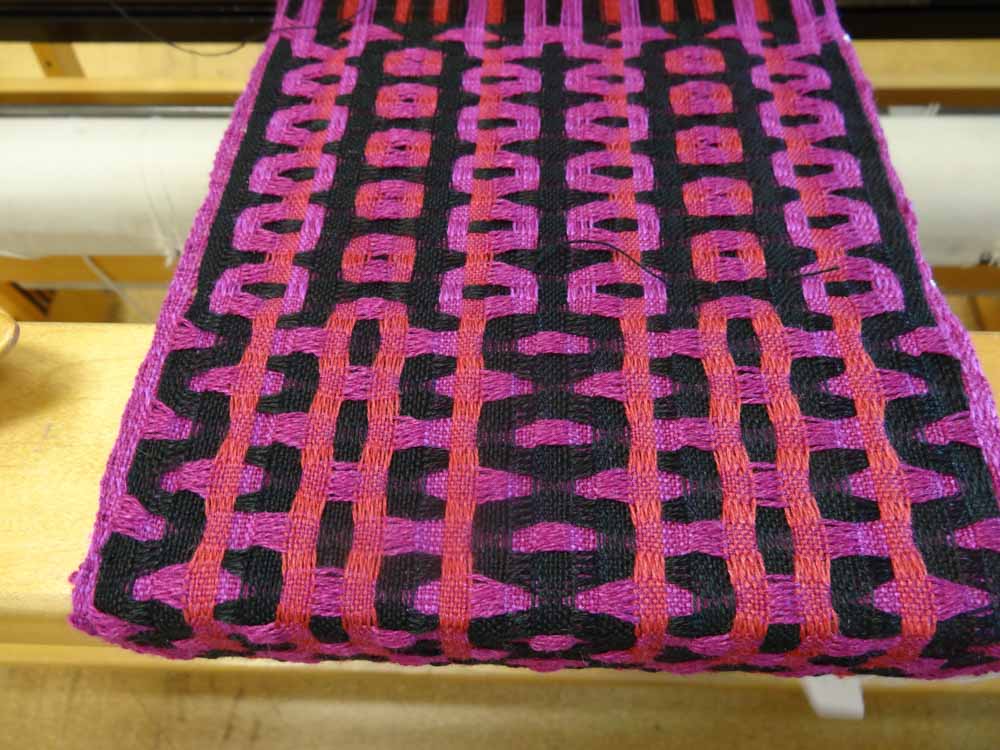
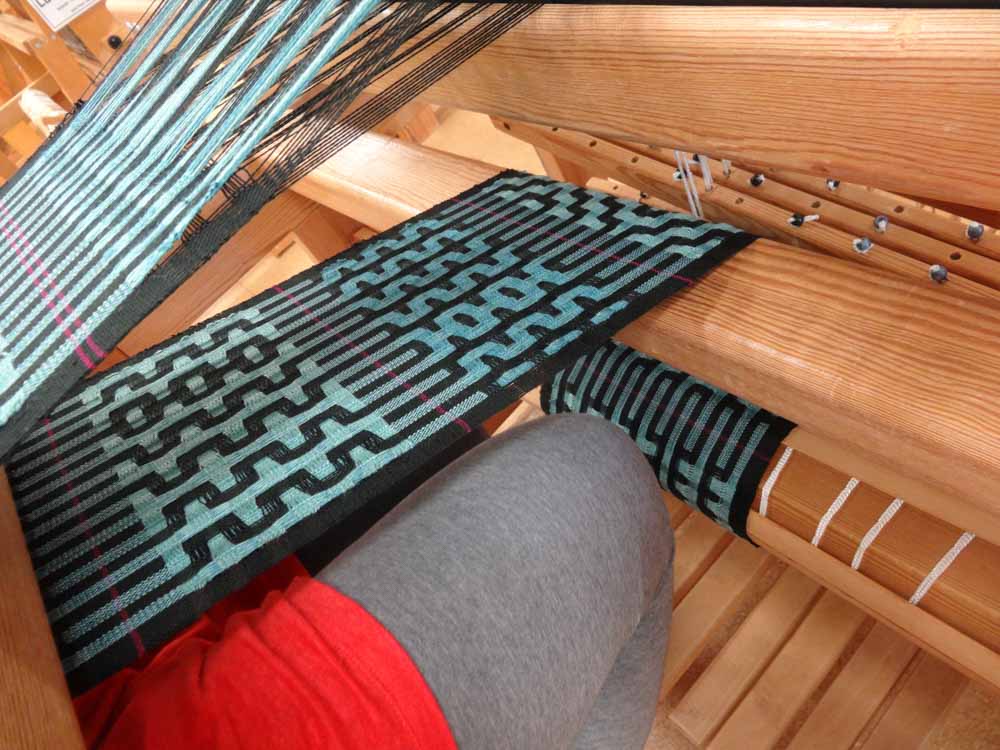
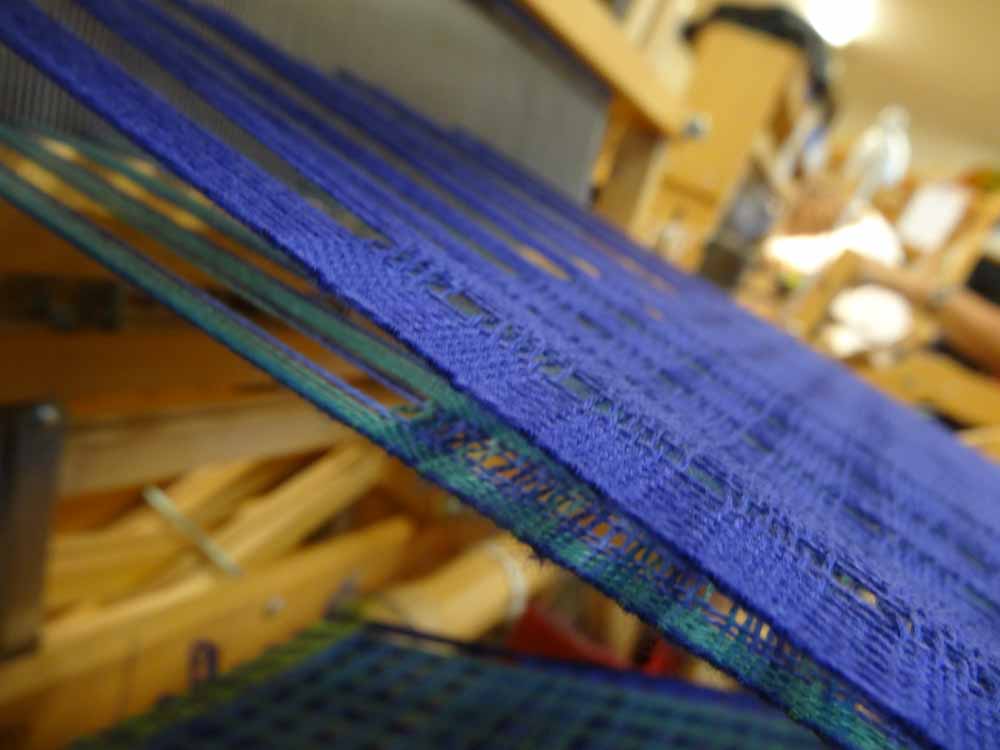
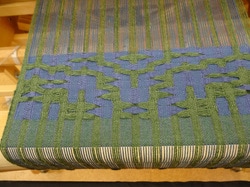
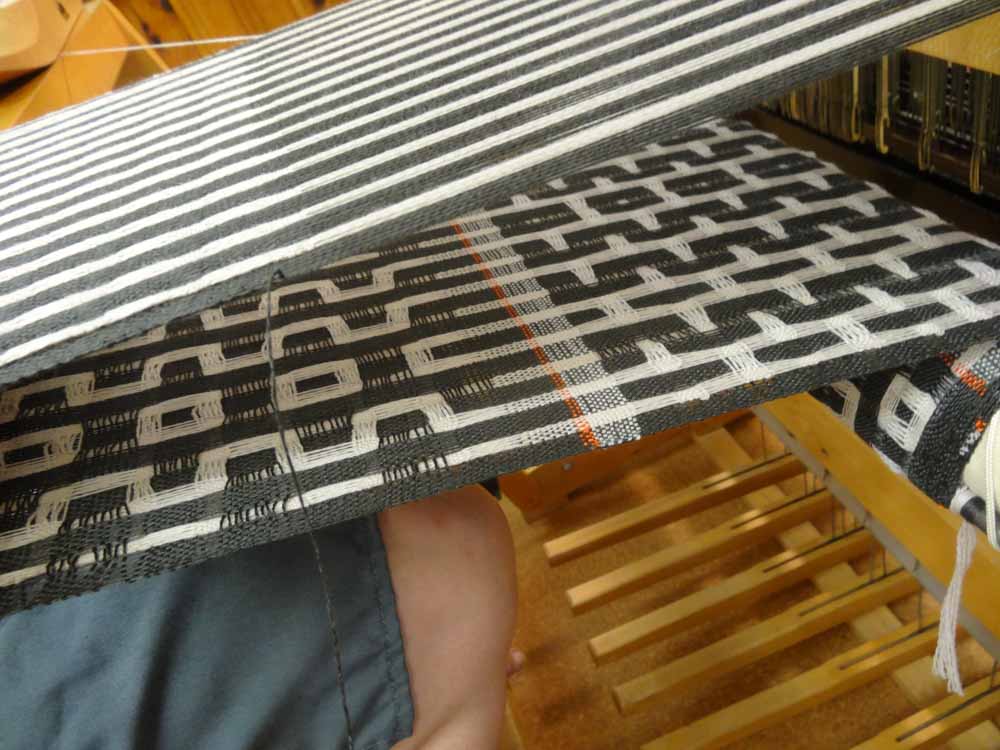
The best part, however, was the class itself.  None of us knew anything about deflected doubleweave.  Lisa (Elisabeth) Hill was a wonderful, generous instructor.  She came with 2 tables full of yarn for us to use, pre-wound warps for anyone that chose to use them.  We used gorgeous tencel, silk and wool, alpaca and silk, and merino yarns to warp our looms with beautiful 6-yard long warps that were 10” wide. ​​
Picture
The classroom
Picture
Jackie, hard at work
Picture
Sue, warping her loom
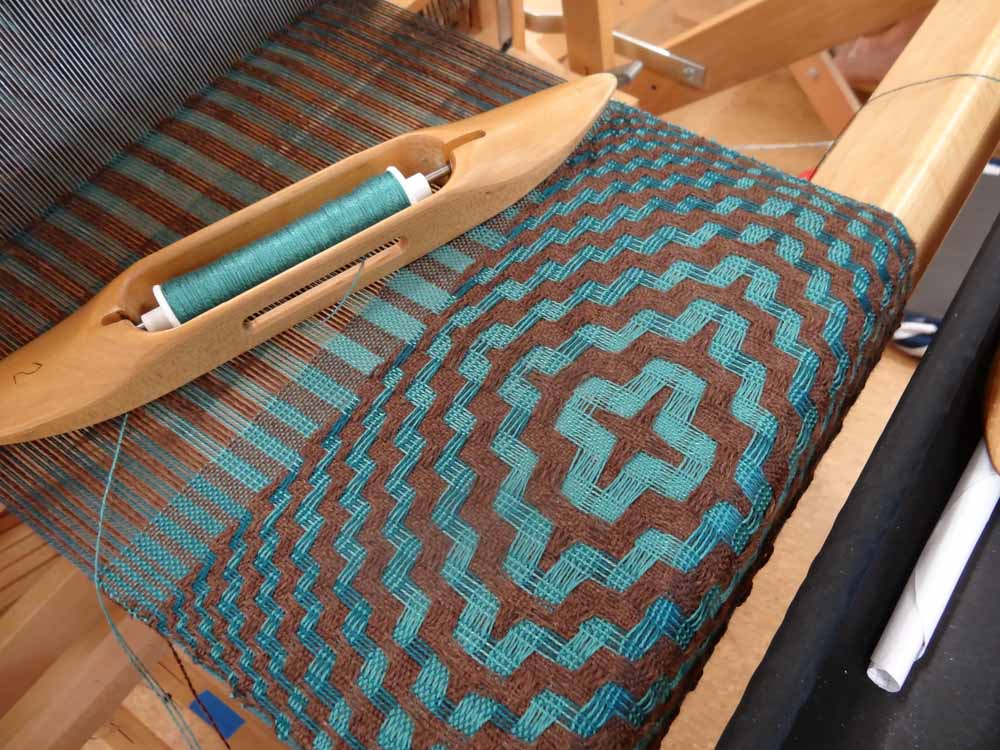
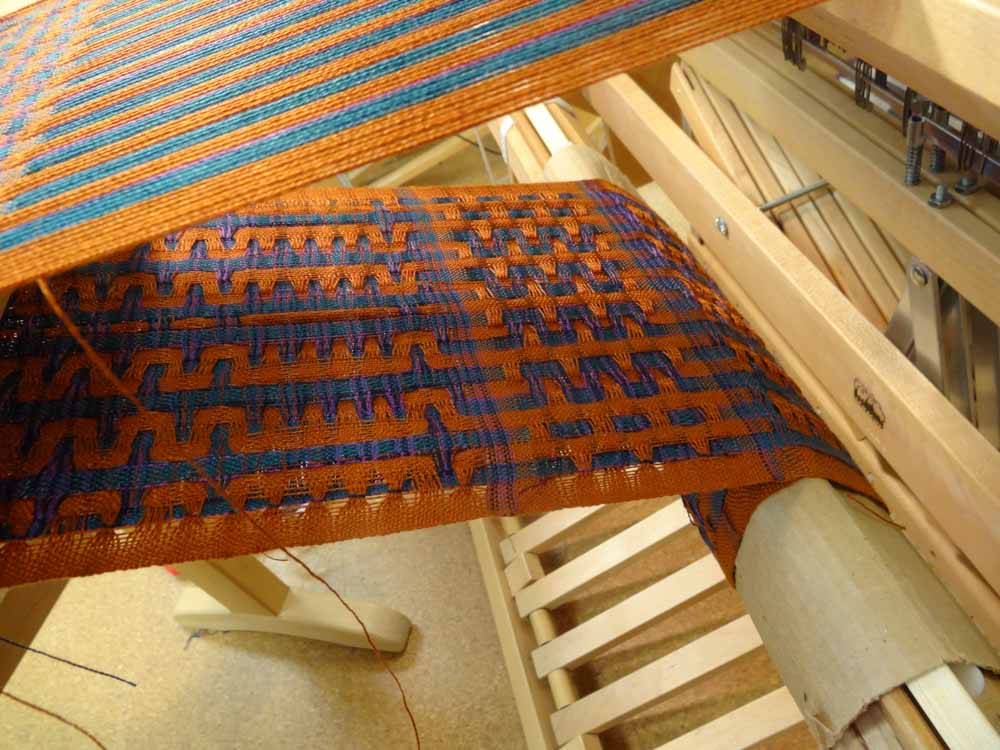
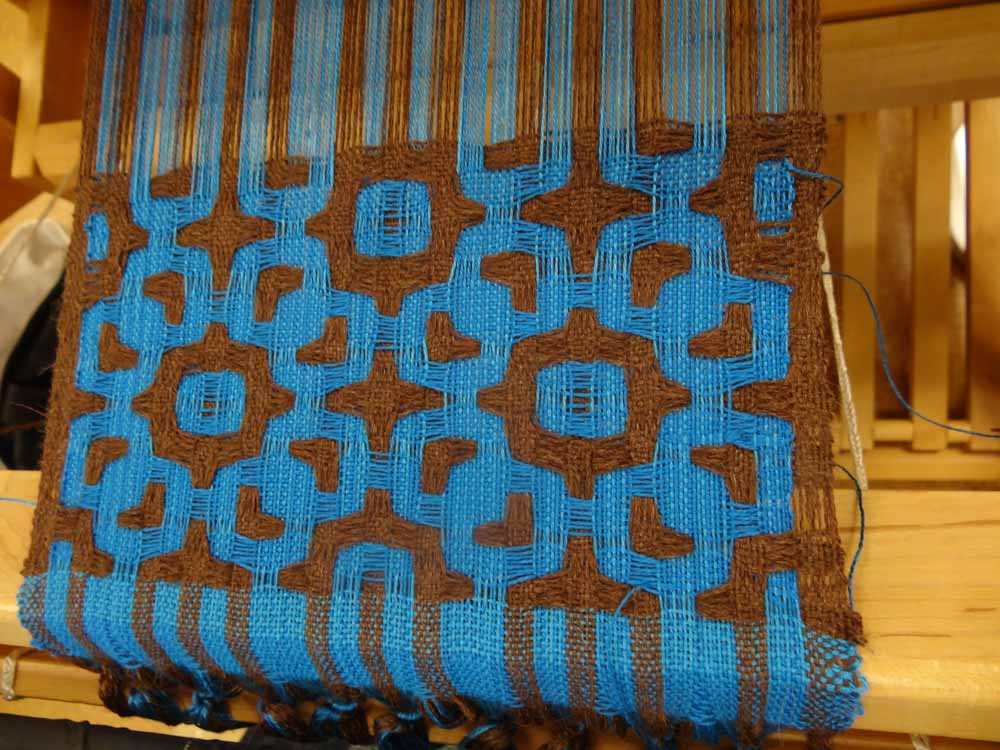
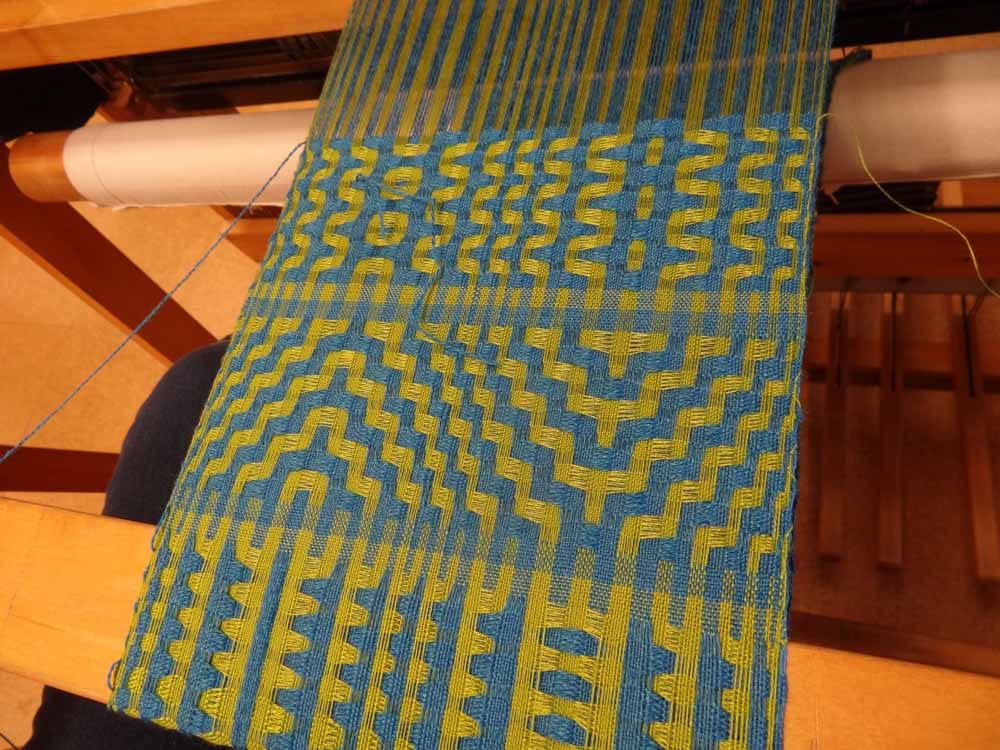
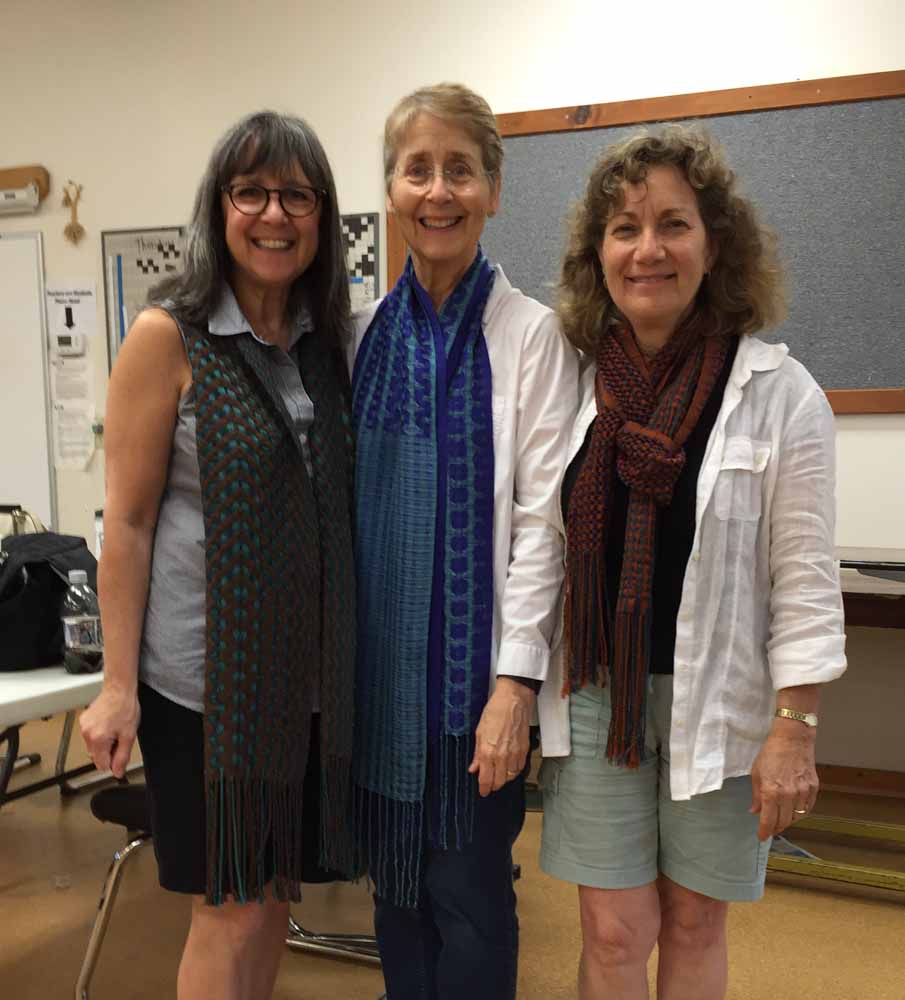
We had a 2 part mission: weave a sampler and weave a scarf! Our first assignment was to weave a nice long sampler using 2 different treadlings and a total of about 16 different treadlings.  We cut the samplers from the loom and washed and dried them so we could which decide which treadlings to use for a scarf.  ​
Picture
Picture
Picture
Picture
Picture
Picture
Picture
Picture
Picture

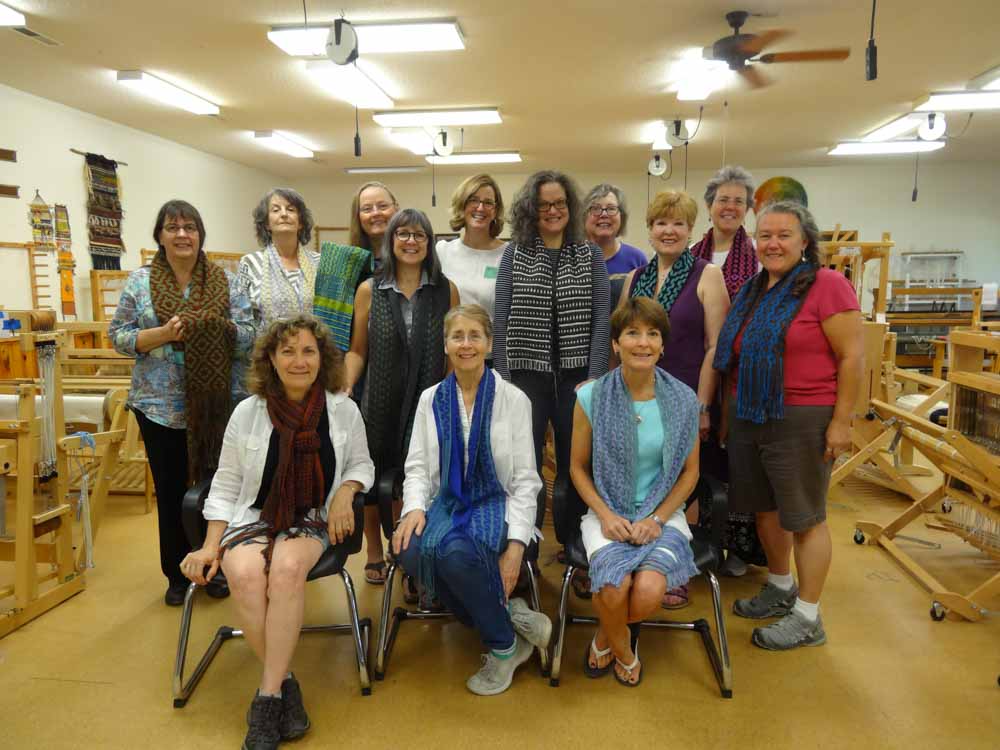
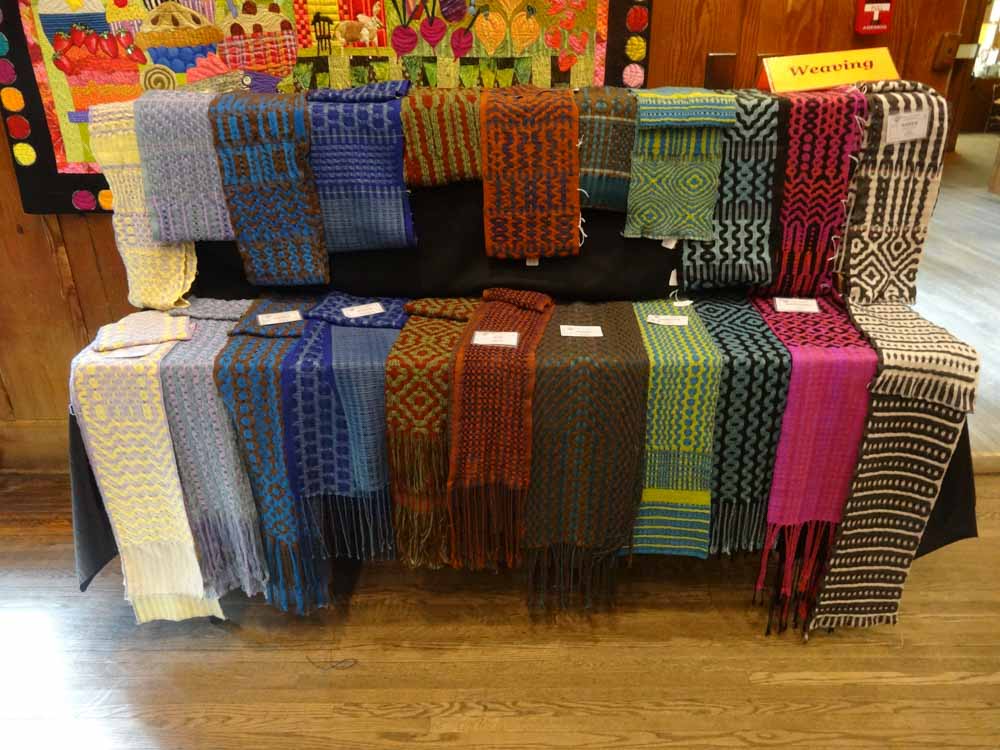
​​Decisions made, we tied back on and wove our scarves.  We had time to twist our fringe, wash and dry (or almost dry) our scarves so they would be ready for the big presentation on Friday before everyone went home.  Thirteen scarves, thirteen completely different threadings and colorways. (Number thirteen was woven by Lisa’s pretty wonderful assistant, Lillian).  Pretty amazing results!
Picture
Picture

That is not the end of the story. We spent a lot of time pouring over the many, many examples of deflected doubleweave Lisa brought with her, which included her beautiful shawls, scarves, runners, placemats, towels, clothing, bags, and samples.  They showed us so many ways to finish our pieces and how many different fibers would look woven in this technique.  She scattered short lectures throughout the weaving days so it gave us a break from the weaving without overwhelming us with technicalities. For those of us who finished our scarves early, Lisa helped us plan additional warps, and we spent the time measuring warps for those projects.  

​
​Meanwhile, Lisa's trusty assistant, Lillian was at our beck and call, helping us with any problems we had and keeping us all on schedule.
Picture
Lisa (on the left) and her assistant Lillian

Picture
Jackie, Pattie and Sue


​In a few short days, Lisa showed us just how magical this structure can be, and all three of us came away itching to try more.
​


​For more information on John C Campbell or to see their online catalog, go to their website,  
www.folkschool.org
 
To visit Elisabeth Hill’s website, 
​click here -->  www.plainweave.net

​

0 Comments

Treadling for Dummies: Walking the Treadles

8/8/2016

11 Comments

 
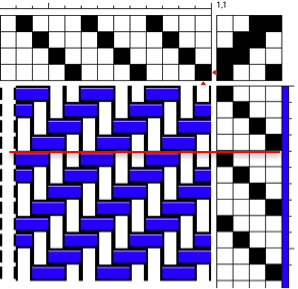
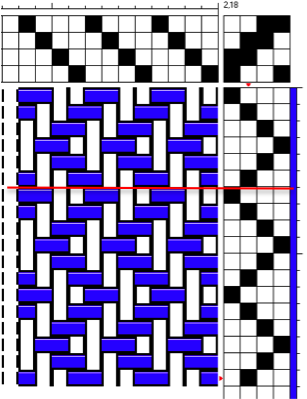
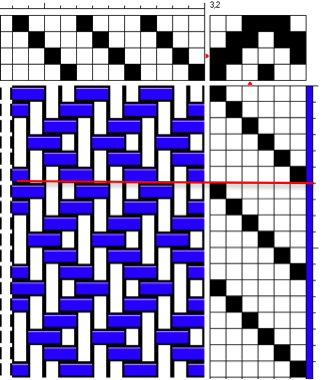
When we first learn to weave we usually are taught to tie up our treadles from left to right just as they are written in a typical draft.
Picture
​

​​In a simple example, to weave straight twill you would need to set up 4 treadles as indicated below:
  • Treadle 1 lifts harnesses 1 & 2
  • Treadle 2 lifts harnesses 2 & 3
  • Treadle 3 lifts harnesses 3 & 4
  • Treadle 4 lifts harnesses 4 & 1
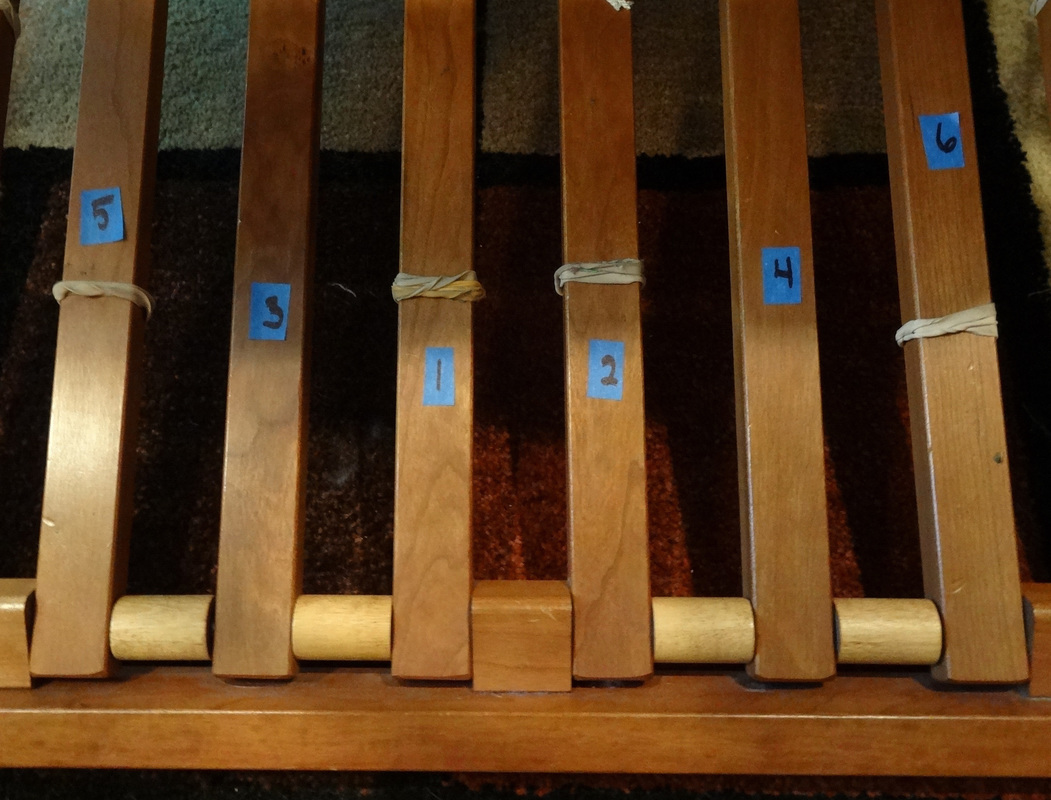
Traditionally, you would set up the treadles from left to right as they are written in the tieup:
 
           Treadle           1        2     Center      3       4
            Lifting           12      23                34     41
            Foot                --Left--                   --Right--              
 
To weave this pattern, you would use your left foot to weave treadle 1 followed by treadle 2, then switch to your right foot to weave treadles 3 followed by treadle 4.

Walking the treadles is a much more comfortable, ergonomic alternative to this.  The treadles still lift the same harnesses in the same order in order to get the same pattern.  The difference is that the treadles under the loom are not tied up from left to right.  They are tied up so that you can “walk” the treadles left-right-left-right from the center out.  Your odd numbered treadles will be on the left, even on the right.  ​
For the straight twill shown above the treadles would be tied up as indicated in the draft above, but they would be in a different order under the loom as follows:
 
           Treadle           3        1     Center     2       4
            Lifting           34      12               23     41
            Foot                --Left--                   --Right--               
 
This allows you to comfortably rock from left to right as you throw the shuttle from left to right. ​​
Picture
Note the rubber bands on the center treadles.
My personal preference is to throw the shuttle towards the foot that is treadling, so I treadle 1(left foot is down) and throw to the left, treadle 2 (right foot is down) and throw to the right, treadle 3 and throw to the left, treadle 4 and throw to the right.  Then I move both feet back to the center (where I have rubber bands to help me find the center without peeking).
Tip!

Advantages to walking the treadles:
  • You develop a nice rocking motion that is very comfortable,
  • It allows you to improve your rhythm and speed up your weaving
  • The fact that your shuttle is always heading towards the depressed foot helps “cue you in” if you accidentally get off pattern.  If suddenly your shuttle is going left and your right foot is down, it means you have made a treadling error.

Tips for not losing your place and other notes:
  • After pressing a treadle, I keep my foot there (lightly) until ready to use that foot again.  In other words I never move my foot completely off a treadle so I always know what I did last.
  • If I am doing a sequence that starts over at treadles 1&2 (center treadles), I move my feet back to center together.
  • I use heavy rubber bands to mark my center treadles and other significant treadles to help my feet find the correct treadles without peeking. 
Tips!
  • For example, if I am doing a straight twill with 4 treadles, I would put rubber bands on just the center treadles (1&2). 
  • If I have a twill pattern that I am walking with 6 treadles like the point twill pattern below, I would put rubber bands on the center treadles and the outer treadles (5&6).  This helps me easily find the center treadles when I am returning to center but also helps me distinguish between 3 vs 5 and 4 vs 6 so that I don’t accidently press a treadle in error (because 3&4 are “naked” and 5&6 have bands).
  • Note: I do NOT recommend leaving “space” (untied) treadles between your treadles.  I think it disturbs the rhythm of weaving and the farther from center your treadle is, the more tiring the weaving will be.  SO keep them as close to the center of your body as possible.

A harder example:
 
​Suppose you have a simple point twill treadling.  Normally the tieup would be presented as shown with 4 treadles.  One full repeat consists of the six shots or picks shown above the red line in the draft to the right:
  • Treadle 1 lifts harnesses 1 & 2
  • Treadle 2 lifts harnesses 2 & 3
  • Treadle 3 lifts harnesses 3 & 4
  • Treadle 4 lifts harnesses 1 & 4
  • Treadle 3 lifts harnesses 3 & 4
  • Treadle 2 lifts harnesses 2 & 3
You could set those 4 treadles up in the traditional left to right configuration or walking style.  The problem with this is that anytime you are treadling 2 or 3, you need to remember whether you were going toward treadle 4 or returning from treadle 4.  The possibility of confusion is high.
​

Picture
Everything above the red line is one repeat
6 treadle walking option​:
​

But we can take it one step farther (assuming you have 6 treadles) and assign each of the 6 picks in the repeat their own treadle. Set those 6 treadles up walking style and you will find this treadling pattern easier to weave with no confusion.
  • Treadle 1 lifts harnesses 1 & 2
  • Treadle 2 lifts harnesses 2 & 3
  • Treadle 3 lifts harnesses 3 & 4
  • Treadle 4 lifts harnesses 4 & 1
  • Treadle 5 lifts harnesses 3 & 4
  • Treadle 6 lifts harnesses 2 & 3 
Picture
Everything above the red line is one repeat and weaves the same cloth as the repeat in the draft above.

​​Set the treadles up for walking as follows:
     
    Treadle      5          3        1      Center     2       4        6
    Lifting        34       34      12                23     41     23
    Foot             -----Left-----                         -----Right-----      

Rubber bands on the center treadles help your feet find the center at the end of the sequence. Bands on 5 & 6 also help your feet with the "no peek" treadling.   
 ​
Picture

11 Comments

    Pattie Lamb

    I have been happily weaving since my son was born in 1988.

    All pictures on my blog are "zoomable" - just click on them to enlarge.

    Archives

    March 2023
    June 2022
    November 2020
    October 2020
    February 2020
    October 2019
    June 2019
    May 2019
    June 2018
    July 2017
    June 2017
    May 2017
    April 2017
    February 2017
    January 2017
    August 2016
    July 2016
    May 2016
    February 2016
    February 2015
    January 2015
    October 2014
    September 2014

    Categories

    All
    Artificial Intelligence
    Baby Wraps
    Blankets
    Block Twill
    Block Weave
    Block Weaves
    Cat's PJs
    Challenges
    Charity
    ChatGBT
    Classes
    Commissions
    Deflected Doubleweave
    Design
    Doubleweave
    Dyeing
    Facebook Challenge
    Felting
    Hemstitching
    John C Campbell
    Knitting
    Lace Weaves
    Leftovers
    Life History-Day 1
    Life History-Day 2
    Life History-Day 3
    Life History-Day 4
    Life History-Day 5
    Life History-Day 6
    Life History-Day 7
    Life History-Day 8
    Life History-Day 9
    Life History-Final
    Life History Of A Scarf
    More Than Pink
    Paper Quills
    Plain Weave
    Ply Split
    Process
    Rugs
    Runners
    Scarves
    Selvedges
    Shawls
    Storyboard
    Study Group
    Tencel
    Tie-ups
    Tip Of The Month
    Tips
    Tools
    Towels
    Travel
    Treadling For Dummies
    Turned Twill
    Twill
    Videos
    Walking Pink
    Warping
    Weaving
    Weaving Pink
    Weaving Tips
    Wedding
    Yarn Wraps

    RSS Feed

         HOME        //      SHOP      //       BLOG       //        EVENTS       //       GALLERY     //      ABOUT       //      CONTACT

  • Home
  • SHOP
    • Scarves
    • Shawls & Wraps
    • Throws & Baby Blankets
    • Bags & Purses
    • For the Home
    • Odds & Ends
    • Shop All Handwovens
    • Schacht Equipment
  • Blog
  • Events
  • Gallery
    • Scarves
    • More Scarves
    • Shawls
    • Baby
    • For the Home
    • Just for Fun
    • The Wedding
    • Komen
    • Baby Wraps
  • About
    • Storyboard