Lamb...on the Loom
  • Home
  • SHOP
    • Scarves
    • Shawls & Wraps
    • Throws & Baby Blankets
    • Bags & Purses
    • For the Home
    • Odds & Ends
    • Shop All Handwovens
    • Schacht Equipment
  • Blog
  • Events
  • Gallery
    • Scarves
    • More Scarves
    • Shawls
    • Baby
    • For the Home
    • Just for Fun
    • The Wedding
    • Komen
    • Baby Wraps
  • About
    • Storyboard

Treadling for Dummies: Walking the Treadles

8/8/2016

11 Comments

 
When we first learn to weave we usually are taught to tie up our treadles from left to right just as they are written in a typical draft.
Picture
​

​​In a simple example, to weave straight twill you would need to set up 4 treadles as indicated below:
  • Treadle 1 lifts harnesses 1 & 2
  • Treadle 2 lifts harnesses 2 & 3
  • Treadle 3 lifts harnesses 3 & 4
  • Treadle 4 lifts harnesses 4 & 1
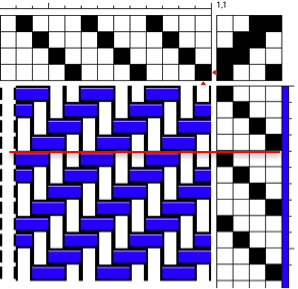
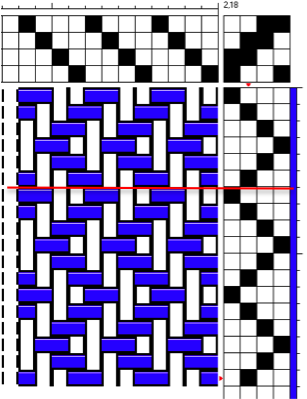
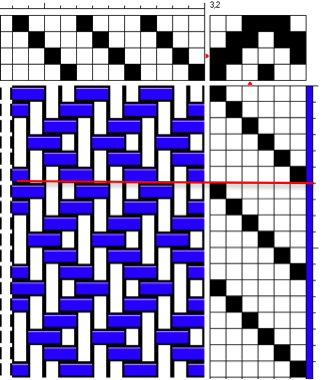
Traditionally, you would set up the treadles from left to right as they are written in the tieup:
 
           Treadle           1        2     Center      3       4
            Lifting           12      23                34     41
            Foot                --Left--                   --Right--              
 
To weave this pattern, you would use your left foot to weave treadle 1 followed by treadle 2, then switch to your right foot to weave treadles 3 followed by treadle 4.

Walking the treadles is a much more comfortable, ergonomic alternative to this.  The treadles still lift the same harnesses in the same order in order to get the same pattern.  The difference is that the treadles under the loom are not tied up from left to right.  They are tied up so that you can “walk” the treadles left-right-left-right from the center out.  Your odd numbered treadles will be on the left, even on the right.  ​
For the straight twill shown above the treadles would be tied up as indicated in the draft above, but they would be in a different order under the loom as follows:
 
           Treadle           3        1     Center     2       4
            Lifting           34      12               23     41
            Foot                --Left--                   --Right--               
 
This allows you to comfortably rock from left to right as you throw the shuttle from left to right. ​​
Picture
Note the rubber bands on the center treadles.
My personal preference is to throw the shuttle towards the foot that is treadling, so I treadle 1(left foot is down) and throw to the left, treadle 2 (right foot is down) and throw to the right, treadle 3 and throw to the left, treadle 4 and throw to the right.  Then I move both feet back to the center (where I have rubber bands to help me find the center without peeking).
Tip!

Advantages to walking the treadles:
  • You develop a nice rocking motion that is very comfortable,
  • It allows you to improve your rhythm and speed up your weaving
  • The fact that your shuttle is always heading towards the depressed foot helps “cue you in” if you accidentally get off pattern.  If suddenly your shuttle is going left and your right foot is down, it means you have made a treadling error.

Tips for not losing your place and other notes:
  • After pressing a treadle, I keep my foot there (lightly) until ready to use that foot again.  In other words I never move my foot completely off a treadle so I always know what I did last.
  • If I am doing a sequence that starts over at treadles 1&2 (center treadles), I move my feet back to center together.
  • I use heavy rubber bands to mark my center treadles and other significant treadles to help my feet find the correct treadles without peeking. 
Tips!
  • For example, if I am doing a straight twill with 4 treadles, I would put rubber bands on just the center treadles (1&2). 
  • If I have a twill pattern that I am walking with 6 treadles like the point twill pattern below, I would put rubber bands on the center treadles and the outer treadles (5&6).  This helps me easily find the center treadles when I am returning to center but also helps me distinguish between 3 vs 5 and 4 vs 6 so that I don’t accidently press a treadle in error (because 3&4 are “naked” and 5&6 have bands).
  • Note: I do NOT recommend leaving “space” (untied) treadles between your treadles.  I think it disturbs the rhythm of weaving and the farther from center your treadle is, the more tiring the weaving will be.  SO keep them as close to the center of your body as possible.

A harder example:
 
​Suppose you have a simple point twill treadling.  Normally the tieup would be presented as shown with 4 treadles.  One full repeat consists of the six shots or picks shown above the red line in the draft to the right:
  • Treadle 1 lifts harnesses 1 & 2
  • Treadle 2 lifts harnesses 2 & 3
  • Treadle 3 lifts harnesses 3 & 4
  • Treadle 4 lifts harnesses 1 & 4
  • Treadle 3 lifts harnesses 3 & 4
  • Treadle 2 lifts harnesses 2 & 3
You could set those 4 treadles up in the traditional left to right configuration or walking style.  The problem with this is that anytime you are treadling 2 or 3, you need to remember whether you were going toward treadle 4 or returning from treadle 4.  The possibility of confusion is high.
​

Picture
Everything above the red line is one repeat
6 treadle walking option​:
​

But we can take it one step farther (assuming you have 6 treadles) and assign each of the 6 picks in the repeat their own treadle. Set those 6 treadles up walking style and you will find this treadling pattern easier to weave with no confusion.
  • Treadle 1 lifts harnesses 1 & 2
  • Treadle 2 lifts harnesses 2 & 3
  • Treadle 3 lifts harnesses 3 & 4
  • Treadle 4 lifts harnesses 4 & 1
  • Treadle 5 lifts harnesses 3 & 4
  • Treadle 6 lifts harnesses 2 & 3 
Picture
Everything above the red line is one repeat and weaves the same cloth as the repeat in the draft above.

​​Set the treadles up for walking as follows:
     
    Treadle      5          3        1      Center     2       4        6
    Lifting        34       34      12                23     41     23
    Foot             -----Left-----                         -----Right-----      

Rubber bands on the center treadles help your feet find the center at the end of the sequence. Bands on 5 & 6 also help your feet with the "no peek" treadling.   
 ​
Picture

11 Comments
Gale Roanoake
7/21/2017 03:50:49 am

Thank you so much for this brilliant post! I am new to floor loom weaving and have been puzzling over how to tie up my six treadles for the four shafts I'm starting with. I mean, I've been reading for days and have felt paralyzed to the extent that I haven't even warped my loom yet! Finally, it all makes sense to me, and today I will finally get started on my new loom!

Reply
Pattie
7/24/2017 12:16:19 pm

Hi Gale - I am so glad the post was helpful (and glad to know someone is reading it). I have to admit that walking the treadles and various treadling modifications have changed my weaving and made weaving much more comfortable for me. Check out the latest blog post: Tip of the Month: Braille for the Feet. Thanks - Pattie

Reply
Robyn
6/14/2018 06:10:21 pm

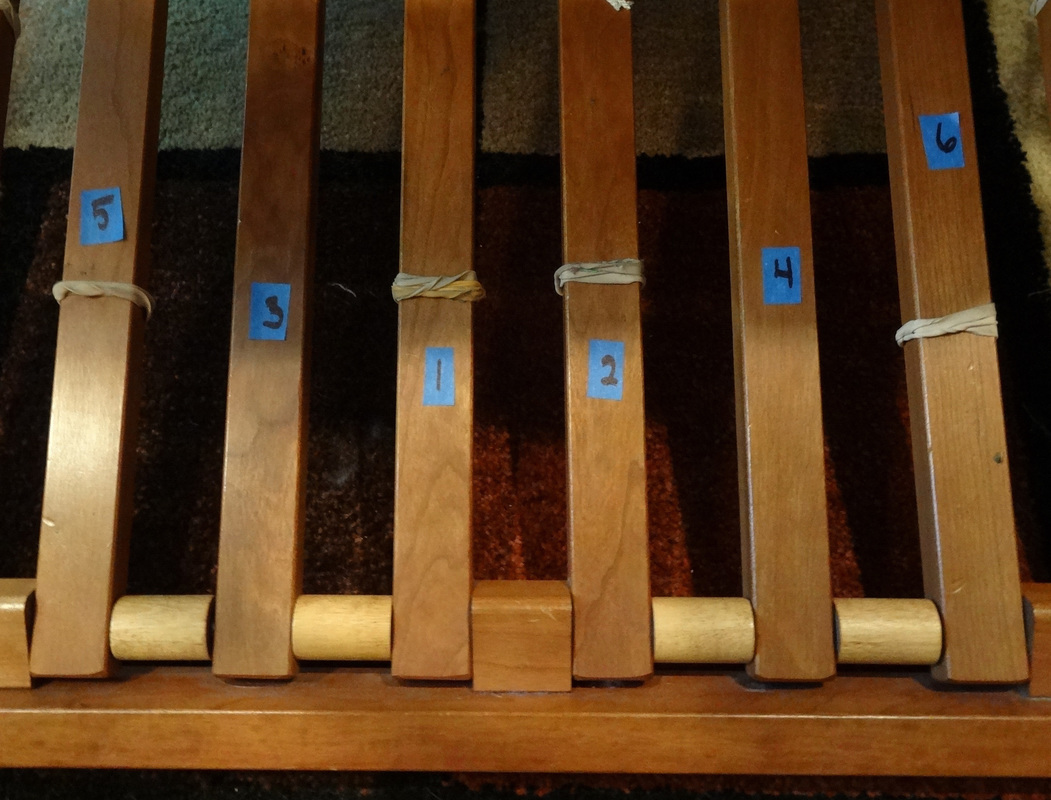
Thank you so very much for this wonderful and CLEAR explanation! I have just bought a floor loom and had just these very points in my mind as queries. I particularly like the hint about using rubber bands.

Reply
Pattie
6/14/2018 06:15:29 pm

I glad this was helpful, Robyn. Have fun with your floor loom. And go buy yourself some ponytail holders! - Pattie

Reply
Tina
11/24/2018 10:51:19 am

Hey Pattie,
Thank you so much for this post! Like many of the other commenters I just got a floor loom and have been puzzled about the best way to tie up my heddles (and why certain ways are better than others.) You explained it very well. Thank you!

Reply
Pattie
11/24/2018 10:22:02 pm

I am happy that this was clear, Tina! Thanks for letting me know. P

Reply
Nancy Mosteller link
3/20/2019 01:46:12 pm

Thank you so much for the wonderful post. My son and I spent most of yesterday trying to make sense of the direction that came with the loom. now i can get down under the loom and get things tied up. Oh joy to be weaving again.

Reply
Pattie Lamb
3/23/2019 08:56:32 am

Hi Nancy,
I am so glad this blog was helpful and that you are weaving again! Have fun!

Reply
Charlene
4/10/2020 02:50:49 pm

In regard to your treadle tie up post, if I may, I'd like to ask how it compares to Peggy Osterkamp's "universal" tie up.

See this LINK: https://i2.wp.com/peggyosterkamp.com/wp-content/uploads/2011/06/tie-up-for-4-shafts.jpg?ssl=1

I'm confused from this sense: Is what you are recommending and what Peggy recommends - two different sugestions? I cannot tie up to "walk the treadles" while at the same time accomodate any weaving pattern with what Peggy suggests.

I am probably stating the obvious, as the treadle #s & the shafts they connect with are different in each case. But I'm not that well versed with experience so was hoping you might point out what I suspect - but am not sure of. Thanks.

Reply
Pattie Lamb
4/10/2020 03:24:19 pm

Hi Charlene,
The picture you sent me the link for describes a direct tie-up system - 1 harness tied to a single treadle. You could weave any pattern with that tie-up - you simply will have to press down one or more treadles to lift the harnesses required by your pattern. In that sense, this is a universal tie-up for 4 harnesses. This would be very difficult to use on an 8 harness pattern.

What I am describing with walking the treadles is very different. It is NOT a universal tie-up. You would tie this up differently for different patterns. Walking the treadles is simply a way of rearranging the tie-up so that can treadle left-right-left right. This is more comfortable than if you tie them up from left to right where you probably would treadle left-left-right-right. Most patterns can comfortably be converted to a walking tie-up.

I hope this helps - Pattie

Reply
Braden Bills link
3/17/2021 11:52:15 am

It's interesting that you can follow guides to help learn how to use a loom. I've been wanting to try that, so maybe I should get a loom of my own! I'll be sure to use the proper methods to ensure that it looks good.

Reply

Your comment will be posted after it is approved.


Leave a Reply.

    Pattie Lamb

    I have been happily weaving since my son was born in 1988.

    All pictures on my blog are "zoomable" - just click on them to enlarge.

    Archives

    March 2023
    June 2022
    November 2020
    October 2020
    February 2020
    October 2019
    June 2019
    May 2019
    June 2018
    July 2017
    June 2017
    May 2017
    April 2017
    February 2017
    January 2017
    August 2016
    July 2016
    May 2016
    February 2016
    February 2015
    January 2015
    October 2014
    September 2014

    Categories

    All
    Artificial Intelligence
    Baby Wraps
    Blankets
    Block Twill
    Block Weave
    Block Weaves
    Cat's PJs
    Challenges
    Charity
    ChatGBT
    Classes
    Commissions
    Deflected Doubleweave
    Design
    Doubleweave
    Dyeing
    Facebook Challenge
    Felting
    Hemstitching
    John C Campbell
    Knitting
    Lace Weaves
    Leftovers
    Life History-Day 1
    Life History-Day 2
    Life History-Day 3
    Life History-Day 4
    Life History-Day 5
    Life History-Day 6
    Life History-Day 7
    Life History-Day 8
    Life History-Day 9
    Life History-Final
    Life History Of A Scarf
    More Than Pink
    Paper Quills
    Plain Weave
    Ply Split
    Process
    Rugs
    Runners
    Scarves
    Selvedges
    Shawls
    Storyboard
    Study Group
    Tencel
    Tie-ups
    Tip Of The Month
    Tips
    Tools
    Towels
    Travel
    Treadling For Dummies
    Turned Twill
    Twill
    Videos
    Walking Pink
    Warping
    Weaving
    Weaving Pink
    Weaving Tips
    Wedding
    Yarn Wraps

    RSS Feed

         HOME        //      SHOP      //       BLOG       //        EVENTS       //       GALLERY     //      ABOUT       //      CONTACT

  • Home
  • SHOP
    • Scarves
    • Shawls & Wraps
    • Throws & Baby Blankets
    • Bags & Purses
    • For the Home
    • Odds & Ends
    • Shop All Handwovens
    • Schacht Equipment
  • Blog
  • Events
  • Gallery
    • Scarves
    • More Scarves
    • Shawls
    • Baby
    • For the Home
    • Just for Fun
    • The Wedding
    • Komen
    • Baby Wraps
  • About
    • Storyboard